Support us .Net Basics C# SQL ASP.NET Aarvi MVC Slides C# Programs Subscribe Download

Angular setvalue and patchvalue methods

Suggested Videos
Part 4 - Angular reactive forms tutorial | Text | Slides
Part 5 - Angular form control and form group | Text | Slides
Part 6 - Angular nested form groups | Text | Slides

In this video, we will discuss how to update HTML elements on a form with new data.


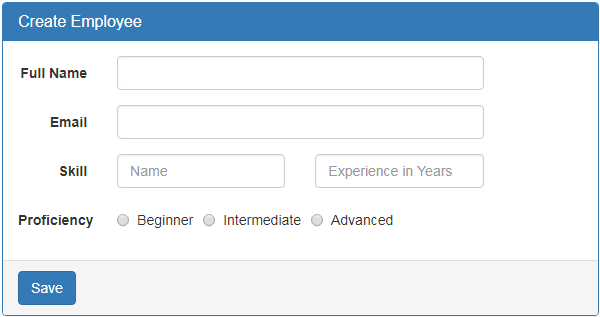
First let's understand why we need to update HTML elements on a form with new data. Let's say, we are using the form below to edit an existing employee. To be able to edit an existing employee details we have to retrieve data from a server and then update the form controls on the form with that retrieved data.

angular setvalue and patchvalue methods


This can be very easily achieved using setValue() method.

Modify the HTML in "create-employee.component.html" file to include "Load Data" button

angular setvalue vs patchvalue

I included "Load Data" button in the bootstrap panel footer. Please note that, I have wrapped both the buttons in a <div> element with "btn-toolbar" class so we get a space between the buttons. Otherwise, they will be joined together.

<div class="panel-footer">
  <div class="btn-toolbar">
  <button class="btn btn-primary" type="submit">Save</button>
  <button class="btn btn-primary" type="button"
          (click)="onLoadDataClick()">Load Data</button>
</div>

In the component class, include onLoadDataClick() method

onLoadDataClick(): void {
  this.employeeForm.setValue({
    fullName: 'Pragim Technologies',
    email: 'pragim@pragimtech.com',
    skills: {
      skillName: 'C#',
      experienceInYears: 5,
      proficiency: 'beginner'
    }
  });
}

At this point, when "Load Data" button is clicked, the form controls are updated with the form model data specified in onLoadDataClick() event handler.

Updating only a sub-set of HTML elements on the form : If I want to update only a sub-set of HTML elements on the form, can I still use setValue() method. The answer is NO. Let's see what happens if I use setValue() method and try to update only fullName and email fields.

Comment the code in onLoadDataClick() event handler as shown below.

onLoadDataClick(): void {
  this.employeeForm.setValue({
    fullName: 'Pragim Technologies',
    email: 'pragim@pragimtech.com',
    // skills: {
    //   skillName: 'C#',
    //   experienceInYears: 5,
    //   proficiency: 'beginner'
    // }
  });
}

At this point, when "Load Data" button is clicked, you will see the following error in the browser developer tools.
Must supply a value for form control with name: 'skills'

If you want to update only a sub-set of form controls, then use patchValue() method instead of setValue().

onLoadDataClick(): void {
  this.employeeForm.patchValue({
    fullName: 'Pragim Technologies',
    email: 'pragim@pragimtech.com',
    // skills: {
    //   skillName: 'C#',
    //   experienceInYears: 5,
    //   proficiency: 'beginner'
    // }
  });
}

At this point, when "Load Data" button is clicked, fullName and email form controls are updated as expected.

Can I use patchValue() to update all the formControls
Yes, you can use patchValue() to either update all the formControls or only a sub-set of form controls. In either cases, patchValue() method succeeds without any error. setValue() on the other hand can only be used to update all the form controls. You cannot use it to update a sub-set of form controls. If you try to, you will get an error. 

So setValue() is very useful when we want to update all the form controls. If we accidentally miss a value for a formcontrol, setValue() fails with an error so we know we are missing something. patchValue() on the other hand silently fails without an error. So, you may not realise you have missed something, especially when you have a very large form group.

So in short, use setValue() to update all form controls and patchValue() to update a sub-set of form controls

angular 6 tutorial for beginners

Angular setvalue and patchvalue methods - Slides


Angular 6 tutorial for beginners

Suggested Video Tutorials
Angular 2 Tutorial
Angular CLI Tutorial
Angular CRUD Tutorial


  1. Creating angular 6 project | Text | Slides
  2. Install Bootstrap for Angular 6 | Text | Slides
  3. Angular 6 routing tutorial | Text | Slides
  4. Angular reactive forms tutorial | Text | Slides
  5. Angular form control and form group | Text | Slides
  6. Angular nested form groups | Text | Slides
  7. Angular setvalue and patchvalue methods | Text | Slides
  8. Angular formbuilder example | Text | Slides
  9. Angular reactive forms validation | Text | Slides
  10. Angular form control valuechanges | Text | Slides
  11. Loop through all form controls in formgroup in reactive form | Text | Slides
  12. Move validation messages to the component class in reactive form | Text | Slides
  13. Move validation logic to the component class in reactive form | Text | Slides
  14. Dynamically adding or removing form control validators in reactive form | Text | Slides
  15. Angular reactive form custom validator | Text | Slides
  16. Angular reactive form custom validator with parameter | Text | Slides
  17. Angular Reusable Custom Validator | Text | Slides
  18. Angular reactive forms cross field validation | Text | Slides
  19. Angular formarray example | Text | Slides
  20. Creating formarray of formgroup objects in Angular | Text | Slides
  21. Angular dynamic forms tutorial | Text | Slides
  22. Generate unique id value for dynamically created form controls in angular | Text | Slides
  23. Angular dynamic forms validation | Text | Slides
  24. Angular formarray validation | Text | Slides
  25. Remove dynamically created form controls in angular | Text | Slides
  26. RxJS operators in angular services | Text | Slides
  27. Angular reactive forms edit example | Text | Slides
  28. Angular populate formarray | Text | Slides
  29. Angular reactive forms put example | Text | Slides
  30. Angular reactive forms post example | Text | Slides
  31. Angular modules explained | Text | Slides
  32. Creating feature module in angular | Text | Slides
  33. Creating feature routing module in angular | Text | Slides
  34. Creating shared module in angular | Text | Slides
  35. Grouping routes and creating component less route in angular | Text | Slides
  36. Lazy loading in angular | Text | Slides
  37. Preloading angular modules | Text | Slides
  38. Angular custom preloading strategy | Text | Slides

Angular nested form groups

Suggested Videos
Part 3 - Angular 6 routing tutorial | Text | Slides
Part 4 - Angular reactive forms tutorial | Text | Slides
Part 5 - Angular form control and form group | Text | Slides

In this video we will discuss nested form groups in a reactive form. Along the way, we will also discuss working with radio buttons in a reactive form.


Let's understand, creating nested form groups with an example

angular nested form groups


In addition to fullName and email, we want to add the following 3 fields to "Create Employee" form.
  • Skill Name
  • Experience in Years
  • Proficiency
What we want to be able to ultimately do is add multiple skills dynamically at run time, by clicking "Add a new skill" button.

angular reactive forms nested form groups

When the button is clicked, we want to dynamically add another set of skill related fields i.e 
  • Skill Name
  • Experience in Years and
  • Proficiency
Also, another additional requirement is to keep "Add a new skill" button disabled, until all the skill related fields are properly filled and valid.

So in short, the requirement is to dynamically create a group of form fields and also validate them as a single group so "Add a new skill" button can be enabled or disabled based on the validation state of the group. This can be very easily achieved using a nested form group. So, first let's create a nested form group for skill related fields in the component class.

Step 1: Creating a nested form group in the component class : Form groups can accept both form control and form group instances as children. This allows us to create a nested form group. Modify the code in ngOnInit() life cycle hook as shown below.

ngOnInit() {
  this.employeeForm = new FormGroup({
    fullName: new FormControl(),
    email: new FormControl(),
    // Create skills form group
    skills: new FormGroup({
      skillName: new FormControl(),
      experienceInYears: new FormControl(),
      proficiency: new FormControl()
    })
  });
}

Notice we have created a nested form group with key - skills. This nested form group contains 3 form controls.
  • skillName,
  • experienceInYears and
  • proficiency
Step 2: Grouping the nested form in the template : To group the form elements in the HTML, encapsulate the form elements in a <div> element and use the formGroupName directive on that container <div> element. Bind the formGroupName directive to the skills FormGroup instance in the component class. Bind each input element in the HTML, to the corresponding FormControl instance using the formControlName directive.

<div formGroupName="skills">

  <div class="form-group">
    <label class="col-sm-2 control-label" for="skillName">
      Skill
    </label>
    <div class="col-sm-4">
      <input type="text" class="form-control" id="skillName"
          placeholder="Name" formControlName="skillName">
    </div>
    <div class="col-sm-4">
      <input type="text" placeholder="Experience in Years"
          class="form-control" formControlName="experienceInYears">
    </div>
  </div>

  <div class="form-group">
    <label class="col-md-2 control-label">Proficiency</label>
    <div class="col-md-8">
      <label class="radio-inline">
        <input id="proficiency" type="radio" value="beginner"
               formControlName="proficiency">Beginner
      </label>
      <label class="radio-inline">
        <input id="proficiency" type="radio" value="intermediate"
               formControlName="proficiency">Intermediate
      </label>
      <label class="radio-inline">
        <input id="proficiency" type="radio" value="advanced"
               formControlName="proficiency">Advanced
      </label>
    </div>
  </div>

</div>

At this point, save all the changes and when you fill out the form.

angular access nested formgroup

skills nested formgroup value is reflected on the page. 

get value from nested formgroup

Please note : If you do not see the nested formgroup value displayed, make sure you have the following in the template after the closing <form> element.
Form Values : {{employeeForm.value}}

In our upcoming sessions we will discuss, form validation and dynamically adding form controls.

angular 6 tutorial for beginners

Angular nested form groups - Slides


Angular form control and form group

Suggested Videos
Part 2 - Install Bootstrap for Angular 6 | Text | Slides
Part 3 - Angular 6 routing tutorial | Text | Slides
Part 4 - Angular reactive forms tutorial | Text | Slides

In this video we will discuss FormControl and FormGroup classes

  • When working with reactive forms we create instances of FormControl and FormGroup classes to create a form model.
  • To bind an HTML <form> tag in the template to the FromGroup instance in the component class, we use formGroup directive
  • To bind an  HTML <input> element in the template to the FormControl instance in the component class, we use formControlName directive
  • formGroup and formControlName directives are provided by the ReactiveFormsModule
  • Both FormControl and FormGroup classes inherit from AbstractControl base class
  • The AbstractControl class has properties that help us track both FormControl and FormGroup value and state

The following are some of the useful properties provided by the AbstractControl class
  • value
  • errors
  • valid
  • invalid
  • dirty
  • pristine
  • touched
  • untouched
FormControl instance tracks the value and state of the individual html element it is associated with
FormGroup instance tracks the value and state of all the form controls in it's group

To see the form model we created using FormGroup and FormControl classes, log the employeeForm to the console.

onSubmit(): void {
  console.log(this.employeeForm);
}

On Save button click, you should see the following form model in the browser console.

angular form control and form group

To access the FormGroup properties use, employeeForm property in the component class. When you press DOT on the employeeForm property you can see all the available properties and methods.

angular formgroup example

To access a FormControl in a FormGroup, we can use one of the following 2 ways.

employeeForm.controls.fullName.value
employeeForm.get('fullName').value

Note: This same code works, both in the template and component class.

Please include the following HTML, just after the <form> tag, in the template, and you can see the property values change as you interact with the form controls on the form.

<table border="1">
  <tr>
    <th style="padding: 10px">FormGroup</th>
    <th style="padding: 10px">FormControl (fullName)</th>
  </tr>
  <tr>
    <td style="padding: 10px">
      touched : {{ employeeForm.touched }}
      <br/> dirty : {{ employeeForm.dirty }}
      <br/> valid : {{ employeeForm.valid }}
      <br/> Form Values : {{employeeForm.value | json}}
    </td>
    <td style="padding: 10px">
      touched : {{ employeeForm.get('fullName').touched }}
      <br/> dirty : {{ employeeForm.get('fullName').dirty }}
      <br/> valid : {{ employeeForm.get('fullName').valid }}
      <br/> FullName Value : {{employeeForm.get('fullName').value}}
    </td>
  </tr>
</table>

In addition to these properties, AbstractControl also provides the following methods. In our upcoming videos we will use these properties and methods for form validation and working with data.
  • setValidators()
  • clearValidators()
  • updateValueAndValidity()
  • setValue()
  • patchValue()
  • Reset()
angular 6 tutorial for beginners