Suggested Videos
Part 4 - Controllers in an mvc application
Part 5 - Views in an mvc application
Part 6 - ViewData and ViewBag in mvc
In this video we will discuss models in an mvc application.
Let's understand models with an example. We want to retrieve an employee information from tblEmployee table and display it as shown below.
 To encapsulate Employee information, add Employee model class to the Models folder. To do this
1. Right click on "Models" folder > Add > Class
2. Name the class as Employee.cs
3. Click "Add"
Copy and paste the following code in Employee.cs class file.
public class Employee
{
public int EmployeeId { get; set; }
public string Name { get; set; }
public string Gender { get; set; }
public string City { get; set; }
}
Now let's Add EmployeeController class to "Controllers" folder. To do this
1. Right click on "Controllers" folder > Add > Controller
2. Use EmployeeController as the name
3. Click "Add"
We want to use "Employee" model class in EmployeeController. So copy and paste the following "using" statement in "EmployeeController.cs"
using MVCDemo.Models;
By default an Index() Action method is created in EmployeeController. Change the name of the function to Details(). Create an instance of Employee class. For now we will hard code Employee data in this class. In a later video session, we will discuss about retrieving employee information from the database table tblEmployee. At this point EmployeeController should look as shown below.
public ActionResult Details()
{
Employee employee = new Employee()
{
EmployeeId = 101,
Name = "John",
Gender = "Male",
City = "London"
};
return View();
}
Now, we need to pass the employee model object that we constructed in EmployeeController to a view, so the view can generate the HTML and send it to the requested client. To do this we first need to add a view. To add a view
1. Right click on Details() action method and select "Add View" from the context menu
2. Set
a)View Name = Details
b)View Engine = Razor
c)Select "Create strongly typed view" check box
d)From the "Model class" dropdownlist, select "Employee (MVCDemo.Models)"
Note: If Employee class is not visible in the dropdownlist, please build your project and then try adding the view again.
3. Finally click "Add"
At this point, Details.cshtml should be added to "Employee" folder. Please note that "Employee" folder is automatically created and added to "Views" folder.
Copy and paste the following code in Details.cshtml file.
@model MVCDemo.Models.Employee
@{
ViewBag.Title = "Employee Details";
}
<h2>Employee Details</h2>
<table style="font-family:Arial">
<tr>
<td>
Employee ID:
</td>
<td>
@Model.EmployeeId
</td>
</tr>
<tr>
<td>
Name:
</td>
<td>
@Model.Name
</td>
</tr>
<tr>
<td>
Gender:
</td>
<td>
@Model.Gender
</td>
</tr>
<tr>
<td>
City:
</td>
<td>
@Model.City
</td>
</tr>
</table>
At this point if you run the project, and if you navigate to the following URL, you get a runtime error stating - Object reference not set to an instance of an object.
http://localhost/MVCDemo/Employee/Details
To fix this error, pass "Employee" object to the view. The "return" statement in Details() action method need to be modified as shown below.
return View(employee);
That's it. Run the application and navigate to http://localhost/MVCDemo/Employee/Details. We should get the output as expected.
To encapsulate Employee information, add Employee model class to the Models folder. To do this
1. Right click on "Models" folder > Add > Class
2. Name the class as Employee.cs
3. Click "Add"
Copy and paste the following code in Employee.cs class file.
public class Employee
{
public int EmployeeId { get; set; }
public string Name { get; set; }
public string Gender { get; set; }
public string City { get; set; }
}
Now let's Add EmployeeController class to "Controllers" folder. To do this
1. Right click on "Controllers" folder > Add > Controller
2. Use EmployeeController as the name
3. Click "Add"
We want to use "Employee" model class in EmployeeController. So copy and paste the following "using" statement in "EmployeeController.cs"
using MVCDemo.Models;
By default an Index() Action method is created in EmployeeController. Change the name of the function to Details(). Create an instance of Employee class. For now we will hard code Employee data in this class. In a later video session, we will discuss about retrieving employee information from the database table tblEmployee. At this point EmployeeController should look as shown below.
public ActionResult Details()
{
Employee employee = new Employee()
{
EmployeeId = 101,
Name = "John",
Gender = "Male",
City = "London"
};
return View();
}
Now, we need to pass the employee model object that we constructed in EmployeeController to a view, so the view can generate the HTML and send it to the requested client. To do this we first need to add a view. To add a view
1. Right click on Details() action method and select "Add View" from the context menu
2. Set
a)View Name = Details
b)View Engine = Razor
c)Select "Create strongly typed view" check box
d)From the "Model class" dropdownlist, select "Employee (MVCDemo.Models)"
Note: If Employee class is not visible in the dropdownlist, please build your project and then try adding the view again.
3. Finally click "Add"
At this point, Details.cshtml should be added to "Employee" folder. Please note that "Employee" folder is automatically created and added to "Views" folder.
Copy and paste the following code in Details.cshtml file.
@model MVCDemo.Models.Employee
@{
ViewBag.Title = "Employee Details";
}
<h2>Employee Details</h2>
<table style="font-family:Arial">
<tr>
<td>
Employee ID:
</td>
<td>
@Model.EmployeeId
</td>
</tr>
<tr>
<td>
Name:
</td>
<td>
@Model.Name
</td>
</tr>
<tr>
<td>
Gender:
</td>
<td>
@Model.Gender
</td>
</tr>
<tr>
<td>
City:
</td>
<td>
@Model.City
</td>
</tr>
</table>
At this point if you run the project, and if you navigate to the following URL, you get a runtime error stating - Object reference not set to an instance of an object.
http://localhost/MVCDemo/Employee/Details
To fix this error, pass "Employee" object to the view. The "return" statement in Details() action method need to be modified as shown below.
return View(employee);
That's it. Run the application and navigate to http://localhost/MVCDemo/Employee/Details. We should get the output as expected.

Suggested Videos
Part 3 - Creating your first asp.net mvc application
Part 4 - Controllers in an mvc application
Part 5 - Views in an mvc application
In this video we will discuss
1. What is ViewData
2. What is ViewBag
3. Difference between ViewData and ViewBag
Both ViewData and ViewBag are used to pass data from a controller to a view. ViewData is a dictionary of objects that are stored and retrieved using strings as keys. The syntax of ViewData is very similar to that of ViewState, SessionState and ApplicationState.
// Storing data in ViewData
ViewData["YourData"] = "SomeData";
// Retrieving data from ViewData
string strData = ViewData["YourData"].ToString();
ViewData does not provide compile time error checking. For example, if you mis-spell the key names you wouldn't get any compile time error. You get to know about the error only at runtime.
ViewBag uses the dynamic feature that was introduced in to C# 4.0. It allows an object to have properties dynamically added to it. Using ViewBag the above code can be rewritten as below.
// Storing data in ViewBag
ViewBag.YourData = "SomeData";
// Retrieving data from ViewBag
string strData = ViewBag.YourData;
Just like ViewData, ViewBag does not provide compile time error checking. For example, if you mis-spell the property name, you wouldn't get any compile time error. You get to know about the error only at runtime.
Internally ViewBag properties are stored as name/value pairs in the ViewData dictionary.
Please Note: To pass data from controller to a view, It's always a good practice to use strongly typed view models instead of using ViewBag & ViewData. Strongly typed view models provide compile time error checking. We will discuss view models in a later video session.
Suggested Videos
Part 2 - Which asp.net mvc version is my mvc application using
Part 3 - Creating your first asp.net mvc application
Part 4 - Controllers in an mvc application
In this video we will discuss views. Please watch Part 4 of MVC tutorial before proceeding. Let's change the Index() method in HomeController to return a list of country names. Since country names are strings, return List<string>. Get rid of id and name parameters.
public List<string> Index()
{
return new List<string>()
{
"India",
"US",
"UK",
"Canada"
};
}
Run the application and notice that the output is not as expected.
System.Collections.Generic.List`1[System.String]
To correct this problem, let's add a view to our project.
1. Right click on the Index() function
2. Click on "Add View"
3. Notice that, the view name in "Add View" dialog box matches the name of the controller action method
4. Select "Razor" as the view engine
5. Leave the rest of the defaults as is, and click "Add" button
Make the following modifications to the Index() function of the HomeController class, so that, the HomeController returns a view instead of List<string>.
// Change the return type from List<string> to ActionResult
public ActionResult Index()
{
// Store the list of Countries in ViewBag.
ViewBag.Countries = new List<string>()
{
"India",
"US",
"UK",
"Canada"
};
// Finally return a view
return View();
}
We will discuss ViewBag & ViewData, and the differences between them in our next video session. For now, understand that, ViewBag & ViewData is a mechanism to pass data from the controller to the view.
Please Note: To pass data from controller to a view, It's always a good practice to use strongly typed view models instead of using ViewBag & ViewData. We will discuss view models in a later video session.
Now, copy and paste the following code in "Index.cshtml" view
@{
ViewBag.Title = "Countries List";
}
<h2>Countries List</h2>
<ul>
@foreach (string strCountry in ViewBag.Countries)
{
<li>@strCountry</li>
}
</ul>
Please Note: We use "@" symbol to switch between html and c# code. We will discuss razor views and their syntax in a later video session.
Suggested Videos
Part 1 - Installing asp.net mvc
Part 2 - Which asp.net mvc version is my mvc application using
Part 3 - Creating your first asp.net mvc application
In this video we will discuss about controllers. Please watch Part 3 of MVC tutorial before proceeding. In Part 3, we discussed that, the URL - http://localhost/MVCDemo/Home/Index will invoke Index() function of HomeController class. So, the question is, where is this mapping defined. The mapping is defined in Global.asax. Notice that in Global.asax we have RegisterRoutes() method.
RouteConfig.RegisterRoutes(RouteTable.Routes);
Right click on this method, and select "Go to Definition". Notice the implementation of RegisterRoutes() method in RouteConfig class. This method has got a default route.
public static void RegisterRoutes(RouteCollection routes)
{
routes.IgnoreRoute("{resource}.axd/{*pathInfo}");
routes.MapRoute(
name: "Default",
url: "{controller}/{action}/{id}",
defaults: new { controller = "Home", action = "Index", id = UrlParameter.Optional }
);
}
The following URL does not have id. This is not a problem because id is optional in the default route.
http://localhost/MVCDemo/Home/Index
Now pass id in the URL as shown below and press enter. Nothing happens.
http://localhost/MVCDemo/Home/Index/10
Change the Index() function in HomeController as shown below.
public string Index(string id)
{
return "The value of Id = " + id;
}
Enter the following URL and press enter. We get the output as expected.
http://localhost/MVCDemo/Home/Index/10
In the following URL, 10 is the value for id parameter and we also have a query string "name".
http://localhost/MVCDemo/home/index/10?name=Pragim
Change the Index() function in HomeController as shown below, to read both the parameter values.
public string Index(string id, string name)
{
return "The value of Id = " + id + " and Name = " + name;
}
Just like web forms, you can also use "Request.QueryString"
public string Index(string id)
{
return "The value of Id = " + id + " and Name = " + Request.QueryString["name"];
}
Suggested Videos
Part 1 - Installing asp.net mvc
Part 2 - Which asp.net mvc version is my mvc application using
In this video we will discuss about
1. Creating an asp.net mvc application
2. Understand how mvc request is processed as apposed to webform request
Creating an mvc application:
1. Open visual studio
2. Click File > New Project
3. Select "Web" from "Installed Templates" section
4. Select ASP.NET MVC 4 Web Application
5. Set Name="MVCDemo"
6. Click OK
7. Select "Empty" template. Select "Razor" as the ViewEngine. There are 2 built in view engines - Razor and ASPX. Razor is preferred by most mvc developers. We will discuss about Razor view engine in detail in a later video session.
8. At this point you should have an mvc application created.
Notice that in the solution explorer, you have several folders - Models, Views, Controllers etc. As the names suggest these folders are going to contain Models, Views, and Controllers. We will discuss about Models, Views, and Controllers in a later video session.
Now let's add a controller to our project
1. Right Click on "Controllers" folder
2. Select Add > Controller
3. Set Controller Name = HomeController
4. Leave rest of the defaults and click "Add"
We should have HomeController.cs added to "Controllers" folder.
At this point run the application by pressing CTRL+F5. Notice that you get an error as shown below.
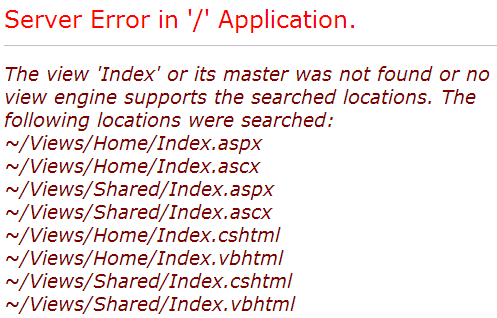 To fix this error, we need to add a view with name, "Index". We will discuss about views in detail in a later video session. Let's fix it another way. The following is the function that is automatically added to HomeController class
public ActionResult Index()
{
return View();
}
Change the return type of Index() function from "ActionResult" to "string", and return string "Hello from MVC Application" instead of View().
public string Index()
{
return "Hello from MVC Application";
}
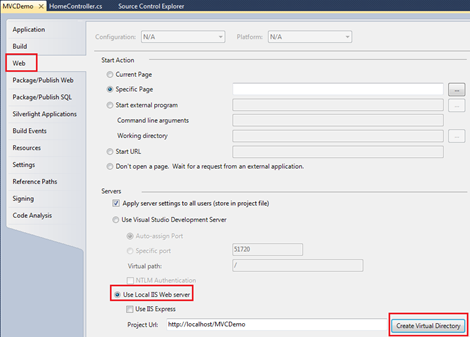
Run the application and notice that, the string is rendered on the screen. When you run the application, by default it is using built-in asp.net development server. Let's use IIS, to run the application instead of the built-in asp.net development server.
1. In the solution explorer, right click on the project and select "Properties"
2. Click on "Web" tab
3. Select "Use Local IIS Web Server" radio button
4. Notice that the Project Url is set to http://localhost/MVCDemo by default
5. Finally click on "Create Virtual Directory" button
To fix this error, we need to add a view with name, "Index". We will discuss about views in detail in a later video session. Let's fix it another way. The following is the function that is automatically added to HomeController class
public ActionResult Index()
{
return View();
}
Change the return type of Index() function from "ActionResult" to "string", and return string "Hello from MVC Application" instead of View().
public string Index()
{
return "Hello from MVC Application";
}
Run the application and notice that, the string is rendered on the screen. When you run the application, by default it is using built-in asp.net development server. Let's use IIS, to run the application instead of the built-in asp.net development server.
1. In the solution explorer, right click on the project and select "Properties"
2. Click on "Web" tab
3. Select "Use Local IIS Web Server" radio button
4. Notice that the Project Url is set to http://localhost/MVCDemo by default
5. Finally click on "Create Virtual Directory" button
 Run the application, and notice that the URL is "http://localhost/MVCDemo/"
Now change the URL to "http://localhost/MVCDemo/Home/index"
In the URL "Home" is the name of the controller and "Index" is the method within HomeController class.
So the improtant point to understand is that the URL is mapped to a controller action method. Where as in web forms application, the URL is mapped to a physical file. For example, in a web application, if we have to display the same message.
1. We add a webform and in the Page_load() event include Response.Write("Hello from ASP.NET Web Forms Application");
2. We then access WebForm1.aspx as shown below
http://localhost/WebFormsApplication/WebForm1.aspx
3. The Page load event gets executed and the message string is displayed.
Run the application, and notice that the URL is "http://localhost/MVCDemo/"
Now change the URL to "http://localhost/MVCDemo/Home/index"
In the URL "Home" is the name of the controller and "Index" is the method within HomeController class.
So the improtant point to understand is that the URL is mapped to a controller action method. Where as in web forms application, the URL is mapped to a physical file. For example, in a web application, if we have to display the same message.
1. We add a webform and in the Page_load() event include Response.Write("Hello from ASP.NET Web Forms Application");
2. We then access WebForm1.aspx as shown below
http://localhost/WebFormsApplication/WebForm1.aspx
3. The Page load event gets executed and the message string is displayed.
Suggested Video
Part 1 - Installing MVC
In this video we will discuss about
How to determine what version of asp.net mvc is being used by an existing mvc application
There are 2 ways to do this
1. At design time - In the solution explorer, expand "References" folder. Right click on System.Web.Mvc assembly and select "Properties" and you can find the version that's used as shown below.
 2. At runtime using code - typeof(Controller).Assembly.GetName().Version.ToString()
Suggested Videos
Part 57 - Export gridview to excel
Part 58 - Export gridview to pdf
Part 59 - Generate pdf document from gridview data and store on web server
In this video we will discuss about
1. The similarities and differences between gridview and repeater controls
2. When to use gridview control over repeater and viceversa
Similarities:
1. Just like gridview, a repeater is also a data-bound control.
2. To bind data, you use DataSource property and invoke DataBind() method.
3. The following 3 events are supported by both the controls
a) ItemCommand
b) ItemCreated
c) ItemDataBound
Differences:
1. By default, a repeater control will not render anything if templates are not specified, but where as with GridView control, the data from the underlying data source will be rendered in a tabular format.
2. GridView is more suitable and designed for displaying data in a tabular format, where as Repeater is used when you want to have complete control over how you want the data to be rendered. For example, if I want the data from tblEmployee table to be rendered as shown below, then repeater is a better control. But please remember, it is also possible to do the same thing with GridView using Template fields.
 3. By default, the repeater control does not offer editing, paging and sorting capabilities, but where as a gridview control does. However, with a bit of effort and code it is possible to implement these features using a repeater control.
When do you use gridview control over repeater and vice versa?
A repeater is a very light weight control, and if you want to have the complete control over how the data is rendered, and if you don't want editing, paging or sorting capabilities, then repeater should be your choice. On the other hand if you want the data to be displayed in a tabular format and you also need editing, paging and sorting capabilities, then gridview should be your choice.
For sql script to create and populate tblEmployee table, please refer to Part 30 by clicking here.
Webform1.aspx HTML used in the demo
<table>
<tr>
<td>
<asp:GridView ID="GridView1" ShowHeader="false"
GridLines="None" AutoGenerateColumns="false"
runat="server">
<Columns>
<asp:TemplateField>
<ItemTemplate>
<table style="border: 1px solid #A55129;
background-color: #FFF7E7">
<tr>
<td style="width: 200px">
<asp:Image ID="imgEmployee"
ImageUrl='<%# Eval("PhotoPath")%>'
runat="server" />
</td>
<td style="width: 200px">
<table>
<tr>
<td>
<b>Id:</b>
</td>
<td>
<asp:Label ID="lblId"
runat="server"
Text='<%#Eval("EmployeeId") %>'>
</asp:Label>
</td>
</tr>
<tr>
<td>
<b>Name:</b>
</td>
<td>
<asp:Label ID="lblName"
runat="server"
Text='<%#Eval("Name") %>'>
</asp:Label>
</td>
</tr>
<tr>
<td>
<b>Gender:</b>
</td>
<td>
<asp:Label ID="lblGender"
runat="server"
Text='<%#Eval("Gender") %>'>
</asp:Label>
</td>
</tr>
<tr>
<td>
<b>City:</b>
</td>
<td>
<asp:Label ID="lblCity"
runat="server"
Text='<%#Eval("City") %>'>
</asp:Label>
</td>
</tr>
</table>
</td>
</tr>
</table>
</ItemTemplate>
</asp:TemplateField>
</Columns>
</asp:GridView>
</td>
<td>
<asp:Repeater ID="Repeater1" runat="server">
<ItemTemplate>
<table style="border: 1px solid #A55129;
background-color: #FFF7E7">
<tr>
<td style="width: 200px">
<asp:Image ID="imgEmployee"
ImageUrl='<%# Eval("PhotoPath")%>'
runat="server" />
</td>
<td style="width: 200px">
<table>
<tr>
<td>
<b>Id:</b>
</td>
<td>
<asp:Label ID="lblId"
runat="server"
Text='<%#Eval("EmployeeId") %>'>
</asp:Label>
</td>
</tr>
<tr>
<td>
<b>Name:</b>
</td>
<td>
<asp:Label ID="lblName"
runat="server"
Text='<%#Eval("Name") %>'>
</asp:Label>
</td>
</tr>
<tr>
<td>
<b>Gender:</b>
</td>
<td>
<asp:Label ID="lblGender"
runat="server"
Text='<%#Eval("Gender") %>'>
</asp:Label>
</td>
</tr>
<tr>
<td>
<b>City:</b>
</td>
<td>
<asp:Label ID="lblCity"
runat="server"
Text='<%#Eval("City") %>'>
</asp:Label>
</td>
</tr>
</table>
</td>
</tr>
</table>
</ItemTemplate>
<SeparatorTemplate>
<asp:Image ID="Image1"
ImageUrl="~/Images/1x1PixelImage.png"
runat="server" />
</SeparatorTemplate>
</asp:Repeater>
</td>
</tr>
</table>
WebForm1.aspx.cs code:
protected void Page_Load(object sender, EventArgs e)
{
DataSet ds = GetData();
GridView1.DataSource = ds;
GridView1.DataBind();
Repeater1.DataSource = ds;
Repeater1.DataBind();
}
private DataSet GetData()
{
string CS = ConfigurationManager.ConnectionStrings["DBCS"].ConnectionString;
using (SqlConnection con = new SqlConnection(CS))
{
SqlDataAdapter da = new SqlDataAdapter("Select * from tblEmployee", con);
DataSet ds = new DataSet();
da.Fill(ds);
return ds;
}
}
3. By default, the repeater control does not offer editing, paging and sorting capabilities, but where as a gridview control does. However, with a bit of effort and code it is possible to implement these features using a repeater control.
When do you use gridview control over repeater and vice versa?
A repeater is a very light weight control, and if you want to have the complete control over how the data is rendered, and if you don't want editing, paging or sorting capabilities, then repeater should be your choice. On the other hand if you want the data to be displayed in a tabular format and you also need editing, paging and sorting capabilities, then gridview should be your choice.
For sql script to create and populate tblEmployee table, please refer to Part 30 by clicking here.
Webform1.aspx HTML used in the demo
<table>
<tr>
<td>
<asp:GridView ID="GridView1" ShowHeader="false"
GridLines="None" AutoGenerateColumns="false"
runat="server">
<Columns>
<asp:TemplateField>
<ItemTemplate>
<table style="border: 1px solid #A55129;
background-color: #FFF7E7">
<tr>
<td style="width: 200px">
<asp:Image ID="imgEmployee"
ImageUrl='<%# Eval("PhotoPath")%>'
runat="server" />
</td>
<td style="width: 200px">
<table>
<tr>
<td>
<b>Id:</b>
</td>
<td>
<asp:Label ID="lblId"
runat="server"
Text='<%#Eval("EmployeeId") %>'>
</asp:Label>
</td>
</tr>
<tr>
<td>
<b>Name:</b>
</td>
<td>
<asp:Label ID="lblName"
runat="server"
Text='<%#Eval("Name") %>'>
</asp:Label>
</td>
</tr>
<tr>
<td>
<b>Gender:</b>
</td>
<td>
<asp:Label ID="lblGender"
runat="server"
Text='<%#Eval("Gender") %>'>
</asp:Label>
</td>
</tr>
<tr>
<td>
<b>City:</b>
</td>
<td>
<asp:Label ID="lblCity"
runat="server"
Text='<%#Eval("City") %>'>
</asp:Label>
</td>
</tr>
</table>
</td>
</tr>
</table>
</ItemTemplate>
</asp:TemplateField>
</Columns>
</asp:GridView>
</td>
<td>
<asp:Repeater ID="Repeater1" runat="server">
<ItemTemplate>
<table style="border: 1px solid #A55129;
background-color: #FFF7E7">
<tr>
<td style="width: 200px">
<asp:Image ID="imgEmployee"
ImageUrl='<%# Eval("PhotoPath")%>'
runat="server" />
</td>
<td style="width: 200px">
<table>
<tr>
<td>
<b>Id:</b>
</td>
<td>
<asp:Label ID="lblId"
runat="server"
Text='<%#Eval("EmployeeId") %>'>
</asp:Label>
</td>
</tr>
<tr>
<td>
<b>Name:</b>
</td>
<td>
<asp:Label ID="lblName"
runat="server"
Text='<%#Eval("Name") %>'>
</asp:Label>
</td>
</tr>
<tr>
<td>
<b>Gender:</b>
</td>
<td>
<asp:Label ID="lblGender"
runat="server"
Text='<%#Eval("Gender") %>'>
</asp:Label>
</td>
</tr>
<tr>
<td>
<b>City:</b>
</td>
<td>
<asp:Label ID="lblCity"
runat="server"
Text='<%#Eval("City") %>'>
</asp:Label>
</td>
</tr>
</table>
</td>
</tr>
</table>
</ItemTemplate>
<SeparatorTemplate>
<asp:Image ID="Image1"
ImageUrl="~/Images/1x1PixelImage.png"
runat="server" />
</SeparatorTemplate>
</asp:Repeater>
</td>
</tr>
</table>
WebForm1.aspx.cs code:
protected void Page_Load(object sender, EventArgs e)
{
DataSet ds = GetData();
GridView1.DataSource = ds;
GridView1.DataBind();
Repeater1.DataSource = ds;
Repeater1.DataBind();
}
private DataSet GetData()
{
string CS = ConfigurationManager.ConnectionStrings["DBCS"].ConnectionString;
using (SqlConnection con = new SqlConnection(CS))
{
SqlDataAdapter da = new SqlDataAdapter("Select * from tblEmployee", con);
DataSet ds = new DataSet();
da.Fill(ds);
return ds;
}
}

Suggested Videos
Part 56 - Gridview paging using a dropdownlist
Part 57 - Export gridview to excel
Part 58 - Export gridview to pdf
In this video, we will discuss about generating a PDF document from gridview data and storing it in a folder on the web server. We will be using tblEmployee table for this demo. Please refer to Part 13 by clicking here, if you need the sql script to create and populate these tables.
Please watch Part 58, before proceeding with this video.
Step 1: Create an asp.net web application project. Add a folder with name "PDFDocuments" to the project. We will be using this folder to store the dynamically generated pdf document.
Step 2: Drag and drop a gridview control and a button control on webform1.aspx. Autoformat the gridview control to use "BrownSugar" scheme. Double click on the button control, to generate click event handler method.
At this point the HTML on webform1.aspx should be as shown below.
<asp:GridView ID="GridView1" runat="server" BackColor="#DEBA84"
BorderColor="#DEBA84" BorderStyle="None" BorderWidth="1px"
CellPadding="3" CellSpacing="2">
<FooterStyle BackColor="#F7DFB5" ForeColor="#8C4510" />
<HeaderStyle BackColor="#A55129" Font-Bold="True"
ForeColor="White" />
<PagerStyle ForeColor="#8C4510" HorizontalAlign="Center" />
<RowStyle BackColor="#FFF7E7" ForeColor="#8C4510" />
<SelectedRowStyle BackColor="#738A9C" Font-Bold="True"
ForeColor="White" />
<SortedAscendingCellStyle BackColor="#FFF1D4" />
<SortedAscendingHeaderStyle BackColor="#B95C30" />
<SortedDescendingCellStyle BackColor="#F1E5CE" />
<SortedDescendingHeaderStyle BackColor="#93451F" />
</asp:GridView>
<asp:Button ID="Button1" runat="server" Text="Button"
onclick="Button1_Click" />
Step 3: To generate PDF documents we will be using open source assembly - iTextSharp.dll. This assembly can be downloaded from http://sourceforge.net/projects/itextsharp/. After you download the assembly, add a reference to it, from your web application.
a) In Solution Explorer, right click on the "References" folder and select "Add Reference"
b) Browse to the folder where you have downloaded the assembly and Click OK.
Step 4: Add the following "USING" statements, in your code-behind file.
using System;
using System.Collections.Generic;
using System.Linq;
using System.Web;
using System.Web.UI;
using System.Web.UI.WebControls;
using System.Data.SqlClient;
using System.Data;
using System.Configuration;
using System.IO;
using iTextSharp.text;
using iTextSharp.text.html.simpleparser;
using iTextSharp.text.pdf;
Step 5: Copy and paste the following code. The code is well commented and is self-explanatory.
protected void Page_Load(object sender, EventArgs e)
{
if (!IsPostBack)
{
BindGridViewData();
}
}
private void BindGridViewData()
{
string CS = ConfigurationManager.ConnectionStrings["DBCS"].ConnectionString;
using (SqlConnection con = new SqlConnection(CS))
{
SqlDataAdapter da = new SqlDataAdapter("Select * from tblEmployee", con);
DataSet ds = new DataSet();
da.Fill(ds);
GridView1.DataSource = ds;
GridView1.DataBind();
}
}
protected void Button1_Click(object sender, EventArgs e)
{
PdfPTable pdfTable = new PdfPTable(GridView1.HeaderRow.Cells.Count);
foreach (TableCell gridViewHeaderCell in GridView1.HeaderRow.Cells)
{
Font font = new Font();
font.Color = new BaseColor(GridView1.HeaderStyle.ForeColor);
PdfPCell pdfCell = new PdfPCell(new Phrase(gridViewHeaderCell.Text, font));
pdfCell.BackgroundColor = new BaseColor(GridView1.HeaderStyle.BackColor);
pdfTable.AddCell(pdfCell);
}
foreach (GridViewRow gridViewRow in GridView1.Rows)
{
foreach (TableCell gridViewCell in gridViewRow.Cells)
{
Font font = new Font();
font.Color = new BaseColor(GridView1.RowStyle.ForeColor);
PdfPCell pdfCell = new PdfPCell(new Phrase(gridViewCell.Text, font));
pdfCell.BackgroundColor = new BaseColor(GridView1.RowStyle.BackColor);
pdfTable.AddCell(pdfCell);
}
}
Document pdfDocument = new Document(PageSize.A4, 10f, 10f, 10f, 10f);
// Roate page using Rotate() function, if you want in Landscape
// pdfDocument.SetPageSize(PageSize.A4.Rotate());
// Using PageSize.A4_LANDSCAPE may not work as expected
// Document pdfDocument = new Document(PageSize.A4_LANDSCAPE, 10f, 10f, 10f, 10f);
PdfWriter.GetInstance(pdfDocument, new FileStream(Server.MapPath("~/PDFDocuments/Employees.pdf"), FileMode.Create));
pdfDocument.Open();
pdfDocument.Add(pdfTable);
pdfDocument.Close();
}
At this point, run the application and click on the button. The data gets exported to Employees.PDF document as expected and is stored in the folder "PDFDocuments". Notice that the PDF document, is generated using "Portrait" orientation.
To generate the PDF document in "Landscape" orientation, uncomment the following line
// pdfDocument.SetPageSize(PageSize.A4.Rotate());
To test, add a few other columns to tblEmployee table. You can use the script below.
Alter table tblEmployee
add Department nvarchar(50),
DateOfBirth Date,
DateOfJoining Date,
UserName nvarchar(50)
Update tblEmployee set Department = 'IT', DateOfBirth='03/03/1975',
DateOfJoining='03/08/2000', UserName='Mark' where EmployeeId=1
Update tblEmployee set Department = 'HR', DateOfBirth='08/03/1973',
DateOfJoining='07/09/2001', UserName='John' where EmployeeId=2
Update tblEmployee set Department = 'Payroll', DateOfBirth='02/01/1970',
DateOfJoining='08/02/2006', UserName='Mary' where EmployeeId=3
Update tblEmployee set Department = 'Payroll', DateOfBirth='01/04/1978',
DateOfJoining='01/05/2004', UserName='Mike' where EmployeeId=4
Update tblEmployee set Department = 'IT', DateOfBirth='03/01/1970',
DateOfJoining='02/02/2003', UserName='Pam' where EmployeeId=5
Update tblEmployee set Department = 'IT', DateOfBirth='09/02/1971',
DateOfJoining='06/09/2002', UserName='David' where EmployeeId=6
Update tblEmployee set Department = 'HR', DateOfBirth='10/06/1973',
DateOfJoining='05/01/2001', UserName='Rob' where EmployeeId=7
Update tblEmployee set Department = 'IT', DateOfBirth='11/04/1972',
DateOfJoining='01/02/1999', UserName='Jaimie' where EmployeeId=8
Now, run the application and click on the button. The PDF document should be generated in landscape orientation.

