Support us .Net Basics C# SQL ASP.NET Aarvi MVC Slides C# Programs Subscribe Download

ASP.NET Core view component tag helper

Suggested Videos
Part 23 - Partial views in asp.net core | Text | Slides
Part 24 - ASP.NET Core view components | Text | Slides
Part 25 - Pass parameters to view component in asp.net core | Text | Slides

In this video we will discuss, how to invoke a view component using View Component as tag helper.

Component.InvokeAsync


One way to invoke a view component is by using Component.InvokeAsync. We use an anonymous type to pass parameters to the view component. The property names in the anonymous type must match the parameter names on the view component invoke method. We discussed this technique of invoking a view component in our previous video.


@await Component.InvokeAsync("View Component Name", {Anonymous Type Containing Parameters})

View component tag helper

To be able to use a view component as a Tag Helper, we have to first register the assembly that contains the view component. We do this in the _ViewImports.cshtml file. 

We discussed ViewImports file in detail in Part 31 of ASP.NET Core tutorial.

It is used to include the common namespaces so we do not have to include them in every view or razor page that needs those namespaces. We also use this file to register built-in tag helpers. To register tag helpers we use @addTagHelper directive. We use this same directive to register view components so they can be used as tag helpers.

@addTagHelper *, RazorPagesTutorial

RazorPagesTutorial, is the assembly (DLL) that contains the view components to register
* (asterisk), specifies all the view components.

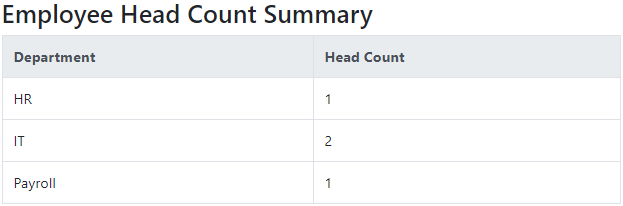
Use the tag helper vc (short for view component), and then a colon (:) and then the view component name. Our view component name is HeadCount view component, so we specify head-count.

<vc:head-count department="Dept.IT"></vc:head-count>

In our example, the parameter name contains just one word. It is very common to have parameters with 2 or more words. For example, if the parameter is departmentName, you specify it like the following . This is called kebab case.

<vc:head-count department-name="Dept.IT"></vc:head-count>

asp.net core tutorial for beginners

ASP.NET Core view component tag helper - Slides


Pass parameters to view component in asp.net core

Suggested Videos
Part 22 - Delete operation in asp.net core razor pages | Text | Slides
Part 23 - Partial views in asp.net core | Text | Slides
Part 24 - ASP.NET Core view components | Text | Slides

In this video we will discuss how to pass parameters to a view component with an example.


This is continuation to previous video - Part 24. Please watch Part 24 from razor pages tutorial before proceeding.


ASP.NET Core view component parameter example

In our previous video we discussed creating the following view component that displays the employee head count summary by department.

asp.net core view component example

At the moment all the departments head count is displayed. We want to be able to filter by department name. For example, if IT is passed as the department name, only IT department headcount should be displayed. If I do not pass any department name, then all the departments must be displayed.

In other words, we want to include a parameter which we can use to filter the view component results. Also, we want to be able to make it optional


IEmployeeRepository.cs

It is the EmployeeCountByDept method that retrieves the data for the view component. Include Dept parameter. The parameter is made nullable, so we can pass null if we want all the departments.

public interface IEmployeeRepository
{
    IEnumerable<DeptHeadCount> EmployeeCountByDept(Dept? dept);
    // Other methods
}

MockEmployeeRepository.cs

public class MockEmployeeRepository : IEmployeeRepository
{
    private List<Employee> _employeeList;

    public MockEmployeeRepository()
    {
        _employeeList = new List<Employee>()
        {
            new Employee() { Id = 1, Name = "Mary", Department = Dept.HR,
                Email = "mary@pragimtech.com", PhotoPath="mary.png" },
            new Employee() { Id = 2, Name = "John", Department = Dept.IT,
                Email = "john@pragimtech.com", PhotoPath="john.png" },
            new Employee() { Id = 3, Name = "Sara", Department = Dept.IT,
                Email = "sara@pragimtech.com", PhotoPath="sara.png" },
            new Employee() { Id = 4, Name = "David", Department = Dept.Payroll,
                Email = "david@pragimtech.com" },
        };
    }

    public IEnumerable<DeptHeadCount> EmployeeCountByDept(Dept? dept)
    {
        IEnumerable<Employee> query = _employeeList;

        if (dept.HasValue)
        {
            query = query.Where(e => e.Department == dept.Value);
        }

        return query.GroupBy(e => e.Department)
                            .Select(g => new DeptHeadCount()
                            {
                                Department = g.Key.Value,
                                Count = g.Count()
                            }).ToList();
    }

    // Other methods
}

HeadCountViewComponent.cs

Include department parameter on the Invoke method of the view component. Specify a default value of null. This makes this parameter optional. If no value is specified when the view component is invoked, the default value null is used and we get to see all the departments.

public class HeadCountViewComponent : ViewComponent
{
    private readonly IEmployeeRepository employeeRepository;

    public HeadCountViewComponent(IEmployeeRepository employeeRepository)
    {
        this.employeeRepository = employeeRepository;
    }

    public IViewComponentResult Invoke(Dept? department = null)
    {
        var result = employeeRepository.EmployeeCountByDept(department);
        return View(result);
    }
}

Invoke view component with parameters

To invoke a view component with parameters, pass an anonymous object to the InvokeAsync() method. The name of the property in the anonymous object must match the name of the parameter on the Invoke (InvokeAsync) method of the view component class. You can pass as many parameters as you want using this technique.

@await Component.InvokeAsync("HeadCount", new
{
    department = Dept.IT
})

To display all the departments, do not include the department parameter or pass null

@await Component.InvokeAsync("HeadCount")

or 

@await Component.InvokeAsync("HeadCount", null)

Details.cshtml

To filter departments based on the Model class department

@await Component.InvokeAsync("HeadCount", new
{
    department = Model.Employee.Department
})

asp.net core tutorial for beginners

Pass parameters to view component in asp.net core - Slides


ASP.NET Core view components

Suggested Videos
Part 21 - ASP.NET Core razor pages client side validation | Text | Slides
Part 22 - Delete operation in asp.net core razor pages | Text | Slides
Part 23 - Partial views in asp.net core | Text | Slides

In this video we will discuss View Components in ASP.NET core with example.

View component example


In addition to page specific content, we want to display the following Employee Head Count Summary on several pages in our application. 


asp.net core view component example

Since, we want to display the Employee Head Count Summary on several pages, it makes sense to create a reusable component. 

What we do not want to do is include the code on each page. This approach duplicates code. 

We can't use a partial view either, because a partial view cannot have it's own data access logic. It depends on the data passed from the parent view or razor page. We do not want to include the code that retrieves data on each page. This is again code duplication. We want something that can retrieve data independently and render. View Component is a perfect choice for this.

View Components folder

Create View Components folder, in the root project directory. We will place all our view components in this folder. Add a new class file with name - HeadCountViewComponent.cs. Copy and paste the following code.

using Microsoft.AspNetCore.Mvc;
using RazorPagesTutorial.Services;

namespace RazorPagesTutorial.ViewComponents
{
    public class HeadCountViewComponent : ViewComponent
    {
        private readonly IEmployeeRepository employeeRepository;

        public HeadCountViewComponent(IEmployeeRepository employeeRepository)
        {
            this.employeeRepository = employeeRepository;
        }

        public IViewComponentResult Invoke()
        {
            var result = employeeRepository.EmployeeCountByDept();
            return View(result);
        }
    }
}

View component class
  1. View component class name ends with the suffix ViewComponent
  2. It inherits from the ViewComponent base class
  3. It supports dependency injection, just like a razor page or an MVC controller
  4. A view component does not directly respond to an HTTP request. It is usually invoked and consumed by a razor page, layout view or an MVC view.
  5. When a view component is invoked, it calls the Invoke method.
  6. Inovke() method returns IViewComponentResult.
  7. Use InvokeAsync() method, if you want to call the View Component asynchronously.
  8. View Component follows the MVC design pattern. It initialises a model and passes it to a view by calling the View method.
  9. Though it follows the MVC approach, it can be used both in an MVC project and a razor pages project.
View Component view discovery

ASP.NET Core looks for the view in the following locations

Razor pages project
  • /Pages/Shared/Components/{View Component Name}/{View Name}
MVC project
  • /Views/{Controller Name}/Components/{View Component Name}/{View Name}
  • /Views/Shared/Components/{View Component Name}/{View Name}
Create view component view file
  1. In the Shared folder, create Components folder. 
  2. In the Components folder, create a folder with the same name as the View Component. Our view component name is HeadCountViewComponent. So create a folder with name HeadCount. The suffix ViewComponent is not required.
  3. In this folder create a file with name default.cshtml
At this point, the folder structure should look as shown below.

viewcomponent folder structure

Copy and paste the following code in default.cshtml

@model IEnumerable<DeptHeadCount>

<h3>Employee Head Count Summary</h3>

<table class="table table-bordered">
    <thead class="thead-light">
        <tr>
            <th>Department</th>
            <th>Head Count</th>
        </tr>
    </thead>
    <tbody>
        @foreach (var deptHeadCount in Model)
        {
            <tr>
                <td>@deptHeadCount.Department</td>
                <td>@deptHeadCount.Count</td>
            </tr>
        }
    </tbody>
</table>

Rendering view component

Use Component.InvokeAsync to invoke the view component. We want to render it from Details razor page. So include the following code on Details.cshtml page.

@await Component.InvokeAsync("HeadCount")

Supporting classes

DeptHeadCount.cs in Models project

namespace RazorPagesTutorial.Models
{
    public class DeptHeadCount
    {
        public Dept Department { get; set; }
        public int Count { get; set; }
    }
}

IEmployeeRepository.cs in Models project

namespace RazorPagesTutorial.Services
{
    public interface IEmployeeRepository
    {
        // Other methods
        IEnumerable<DeptHeadCount> EmployeeCountByDept();
    }
}

MockEmployeeRepository.cs in Models project

namespace RazorPagesTutorial.Services
{
    public class MockEmployeeRepository : IEmployeeRepository
    {
        private List<Employee> _employeeList;

        public MockEmployeeRepository()
        {
            _employeeList = new List<Employee>()
            {
                new Employee() { Id = 1, Name = "Mary", Department = Dept.HR,
                    Email = "mary@pragimtech.com", PhotoPath="mary.png" },
                new Employee() { Id = 2, Name = "John", Department = Dept.IT,
                    Email = "john@pragimtech.com", PhotoPath="john.png" },
                new Employee() { Id = 3, Name = "Sara", Department = Dept.IT,
                    Email = "sara@pragimtech.com", PhotoPath="sara.png" },
                new Employee() { Id = 4, Name = "David", Department = Dept.Payroll,
                    Email = "david@pragimtech.com" },
            };
        }

        public IEnumerable<DeptHeadCount> EmployeeCountByDept()
        {
            return _employeeList.GroupBy(e => e.Department)
                            .Select(g => new DeptHeadCount()
                            {
                                Department = g.Key.Value,
                                Count = g.Count()
                            }).ToList();
        }
    }
}

asp.net core tutorial for beginners

ASP.NET Core view components - Slides


Partial views in asp.net core

Suggested Videos
Part 20 - Create form in asp.net core razor pages | Text | Slides
Part 21 - ASP.NET Core razor pages client side validation | Text | Slides
Part 22 - Delete operation in asp.net core razor pages | Text | Slides

In this video we will discuss Partial Views in ASP.NET Core. 

What is a partial view

  • Just like a razor page or an MVC view, a partial view also has a .cshtml extension.
  • Partial view enables code reuse.
  • Encapsulates HTML and C# code that can be reused on multiple razor pages or view.

ASP.NET Core partial view example

Consider the following Employee List (/Employees/Index) razor page.

asp.net core partial view example

Employee List razor page (/Employees/Index)

We have the following code on this page
  • The code to loop through the list of employees
  • The code to display Employee Name, Photo and the 3 buttons - View, Edit and Delete.
@page
@model RazorPagesTutorial.Pages.Employees.IndexModel
@{
    ViewData["Title"] = "Index";
}

<style>
    .btn {
        width: 75px;
    }
</style>

<h1>Employees</h1>

<div class="card-deck">
    @foreach (var employee in Model.Employees)
    {
        var photoPath = "~/images/" + (employee.PhotoPath ?? "noimage.jpg");

        <div class="card m-3" style="min-width: 18rem; max-width:30.5%;">
            <div class="card-header">
                <h3>@employee.Name</h3>
            </div>

            <img class="card-img-top imageThumbnail" src="@photoPath"
                 asp-append-version="true" />

            <div class="card-footer text-center">
                <a asp-page="/Employees/Details" asp-route-ID="@employee.Id"
                   class="btn btn-primary m-1">View</a>

                <a asp-page="/Employees/Edit" asp-route-ID="@employee.Id"
                   class="btn btn-primary m-1">Edit</a>

                <a asp-page="/Employees/Delete" asp-route-ID="@employee.Id"
                   class="btn btn-danger m-1">Delete</a>
            </div>
        </div>
    }
</div>

Now, consider the following Delete razor page (/Employees/Delete)

asp.net core razor pages partial view

Delete razor page (/Employees/Delete)

Notice, the code to display Employee Name, and Photo is duplicated even on this page (in red colour).

@page "{id}"
@model RazorPagesTutorial.Pages.Employees.DeleteModel
@{
    ViewData["Title"] = "Delete";
    var photoPath = "~/images/" + (Model.Employee.PhotoPath ?? "noimage.jpg");
}

<h1>Delete Confirmation</h1>

<div class="alert alert-danger">
    <div class="card m-3" style="min-width: 18rem; max-width:30.5%;">
        <div class="card-header">
            <h3>@Model.Employee.Name</h3>
        </div>

        <img class="card-img-top imageThumbnail" src="@photoPath"
             asp-append-version="true" />
    </div>
    <h5>Are you sure you want to delete employee - @Model.Employee.Name</h5>
    <form method="post">
        <button type="submit" class="btn btn-danger">Yes</button>
        <a asp-page="/Employees/Index" class="btn btn-primary">No</a>
    </form>
</div>

Use partial view to reuse code

In general, code duplication is not good. The code that displays Employee Name, Photo and three buttons (View, Edit and Delete) can be encapsulated into a partial view. This partial view can then be reused on any number of pages, even from a layout page.

Partial view naming convention

A partial view file name usually begins with an underscore (_). It's a naming convention. Just by looking at the leading underscore in the name we can easily say this is a partial view and not a regular razor view or page. We named our partial view _DisplayEmployeePartial.cshtml

Partial view discovery

If the partial view is placed in a specific folder in the Pages folder, then only the views or pages in that specific folder can use the partial view. If you want to use the partial view from the pages or views from a different sub-folder, place it in the Shared folder.

partial view discovery

@model Employee
@{
    var photoPath = "~/images/" + (Model.PhotoPath ?? "noimage.jpg");
    // View, Edit and Delete buttons must not be displayed on the Delete razor
    // page. They should be displayed only on the Employee List razor pages
    // These pages will pass true or false using ViewData dictionary
    bool showButtons = (bool)ViewData["ShowButtons"];
}

<div class="card m-3" style="min-width: 18rem; max-width:30.5%;">
    <div class="card-header">
        <h3>@Model.Name</h3>
    </div>

    <img class="card-img-top imageThumbnail" src="@photoPath"
         asp-append-version="true" />

    @if (showButtons)
    {
        <div class="card-footer text-center">
            <a asp-page="/Employees/Details" asp-route-ID="@Model.Id"
               class="btn btn-primary m-1">View</a>

            <a asp-page="/Employees/Edit" asp-route-ID="@Model.Id"
               class="btn btn-primary m-1">Edit</a>

            <a asp-page="/Employees/Delete" asp-route-ID="@Model.Id"
               class="btn btn-danger m-1">Delete</a>
        </div>
    }
</div>

Rendering partial view

To render partial view, use the <partial> tag helper. Use the model attribute to pass Model data. If you want to pass any other additional data you can also use the ViewData dictionary.

@{
    ViewData["ShowButtons"] = true;
}

<partial name="_DisplayEmployeePartial" model="employee" view-data="ViewData" />

Rendering partial view from Employee List razor page (/Employees/Index)

@page
@model RazorPagesTutorial.Pages.Employees.IndexModel
@{
    ViewData["Title"] = "Index";
    // Pass true using ViewData to tell the partial view
    // to display View, Edit and Delete buttons
    ViewData["ShowButtons"] = true;
}

<style>
    .btn {
        width: 75px;
    }
</style>

<h1>Employees</h1>

<div class="card-deck">
    @foreach (var employee in Model.Employees)
    {
        // Render partial view passing it the model data and ViewData dictionary
        <partial name="_DisplayEmployeePartial" model="employee" view-data="ViewData" />
    }
</div>

Rendering partial view from Delete razor page (/Employees/Delete)

@page "{id}"
@model RazorPagesTutorial.Pages.Employees.DeleteModel
@{
    ViewData["Title"] = "Delete";
    // Pass true using ViewData to tell the partial view
    // to display View, Edit and Delete buttons
    ViewData["ShowButtons"] = false;
}

<h1>Delete Confirmation</h1>

<div class="alert alert-danger">
    @*Render partial view passing it the model data and ViewData dictionary*@
    <partial name="_DisplayEmployeePartial" model="Model.Employee" view-data="ViewData" />

    <h5>Are you sure you want to delete employee - @Model.Employee.Name</h5>
    <form method="post">
        <button type="submit" class="btn btn-danger">Yes</button>
        <a asp-page="/Employees/Index" class="btn btn-primary">No</a>
    </form>
</div>

asp.net core tutorial for beginners