Suggested Videos
Part 1 - Adding JavaScript to ASP.NET controls
Part 2 - JavaScript confirm on GridView delete
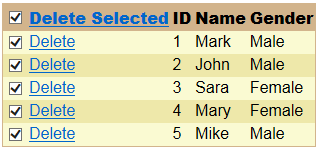
In this video we will discuss how to implement select all CheckBox in ASP.NET GridView.
If the checkbox in the header is checked, all the checkboxes in the GridView should be checked. If we uncheck the checkbox in the header, all the checkboxes in the GridView should be unchecked. When Delete Selected button is clicked the rows that have the checkboxes checked should be deleted.

We will continue with the example that we worked with in Part 2 of JavaScript with ASP.NET tutorial.
Add a TemplateField to the GridView with checkbox in HeaderTemplate and ItemTemplate. At this point the HTML of the GridView should be as shown below. Notice the checkboxes in the first TemplateField.
Include the following 2 JavaScript functions on the page
Associate HeaderCheckBoxClick() JavaScript function with onclick event of the checkbox in the HeaderTemplate.
Associate ChildCheckBoxClick() JavaScript function with onclick event of the checkbox in the ItemTemplate
So, the HTML of the TemplateFiled should now look as shown below.
This is all the code that is required for implementing select/deselect all checkboxes in GridView.
Now let's see how to delete all the selected rows at once.
Include a HeaderTemplate in the TemplateField that has the Delete LinkButton. Place a LinkButton inside the HeaderTemplate.
1. Remove the CommandName attribute
2. Set Text="Delete Selected"
3. Set ID="lbDeleteAll"
4. Set OnClick="lbDeleteAll_Click"
The HTML of the TemplateFiled should now look as shown below.
At the moment ID column in the GridView is a BoundField. Convert it to TemplateField. The HTML of the ID TemplateFiled should now look as shown below.
Include the following 2 functions in the code-behind file.
Please make sure to include the following using declarations in the code-behind file
using System.Text;
using System.Data;
using System.Data.SqlClient;
using System.Configuration;
Finally create the following stored procedure
Create Procedure spDeleteEmployees
@IDs nvarchar(1000)
as
Begin
EXEC('Delete from Employees WHERE ID IN (' + @IDs+ ')')
End

Part 1 - Adding JavaScript to ASP.NET controls
Part 2 - JavaScript confirm on GridView delete
In this video we will discuss how to implement select all CheckBox in ASP.NET GridView.
If the checkbox in the header is checked, all the checkboxes in the GridView should be checked. If we uncheck the checkbox in the header, all the checkboxes in the GridView should be unchecked. When Delete Selected button is clicked the rows that have the checkboxes checked should be deleted.

We will continue with the example that we worked with in Part 2 of JavaScript with ASP.NET tutorial.
Add a TemplateField to the GridView with checkbox in HeaderTemplate and ItemTemplate. At this point the HTML of the GridView should be as shown below. Notice the checkboxes in the first TemplateField.
<asp:GridView ID="GridView1" runat="server" AutoGenerateColumns="False"
DataKeyNames="ID" DataSourceID="SqlDataSource1"
onrowdatabound="GridView1_RowDataBound">
<Columns>
<asp:TemplateField>
<ItemTemplate>
<asp:CheckBox ID="CheckBox1" runat="server" />
</ItemTemplate>
<HeaderTemplate>
<asp:CheckBox ID="checkboxSelectAll" runat="server" />
</HeaderTemplate>
</asp:TemplateField>
<asp:TemplateField ShowHeader="False">
<ItemTemplate>
<asp:LinkButton ID="LinkButton1" runat="server" CausesValidation="False"
CommandName="Delete" Text="Delete"></asp:LinkButton>
</ItemTemplate>
</asp:TemplateField>
<asp:BoundField DataField="ID" HeaderText="ID" InsertVisible="False"
ReadOnly="True" SortExpression="ID" />
<asp:BoundField DataField="Name" HeaderText="Name" SortExpression="Name" />
<asp:BoundField DataField="Gender" HeaderText="Gender"
SortExpression="Gender" />
</Columns>
</asp:GridView>
Include the following 2 JavaScript functions on the page
<script type="text/javascript" language="javascript">
function HeaderCheckBoxClick(checkbox)
{
var gridView = document.getElementById("GridView1");
for (i = 1; i < gridView.rows.length;
i++)
{
gridView.rows[i].cells[0].getElementsByTagName("INPUT")[0].checked
= checkbox.checked;
}
}
function ChildCheckBoxClick(checkbox)
{
var atleastOneCheckBoxUnchecked = false;
var gridView = document.getElementById("GridView1");
for (i = 1; i < gridView.rows.length;
i++)
{
if (gridView.rows[i].cells[0].getElementsByTagName("INPUT")[0].checked
== false)
{
atleastOneCheckBoxUnchecked =
true;
break;
}
}
gridView.rows[0].cells[0].getElementsByTagName("INPUT")[0].checked
= !atleastOneCheckBoxUnchecked;
}
</script>
Associate HeaderCheckBoxClick() JavaScript function with onclick event of the checkbox in the HeaderTemplate.
Associate ChildCheckBoxClick() JavaScript function with onclick event of the checkbox in the ItemTemplate
So, the HTML of the TemplateFiled should now look as shown below.
<asp:TemplateField>
<ItemTemplate>
<asp:CheckBox ID="CheckBox1" runat="server"
onclick="ChildCheckBoxClick(this);" />
</ItemTemplate>
<HeaderTemplate>
<asp:CheckBox ID="checkboxSelectAll" runat="server"
onclick="HeaderCheckBoxClick(this);" />
</HeaderTemplate>
</asp:TemplateField>
This is all the code that is required for implementing select/deselect all checkboxes in GridView.
Now let's see how to delete all the selected rows at once.
Include a HeaderTemplate in the TemplateField that has the Delete LinkButton. Place a LinkButton inside the HeaderTemplate.
1. Remove the CommandName attribute
2. Set Text="Delete Selected"
3. Set ID="lbDeleteAll"
4. Set OnClick="lbDeleteAll_Click"
The HTML of the TemplateFiled should now look as shown below.
<asp:TemplateField ShowHeader="False">
<HeaderTemplate>
<asp:LinkButton ID="lbDeleteAll" runat="server" CausesValidation="False"
Text="Delete Selected" OnClick="lbDeleteAll_Click"></asp:LinkButton>
</HeaderTemplate>
<ItemTemplate>
<asp:LinkButton ID="LinkButton1" runat="server" CausesValidation="False"
CommandName="Delete" Text="Delete"></asp:LinkButton>
</ItemTemplate>
</asp:TemplateField>
At the moment ID column in the GridView is a BoundField. Convert it to TemplateField. The HTML of the ID TemplateFiled should now look as shown below.
<asp:TemplateField HeaderText="ID" InsertVisible="False" SortExpression="ID">
<ItemTemplate>
<asp:Label ID="Label1" runat="server" Text='<%# Bind("ID") %>'></asp:Label>
</ItemTemplate>
<EditItemTemplate>
<asp:Label ID="Label1" runat="server" Text='<%# Eval("ID") %>'></asp:Label>
</EditItemTemplate>
</asp:TemplateField>
Include the following 2 functions in the code-behind file.
private void Delete(string employeeIDs)
{
string cs = ConfigurationManager.ConnectionStrings["SampleDBConnectionString"]
.ConnectionString;
SqlConnection con = new SqlConnection(cs);
SqlCommand cmd = new
SqlCommand("spDeleteEmployees", con);
cmd.CommandType = CommandType.StoredProcedure;
SqlParameter parameter = new SqlParameter("@IDs", employeeIDs);
cmd.Parameters.Add(parameter);
con.Open();
cmd.ExecuteNonQuery();
con.Close();
}
protected void lbDeleteAll_Click(object sender, EventArgs
e)
{
StringBuilder sb = new StringBuilder();
foreach (GridViewRow gr in GridView1.Rows)
{
CheckBox cb = (CheckBox)gr.FindControl("CheckBox1");
if (cb.Checked)
{
sb.Append(((Label)gr.FindControl("Label1")).Text + ",");
}
}
sb.Remove(sb.ToString().LastIndexOf(","), 1);
Delete(sb.ToString());
GridView1.DataBind();
}
Please make sure to include the following using declarations in the code-behind file
using System.Text;
using System.Data;
using System.Data.SqlClient;
using System.Configuration;
Finally create the following stored procedure
Create Procedure spDeleteEmployees
@IDs nvarchar(1000)
as
Begin
EXEC('Delete from Employees WHERE ID IN (' + @IDs+ ')')
End

No comments:
Post a Comment
It would be great if you can help share these free resources