Suggested Videos
Part 1 - Adding JavaScript to ASP.NET controls
In this video we will discuss how to display JavaScript confirmation dialog box when we attempt to delete a GridView row.
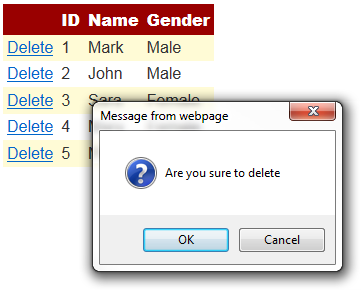
As you can see from the image below, when we click the Delete link button a confirm dialog box should be displayed with the message - Are you sure to delete. If we click OK button the respective row should be deleted. If we click Cancel, the row should not be deleted.
So let us look at different options available to add JavaScript to the Delete button in a GridView control.
The following SQL Script creates SampleDB, Employees table and populates it with test data
Now drag and drop a GridView control and a SqlDataSource control onto the webform.
Configure SqlDataSource control
1. Click Configure Data Source link

2. On Choose Your Data Connection screen, click "New Connection" button
3. On Add Connection screen, set
a) Server name = (local)
b) Select "Use Windows Authentication" radio button
c) From "Select or enter a database name" dropdownlist, select SampleDB
d) Click OK

4. Click "Next" on Choose Your Data Connection screen
5. Click "Next" on "Save the Connection String to the Application Configuration File"
6. On "Configure the Select Statement" screen, click "Advanced..." button
7. On "Advanced SQL Generation Options" screen, select "Generate INSERT, UPDATE and DELETE statements" checkbox and click OK.
8. Click "Next" on "Configure the Select Statement" screen
9. Click "Finish" on Test Query screen.
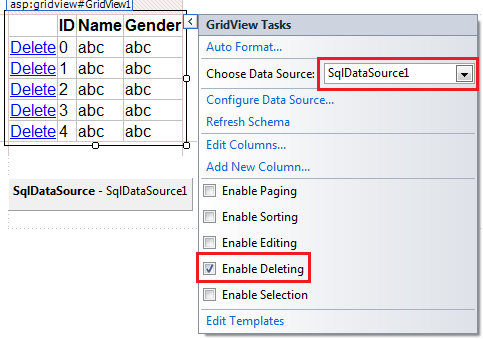
10. In the GridView tasks pane, select "SqlDataSource1" from "Choose Data Source" dropdownlist. Select "Enable Deleting" checkbox.
Now flip the Webform to the source mode and notice that we have 4 columns. The first column is a command field that is used for deleting the row from the GridView control.
If you want to add JavaScript to the delete button declaratively, then we need to convert the command field to a Template field. To do this, flip the webform to the design mode.
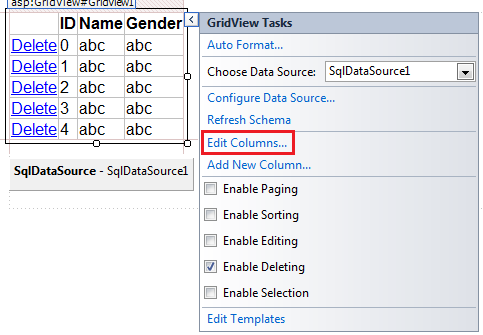
1. In GridView tasks pane, click "Edit Columns..." link
2. On Fields screen
a) Click on "Delete" field in "Selected fields" section
b) Click "Convert this field into a TemplateField" link
c) Click OK
Now flip the Webform to the source mode and notice that the Delete button is now generated as Link Button.
To associate JavaScript to the Delete link button client click event, use OnClientClick attribute as shown below
If you want to associate JavaScript programatically to delete button client click event using server side code
1. Remove the OnClientClick attribute from the HTML
2. Generate GridView1_RowDataBound event handler method
3. Copy and paste the following code in GridView1_RowDataBound event handler method
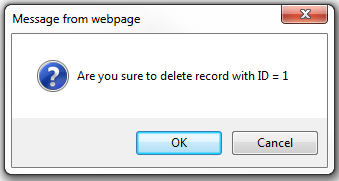
If you also want include the ID of the record being deleted in the confirmation message as shown below.
Modify the code in RowDataBound as shown below

Part 1 - Adding JavaScript to ASP.NET controls
In this video we will discuss how to display JavaScript confirmation dialog box when we attempt to delete a GridView row.
As you can see from the image below, when we click the Delete link button a confirm dialog box should be displayed with the message - Are you sure to delete. If we click OK button the respective row should be deleted. If we click Cancel, the row should not be deleted.
So let us look at different options available to add JavaScript to the Delete button in a GridView control.
The following SQL Script creates SampleDB, Employees table and populates it with test data
Create Database SampleDB
GO
Use SampleDB
GO
Create Table Employees
(
ID int identity
primary key,
Name nvarchar(100),
Gender nvarchar(10)
)
GO
Insert into Employees values('Mark', 'Male')
Insert into Employees values('John', 'Male')
Insert into Employees values('Sara', 'Female')
Insert into Employees values('Mary', 'Female')
Insert into Employees values('Mike', 'Male')
Now drag and drop a GridView control and a SqlDataSource control onto the webform.
Configure SqlDataSource control
1. Click Configure Data Source link
2. On Choose Your Data Connection screen, click "New Connection" button
3. On Add Connection screen, set
a) Server name = (local)
b) Select "Use Windows Authentication" radio button
c) From "Select or enter a database name" dropdownlist, select SampleDB
d) Click OK
4. Click "Next" on Choose Your Data Connection screen
5. Click "Next" on "Save the Connection String to the Application Configuration File"
6. On "Configure the Select Statement" screen, click "Advanced..." button
7. On "Advanced SQL Generation Options" screen, select "Generate INSERT, UPDATE and DELETE statements" checkbox and click OK.
8. Click "Next" on "Configure the Select Statement" screen
9. Click "Finish" on Test Query screen.
10. In the GridView tasks pane, select "SqlDataSource1" from "Choose Data Source" dropdownlist. Select "Enable Deleting" checkbox.
Now flip the Webform to the source mode and notice that we have 4 columns. The first column is a command field that is used for deleting the row from the GridView control.
<Columns>
<asp:CommandField ShowDeleteButton="True" />
<asp:BoundField DataField="ID" HeaderText="ID" InsertVisible="False"
ReadOnly="True" SortExpression="ID" />
<asp:BoundField DataField="Name" HeaderText="Name" SortExpression="Name" />
<asp:BoundField DataField="Gender" HeaderText="Gender"
SortExpression="Gender" />
</Columns>
If you want to add JavaScript to the delete button declaratively, then we need to convert the command field to a Template field. To do this, flip the webform to the design mode.
1. In GridView tasks pane, click "Edit Columns..." link
2. On Fields screen
a) Click on "Delete" field in "Selected fields" section
b) Click "Convert this field into a TemplateField" link
c) Click OK
Now flip the Webform to the source mode and notice that the Delete button is now generated as Link Button.
<Columns>
<asp:TemplateField ShowHeader="False">
<ItemTemplate>
<asp:LinkButton ID="LinkButton1" runat="server" CausesValidation="False"
CommandName="Delete" Text="Delete"></asp:LinkButton>
</ItemTemplate>
</asp:TemplateField>
<asp:BoundField DataField="ID" HeaderText="ID" InsertVisible="False"
ReadOnly="True" SortExpression="ID" />
<asp:BoundField DataField="Name" HeaderText="Name" SortExpression="Name" />
<asp:BoundField DataField="Gender" HeaderText="Gender"
SortExpression="Gender" />
</Columns>
To associate JavaScript to the Delete link button client click event, use OnClientClick attribute as shown below
<asp:LinkButton ID="LinkButton1" runat="server" CausesValidation="False"
CommandName="Delete" Text="Delete"
OnClientClick="return confirm('Are you sure to
delete');" >
</asp:LinkButton>
If you want to associate JavaScript programatically to delete button client click event using server side code
1. Remove the OnClientClick attribute from the HTML
2. Generate GridView1_RowDataBound event handler method
3. Copy and paste the following code in GridView1_RowDataBound event handler method
protected void GridView1_RowDataBound(object sender, GridViewRowEventArgs
e)
{
if (e.Row.RowType == DataControlRowType.DataRow)
{
LinkButton lb = (LinkButton)e.Row.FindControl("LinkButton1");
lb.Attributes.Add("onclick",
"return confirm('Are you sure to
delete');");
}
}
If you also want include the ID of the record being deleted in the confirmation message as shown below.
Modify the code in RowDataBound as shown below
protected void GridView1_RowDataBound(object sender, GridViewRowEventArgs
e)
{
if (e.Row.RowType == DataControlRowType.DataRow)
{
LinkButton lb = (LinkButton)e.Row.FindControl("LinkButton1");
lb.Attributes.Add("onclick",
"return confirm('Are you sure to delete
record with ID = "
+ DataBinder.Eval(e.Row.DataItem,
"ID") + "');");
}
}
No comments:
Post a Comment
It would be great if you can help share these free resources