Suggested Videos
Part 38 - addeventlistener and removeeventlistener in JavaScript
Part 39 - JavaScript event object
Part 40 - Event bubbling in JavaScript
In this video we will discuss creating image gallery with thumbnails in JavaScript. We will take advantage of event bubbling to achieve this.
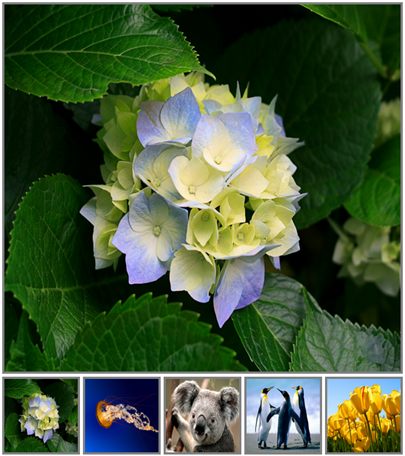
The image gallery should be as shown in the image below. When you click on the image thumnail, the respective image should be displayed in the main section of the page.
For the purpose of this demo we will be using the images that can be found on any windows machine at the following path.
C:\Users\Public\Pictures\Sample Pictures
Step 1 : Open Visual Studio and create a new empty asp.net web application project. Name it Demo.
Step 2 : Right click on the Project Name in Solution Explorer in Visual Studio and create a new folder with name = Images.
Step 3 : Copy images from C:\Users\Public\Pictures\Sample Pictures to Images folder in your project.
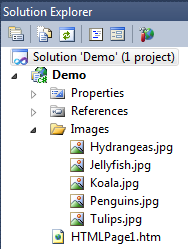
Step 4 : Right click on the Project Name in Solution Explorer in Visual Studio and add a new HTML Page. It should automatically add HTMLPage1.htm. At this point your solution explorer should look as shown below.
Step 5 : Copy and paste the following HTML and JavaScript code in HTMLPage1.htm page.
Finally run the application and test it.

Part 38 - addeventlistener and removeeventlistener in JavaScript
Part 39 - JavaScript event object
Part 40 - Event bubbling in JavaScript
In this video we will discuss creating image gallery with thumbnails in JavaScript. We will take advantage of event bubbling to achieve this.
The image gallery should be as shown in the image below. When you click on the image thumnail, the respective image should be displayed in the main section of the page.
For the purpose of this demo we will be using the images that can be found on any windows machine at the following path.
C:\Users\Public\Pictures\Sample Pictures
Step 1 : Open Visual Studio and create a new empty asp.net web application project. Name it Demo.
Step 2 : Right click on the Project Name in Solution Explorer in Visual Studio and create a new folder with name = Images.
Step 3 : Copy images from C:\Users\Public\Pictures\Sample Pictures to Images folder in your project.
Step 4 : Right click on the Project Name in Solution Explorer in Visual Studio and add a new HTML Page. It should automatically add HTMLPage1.htm. At this point your solution explorer should look as shown below.
Step 5 : Copy and paste the following HTML and JavaScript code in HTMLPage1.htm page.
<html>
<head>
<style type="text/css">
.imgStyle
{
width:100px;
height:100px;
border:3px solid grey;
}
</style>
</head>
<body>
<img id="mainImage" style="border:3px solid grey"
src="/Images/Hydrangeas.jpg" height="500px" width="540x"/>
<br />
<div id="divId" onclick="changeImageOnClick(event)">
<img class="imgStyle" src="/Images/Hydrangeas.jpg" />
<img class="imgStyle" src="/Images/Jellyfish.jpg" />
<img class="imgStyle" src="/Images/Koala.jpg" />
<img class="imgStyle" src="/Images/Penguins.jpg" />
<img class="imgStyle" src="/Images/Tulips.jpg" />
</div>
<script type="text/javascript">
var images = document.getElementById("divId")
.getElementsByTagName("img");
for (var i =
0; i < images.length; i++)
{
images[i].onmouseover = function ()
{
this.style.cursor = 'hand';
this.style.borderColor =
'red';
}
images[i].onmouseout = function ()
{
this.style.cursor = 'pointer';
this.style.borderColor =
'grey';
}
}
function changeImageOnClick(event)
{
event = event || window.event;
var targetElement = event.target ||
event.srcElement;
if (targetElement.tagName == "IMG")
{
mainImage.src = targetElement.getAttribute("src");
}
}
</script>
</body>
</html>
Finally run the application and test it.
i need next and previous button? so i can change image trough that button also
ReplyDeleteWorks like a charm. THANKS
ReplyDeleteWhat is the use/functionality of "||" used in above code ? event || window.event;
ReplyDeleteevent.target || event.srcElement;
|| this means logical OR ,event in function ||windows.events the following code should works
DeletechangeImageOnClick(event) --- please explain me why we are passing event as a parameter to this function.
ReplyDeleteIn C#, you must have noticed that two arguments get passed automatically when you auto generate the button click. One of them is eventArgs that holds some data, some important data I'd say. Same concept is there in JS wherein event variable holds info about the click and target of click and all.
Deleteyour code work fine when I used it inline but its not working when used as external file.
ReplyDeleteMine worked as expected. Did you include the Js file on your page?
ReplyDeletescript src="MyJavaScript.js" /script
Can you please discuss more real time examples using Capturing Event and Bubbling Event
ReplyDeleteAfter reviewing your code, I have come across a minor bug that is when I keep the arrow cursor on the list of images provided it doesn't show the finger/hand cursor, this happens on the very first time.But when after keeping the cursor on next image and coming back to the previous one it then shows the finger image for selection.So i have solved the bug using my below code:
ReplyDeletefor (var i = 0; i < images.length; i++) {
images[i].onmouseover = function () {
this.style.cursor = 'pointer';
this.style.borderColor = 'red';
}
images[i].onmouseout = function () {
this.style.cursor = 'context-menu';
this.style.borderColor = 'grey';
}
}