Suggested Videos
Part 25 - Insert update delete in mvc using entity framework
Part 26 - Customizing the autogenerated index view
Part 27 - Customizing the autogenerated create view
In this video we will discuss, customizing the auto-generated edit view. Please watch Part 27, before proceeding.
If you want "Select Department" as the first item in the "Department" dropdownlist on "Edit" view, then,
REPLACE THE FOLLOWING LINE
@Html.DropDownList("DepartmentId", String.Empty)
WITH
@Html.DropDownList("DepartmentId", "Select Department")
Notice that, a textbox is used for gender. It is ideal to have a dropdownlist for gender rather than a textbox. To achieve this, make the following changes to "Edit.cshtml" view.
REPLACE THE FOLLOWING CODE
@Html.EditorFor(model => model.Gender)
WITH
@Html.DropDownList("Gender", new List<SelectListItem>
{
new SelectListItem { Text = "Male", Value="Male" },
new SelectListItem { Text = "Female", Value="Female" }
}, "Select Gender")
Let's make "Name" non-editable. To achieve this
CHANGE THE FOLLOWING CODE IN EDIT.CSHTML
@Html.EditorFor(model => model.Name)
TO
@Html.DisplayFor(model => model.Name)
@Html.HiddenFor(model => model.Name)
At this point, we will still be able to change "Name" property of the employee, using tools like fiddler. We discussed this in Part 19 of this video series. There are several ways to prevent "Name" property from being updated.
1. Use UpdateModel() function and pass include and exclude list as a parameter - Discussed in Part 20
2. Use Bind attribute - Discussed in Part 21
3. Use interfaces - Discussed in Part 22
Now, let's discuss using BIND attribute to prevent updating "Name" property using tools like fiddler. Along the way, I will demonstrate adding model validation errors dynamically.
Change the implementation of "Edit" controller action method, that responds to [HttpPost] request as shown below
[HttpPost]
public ActionResult Edit([Bind(Exclude="Name")] Employee employee)
{
Employee employeeFromDB = db.Employees.Single(x => x.EmployeeId == employee.EmployeeId);
employeeFromDB.EmployeeId = employee.EmployeeId;
employeeFromDB.Gender = employee.Gender;
employeeFromDB.City = employee.City;
employeeFromDB.DepartmentId = employee.DepartmentId;
employee.Name = employeeFromDB.Name;
if (ModelState.IsValid)
{
db.ObjectStateManager.ChangeObjectState(employeeFromDB, EntityState.Modified);
db.SaveChanges();
return RedirectToAction("Index");
}
ViewBag.DepartmentId = new SelectList(db.Departments, "Id", "Name", employee.DepartmentId);
return View(employee);
}
Please note that, we have excluded "Name" property from model binding using "Bind" attribute. Even without BIND attribute, users will not be able to change the "NAME" of the employee, as we are copying only the required properties(Excluding NAME property) from "employee" object to "employeeFromDB" which in turn is persisted to the database. Since, I want to demonstrate adding model validation errors dynamically, let the attribute be there.
At this point if we run the application and click on "Save" button on "Edit" view, we get a validation error stating - The Name field is required. This is because "Name" property is decorated with [Required] attribute in "Employee.cs" file. To prevent the validation error, remove the [Required] attribute.
The problem with this change is that, "Name" field on "Create" view is no longer mandatory. This means we will now be able to create a new employee, without NAME. To fix the "Create" view, let's add model validation errors dynamically. Change the implementation of "Create" controller action method that responds to [HttpPost] request as shown below.
[HttpPost]
public ActionResult Create(Employee employee)
{
if (string.IsNullOrEmpty(employee.Name))
{
ModelState.AddModelError("Name", "The Name field is required.");
}
if (ModelState.IsValid)
{
db.Employees.AddObject(employee);
db.SaveChanges();
return RedirectToAction("Index");
}
ViewBag.DepartmentId = new SelectList(db.Departments, "Id", "Name", employee.DepartmentId);
return View(employee);
}

Suggested Videos
Part 24 - Deleting database records using post request in mvc
Part 25 - Insert update delete in mvc using entity framework
Part 26 - Customizing the autogenerated index view
In this video we will discuss, customizing the auto-generated create view. Please watch Part 26, before proceeding.
At the moment, none of the fields on "Create" view are required. This means,when you click on the "Create" button without filling any data, NULL values are stored in all the columns of tblEmployee table.
So, how to make these fields on the "Create" view required?
Add [Required] attribute to the "Employee" class. The "Employee" class that is present in "EmployeeDataModel.Designer.cs" is auto-generated by the entity framework. There is no point in adding the [Required] attribute to this class, as we will loose the changes if the class is auto-generated again.
To achieve this, add a class file with "name=Employee.cs" to "Models" folder.
Copy and paste the following code in "Employee.cs" file
using System;
using System.Collections.Generic;
using System.Linq;
using System.Web;
using System.ComponentModel.DataAnnotations;
namespace MVCDemo.Models
{
[MetadataType(typeof(EmployeeMetaData))]
public partial class Employee
{
}
public class EmployeeMetaData
{
[Required]
public string Name { get; set; }
[Required]
public string Gender { get; set; }
[Required]
public string City { get; set; }
[Required]
[Display(Name="Department")]
public int DepartmentId { get; set; }
}
}
At this point, run the application and click on the "Create" button without filling any data. Notice that we get validation error messages as expected. In a later video session, we will discuss changing the colour of the validation messages.
If you want "Select Department" as the first item in the "Department" dropdownlist on "Create" view, then,
REPLACE THE FOLLOWING LINE
@Html.DropDownList("DepartmentId", String.Empty)
WITH
@Html.DropDownList("DepartmentId", "Select Department")
Notice that, a textbox is used for gender. It is ideal to have a dropdownlist for gender rather than a textbox. To achieve this, make the following changes to "Create.cshtml" view.
REPLACE THE FOLLOWING CODE
@Html.EditorFor(model => model.Gender)
WITH
@Html.DropDownList("Gender", new List<SelectListItem>
{
new SelectListItem { Text = "Male", Value="Male" },
new SelectListItem { Text = "Female", Value="Female" }
}, "Select Gender")
Suggested Videos
Part 23 - Why deleting database records using get request is bad
Part 24 - Deleting database records using post request in mvc
Part 25 - Insert update delete in mvc using entity framework
In this video we will discuss, customizing the auto-generated index view. Please watch Part 25, before proceeding.
At the moment, the "Index" view is using "Name" as the column header for both employee name and department name. This is because "Name" column is used in both the database tables(tblEmployee & tblDepartment) and entity framework has used these column names to generate "Name" property in Employee and Department classes that are auto-generated.
I want to change the depratment column header to "Department Name" instead of just "Name". To achieve this, add a class file with "name=Department.cs" to "Models" folder.
Copy and paste the following code in "Department.cs" file
[MetadataType(typeof(DepartmentMetaData))]
public partial class Department
{
}
public class DepartmentMetaData
{
[Display(Name="Department Name")]
public string Name { get; set; }
}
With these changes run the application and notice the column name is displayed as Department Name. This is achieved by using "Display" attribute that is present in "System.ComponentModel.DataAnnotations" namespace.
If you are wondering why can't we apply "Display" attribute directly to the auto-generated "Department" class instead of creating another partial "Department" and DepartmentMetaData class. We can do it. There is nothing stopping us from doing it, but every time the Department class is auto-generated, our custom changes will be lost. This is the reason for creating another partial class, and applying our changes.
Suggested Videos
Part 22 - Including and excluding properties from model binding using interfaces
Part 23 - Why deleting database records using get request is bad
Part 24 - Deleting database records using post request in mvc
In this video we will discuss, selecting, inserting, updating and deleting data in mvc using entity framework. Please watch Part 24, before proceeding.
We will be using tables tblDepartment and tblEmployee for this demo. You can get the sql script to create and populate these tables from Part 10 of this video series.
Step 1: Create a new asp.net mvc 4 web application.
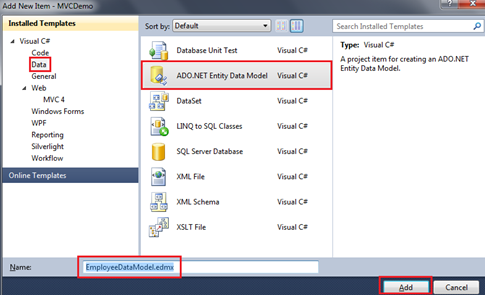
Step 2: Right click on the "Models" folder and add "ADO.NET Entity Data Model". Set Name = EmployeeDataModel.edmx.
 On the subsequent screen, select "Generate from database" option and click "Next".
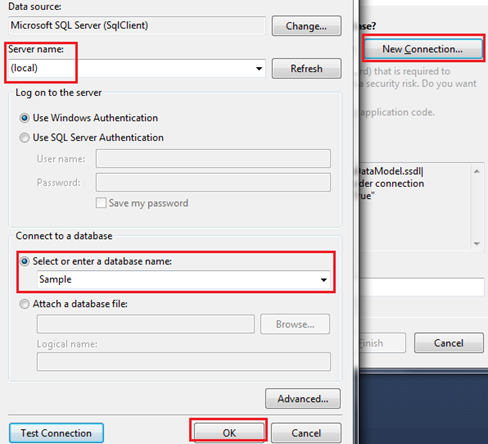
On "Choose your data connection screen", click on "New Connection" button.
Specify the sql server name. In my case, I have sql server installed on my local machine. So I have set "Server Name=(local)". From "Select or enter a database name" dropdownlist, select the Database name and click "OK".
On the subsequent screen, select "Generate from database" option and click "Next".
On "Choose your data connection screen", click on "New Connection" button.
Specify the sql server name. In my case, I have sql server installed on my local machine. So I have set "Server Name=(local)". From "Select or enter a database name" dropdownlist, select the Database name and click "OK".
 Click "Next".
On "Choose your database objects" screen, expand "Tables" and select "tblDepartment" and "tblEmployee" tables. Set "Model Namespace=Models" and click "Finish"
Click "Next".
On "Choose your database objects" screen, expand "Tables" and select "tblDepartment" and "tblEmployee" tables. Set "Model Namespace=Models" and click "Finish"
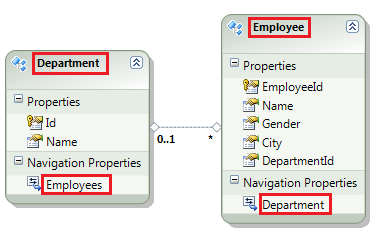
 At this point we should have tblDepartment and tblEmployee entities generated.
a) Change tblDepartment to Department
b) Change tblEmployee to Employee
c) Change tblEmployees nvigation property to Employees
d) Change tblDepartment nvigation property to Department
At this point we should have tblDepartment and tblEmployee entities generated.
a) Change tblDepartment to Department
b) Change tblEmployee to Employee
c) Change tblEmployees nvigation property to Employees
d) Change tblDepartment nvigation property to Department
 Build the solution.
Step 3: Right click on the "Controllers" folder and select Add - Controller. Set
Name = EmployeeController
Template = MVC controller with read/write actions and views, using Entity Framework
Model class = Employee(MVCDemo.Models)
Data Context Class = EmployeeContext(MVCDemo.Models)
Views = Razor
Finally click "Add".
At this point you should have the following files automatically added.
1. EmployeeController.cs file in "Controllers" folder
2. Index, Create, Edit, Detail and Delete views in "Employee" folder.
On Create and Edit views, please delete the following scripts section. We will discuss these in a later video session.
@section Scripts {
@Scripts.Render("~/bundles/jqueryval")
}
At this point, if you run the application by pressing CTRL + F5, you will get an error stating - The resource cannot be found. This is because, by default, the application goes to "HOME" controller and "Index" action.
To fix this,
1. Open "RouteConfig.cs" file from "App_Start" folder
2. Set Controller = "Employee"
Run the application again. Notice that, all the employees are listed on the index view. We can also create a new employee, edit an employee, view their full details and delete an employee as well. However, there are few issues, with each of the views, which we will address in our upcoming videos.
Build the solution.
Step 3: Right click on the "Controllers" folder and select Add - Controller. Set
Name = EmployeeController
Template = MVC controller with read/write actions and views, using Entity Framework
Model class = Employee(MVCDemo.Models)
Data Context Class = EmployeeContext(MVCDemo.Models)
Views = Razor
Finally click "Add".
At this point you should have the following files automatically added.
1. EmployeeController.cs file in "Controllers" folder
2. Index, Create, Edit, Detail and Delete views in "Employee" folder.
On Create and Edit views, please delete the following scripts section. We will discuss these in a later video session.
@section Scripts {
@Scripts.Render("~/bundles/jqueryval")
}
At this point, if you run the application by pressing CTRL + F5, you will get an error stating - The resource cannot be found. This is because, by default, the application goes to "HOME" controller and "Index" action.
To fix this,
1. Open "RouteConfig.cs" file from "App_Start" folder
2. Set Controller = "Employee"
Run the application again. Notice that, all the employees are listed on the index view. We can also create a new employee, edit an employee, view their full details and delete an employee as well. However, there are few issues, with each of the views, which we will address in our upcoming videos.
Suggested Videos
Part 21 - Including and excluding properties from model binding using bind attribute
Part 22 - Including and excluding properties from model binding using interfaces
Part 23 - Why deleting database records using get request is bad
In this video we will discuss
1. Deleting database records using POST request
2. Showing the client side javascript confirmation dialog box before deleting
Please watch Part 23, before proceeding.
Step 1: Mark "Delete" action method in "Employee" controller with [HttpPost] attribute. With this change, the "Delete" method will no longer respond to "GET" request. At this point, if we run the application and click on "Delete" link on the "Index" view, we get an error stating - "The resource cannot be found"
[HttpPost]
public ActionResult Delete(int id)
{
EmployeeBusinessLayer employeeBusinessLayer =
new EmployeeBusinessLayer();
employeeBusinessLayer.DeleteEmployee(id);
return RedirectToAction("Index");
}
Step 2: In "Index.cshtml"
REPLACE THE FOLLOWING CODE
@foreach (var item in Model) {
<tr>
<td>
@Html.DisplayFor(modelItem => item.Name)
</td>
<td>
@Html.DisplayFor(modelItem => item.Gender)
</td>
<td>
@Html.DisplayFor(modelItem => item.City)
</td>
<td>
@Html.DisplayFor(modelItem => item.DateOfBirth)
</td>
<td>
@Html.ActionLink("Edit", "Edit", new { id=item.ID }) |
@Html.ActionLink("Details", "Details", new { id=item.ID }) |
@Html.ActionLink("Delete", "Delete", new { id=item.ID })
</td>
</tr>
}
WITH
@foreach (var item in Model)
{
using (Html.BeginForm("Delete", "Employee", new { id = item.ID }))
{
<tr>
<td>
@Html.DisplayFor(modelItem => item.Name)
</td>
<td>
@Html.DisplayFor(modelItem => item.Gender)
</td>
<td>
@Html.DisplayFor(modelItem => item.City)
</td>
<td>
@Html.DisplayFor(modelItem => item.DateOfBirth)
</td>
<td>
@Html.ActionLink("Edit", "Edit", new { id = item.ID }) |
<input type="submit" value="Delete" />
</td>
</tr>
}
}
Notice that, we are using "Html.BeginForm()" html helper to generate a form tag.
Step 3: To include client-side confirmation, before the data can be deleted, add the "onclick" attribute to "Delete" button as shown below.
<input type="submit" value="Delete" onclick="return confirm('Are you sure you want to delete record with ID = @item.ID');" />
Suggested Videos
Part 20 - Preventing unintended updates
Part 21 - Including and excluding properties from model binding using bind attribute
Part 22 - Including and excluding properties from model binding using interfaces
In this video we will discuss, why deleting database records using GET request is bad. Please watch Part 22, before proceeding.
First let's discuss, how to delete data in MVC using GET request and then we will discuss, why it is bad to do so.
Step 1: Create a stored procedure to delete employee data by "ID"
Create procedure spDeleteEmployee
@Id int
as
Begin
Delete from tblEmployee
where Id = @Id
End
Step 2: Add the following DeleteEmployee() method to "EmployeeBusinessLayer.cs" file in "BusinessLayer" project. This method calls the stored procedure "spDeleteEmployee" that we just created.
public void DeleteEmployee(int id)
{
string connectionString =
ConfigurationManager.ConnectionStrings["DBCS"].ConnectionString;
using (SqlConnection con = new SqlConnection(connectionString))
{
SqlCommand cmd = new SqlCommand("spDeleteEmployee", con);
cmd.CommandType = CommandType.StoredProcedure;
SqlParameter paramId = new SqlParameter();
paramId.ParameterName = "@Id";
paramId.Value = id;
cmd.Parameters.Add(paramId);
con.Open();
cmd.ExecuteNonQuery();
}
}
Step 3: Add the following "DELETE" controller action method to "EmployeeController".
public ActionResult Delete(int id)
{
EmployeeBusinessLayer employeeBusinessLayer =
new EmployeeBusinessLayer();
employeeBusinessLayer.DeleteEmployee(id);
return RedirectToAction("Index");
}
Run the application and navigate to "Index" action. Click the "Delete" link. This issues "GET" request to the following URL, and deletes the record.
http://localhost/MVCDemo/Employee/Delete/1
Deleting database records using GET request opens a security hole and is not recommended by Microsoft. Just imagine what can happen if there is an image tag in a malicious email as shown below. The moment we open the email, the image tries to load and issues a GET request, which would delete the data.
<img src="http://localhost/MVCDemo/Employee/Delete/2" />
Also, when search engines index your page, they issue a GET request which would delete the data. In general GET request should be free of any side-effects, meaning it should not change the state.
Deletes should always be performed using a POST request. We will discuss, implementing this in our next video.
Suggested Videos
Part 19 - Unintended updates
Part 20 - Preventing unintended updates
Part 21 - Including and excluding properties from model binding using bind attribute
In this video we will discuss, including and excluding properties from model binding using interfaces. Please watch Part 21, before proceeding.
In part 20, we have seen how to include and exclude properties from model binding, by passing a string array to UpdateModel() method, and in part 21 we have seen achieving the same using "BIND" attribute.
To include and exclude properties from model binding using interfaces
Step 1: Create an interface "IEmployee" as shown below. Notice that this interface, has got only the properties that we want to include in model binding. "Name" property is not present. This means, "Name" property will be excluded from model binding. Copy and paste this code in "Employee.cs" class file in "BusinessLayer" project
public interface IEmployee
{
int ID { get; set; }
string Gender { get; set; }
string City { get; set; }
DateTime? DateOfBirth { get; set; }
}
Step 2: Make "Employee" class inherit from IEmployee interface
public class Employee : IEmployee
{
public int ID { get; set; }
public string Name { get; set; }
[Required]
public string Gender { get; set; }
[Required]
public string City { get; set; }
[Required]
public DateTime? DateOfBirth { get; set; }
}
Step 3: Modify "Edit_Post()" controller action method that is present in "EmployeeController.cs" file, as shown below.
[HttpPost]
[ActionName("Edit")]
public ActionResult Edit_Post(int id)
{
EmployeeBusinessLayer employeeBusinessLayer = new EmployeeBusinessLayer();
Employee employee = employeeBusinessLayer.Employees.Single(x => x.ID == id);
UpdateModel<IEmployee>(employee);
if (ModelState.IsValid)
{
employeeBusinessLayer.SaveEmmployee(employee);
return RedirectToAction("Index");
}
return View(employee);
}
Notice that we are explicitly calling the model binder, by calling UpdateModel() function passing in our interface IEmployee. The model binder will update only the properties that are present in the interface.
So, if we were to generate a post request using fiddler as we did in the previous session, "Name" property of the "Employee" object will not be updated.
So, in short, there are several ways to include and exclude properties from Model Binding. Depending on the architecture and requirements of your project, you may choose the approach that best fit your needs.
Suggested Videos
Part 18 - Updating data
Part 19 - Unintended updates
Part 20 - Preventing unintended updates
In this video we will discuss, including and excluding properties from model binding using BIND attribute. Please watch Part 20, before proceeding.
In part 20, we have seen how to include and exclude properties from model binding, by passing a string array to UpdateModel() method. There is another way to do the same thing using "Bind" attribute.
Modify "Edit_Post()" controller action method that is present in "EmployeeController.cs" file, as shown below.
[HttpPost]
[ActionName("Edit")]
public ActionResult Edit_Post([Bind(Include = "Id, Gender, City, DateOfBirth")] Employee employee)
{
EmployeeBusinessLayer employeeBusinessLayer = new EmployeeBusinessLayer();
employee.Name = employeeBusinessLayer.Employees.Single(x => x.ID == employee.ID).Name;
if (ModelState.IsValid)
{
employeeBusinessLayer.SaveEmployee(employee);
return RedirectToAction("Index");
}
return View(employee);
}
Notice that, we are using "BIND" attribute and specifying the properties that we want to include in model binding. Since, "Name" property is not specified in the INCLUDE list, it will be excluded from model binding.
public ActionResult Edit_Post([Bind(Include = "Id, Gender, City, DateOfBirth")] Employee employee)
At this point, run the application and navigate to "http://localhost/MVCDemo/Employee/Edit/1". Click "Save" button, you will get a "Model" validation error stating - "The Name field is required".
This is because, we marked "Name" property in "Employee" class with "Required" attribute. Remove the "Required" attribute from "Name" property.
public class Employee
{
public int ID { get; set; }
public string Name { get; set; }
[Required]
public string Gender { get; set; }
[Required]
public string City { get; set; }
[Required]
public DateTime? DateOfBirth { get; set; }
}
So, if we were to generate a post request using fiddler as we did in the previous session, "Name" property of the "Employee" object will not be updated.
Alternatively, to exclude properties from binding, we can specify the exclude list using "Bind" attribute as shown below.
[HttpPost]
[ActionName("Edit")]
public ActionResult Edit_Post([Bind(Exclude = "Name")] Employee employee)
{
// Rest of the method implementation remains the same
}
Suggested Videos
Part 17 - Editing a model
Part 18 - Updating data
Part 19 - Unintended updates
In this video we will discuss, preventing unintended updates in mvc. Please watch Part 19, before proceeding.
Modify "Edit" controller action method that is decorated with [HttpPost] attribute as shown below. This method is present in "EmployeeController.cs" file.
[HttpPost]
[ActionName("Edit")]
public ActionResult Edit_Post(int id)
{
EmployeeBusinessLayer employeeBusinessLayer = new EmployeeBusinessLayer();
Employee employee = employeeBusinessLayer.Employees.Single(x => x.ID == id);
UpdateModel(employee, new string[] { "ID", "Gender", "City", "DateOfBirth" });
if (ModelState.IsValid)
{
employeeBusinessLayer.SaveEmployee(employee);
return RedirectToAction("Index");
}
return View(employee);
}
Please note:
1. The name of the method is changed from "Edit" to "Edit_Post"
2. The method is decorated with [ActionName("Edit")] and [HttpPost] attributes. This indicates that, this method is going to respond to "Edit" action, when the form is posted to the server.
3. The "id" of the employee that is being edited, is passed as a parameter to this method.
4. Using the "id" parameter we load the employee details(Id, Name, Gender, City & DateOfBirth) from the database.
Employee employee = employeeBusinessLayer.Employees.Single(x => x.ID == id);
5. We then call UpdateModel() function. This should automatically update "Employee" object with data from the posted form. We are also passing a string array as the second parameter. This parameter specifies the list of model properties to update. This is also called as include list or white list. Notice that, we did not include "Name" property in the list. This means, even if the posted form data contains value for "Name" property, it will not be used to update the "Name" property of the "Employee" object.
UpdateModel(employee, new string[] { "ID", "Gender", "City", "DateOfBirth" });
So, if we were to generate a post request using fiddler as we did in the previous session, "Name" property of the "Employee" object will not be updated.
Alternatively, to exclude properties from binding, we can specify the exclude list as shown below.
[HttpPost]
[ActionName("Edit")]
public ActionResult Edit_Post(int id)
{
EmployeeBusinessLayer employeeBusinessLayer = new EmployeeBusinessLayer();
Employee employee = employeeBusinessLayer.Employees.Single(x => x.ID == id);
UpdateModel(employee, null, null, new string[] { "Name" });
if (ModelState.IsValid)
{
employeeBusinessLayer.SaveEmployee(employee);
return RedirectToAction("Index");
}
return View(employee);
}
Notice that we are using a different overloaded version of UpdateModel() function. We are passing "NULL" for "prefix" and "includeProperties" parameters.
UpdateModel<TModel>(TModel model, string prefix, string[] includeProperties, string[] excludeProperties)
Suggested Videos
Part 16 - Difference between UpdateModel and TryUpdateModel
Part 17 - Editing a model in mvc
Part 18 - Updating data in mvc
In this video we will discuss, how, unintended updates can happen in mvc. Please watch Part 18, before proceeding. Let's understand this with an example.
At the moment, "Employee Edit" view can be used to change all of the following fields.
1. Name
2. Gender
3. City
4. DateOfBirth
Let's make "Name" non-editable. To achieve this
CHANGE THE FOLLOWING CODE IN EDIT.CSHTML
@Html.EditorFor(model => model.Name)
TO
@Html.DisplayFor(model => model.Name)
@Html.HiddenFor(model => model.Name)
Run the application and edit an employee. Notice that, Name of the employee is no longer rendered using a textbox. At this point we may think, that it is impossible for the user to change the name of the employee using "Edit" view. That is not true. Because of the way we have written our code, tools like Fiddler can be used to very easily change any properties of the "Employee" object.
Fiddler can be downloaded from the following URL
http://fiddler2.com/get-fiddler
After you have downloaded and installed fiddler, run fiddler, and navigate to the following URL
http://localhost/MVCDemo/Employee/Edit/1
In fiddler, in web sessions window, select the url. Under the "Inspectors" tab you can see Request headers and response. We will discuss more about fiddler in a later video session.
Now click on "Save" button on "Edit" view. Notice that, under "Web Sessions" in fiddler, another request is captured for the same URL - http://localhost/MVCDemo/Employee/Edit/1
Now, without using the browser, let' us see how to generate a post request using fiddler.
1. Click on "Composer" tab in fiddler
2. Drag and drop the following URL from "Web Sessions" window onto Composer window.
http://localhost/MVCDemo/Employee/Edit/1
3. In "Reques Body" under "Composer" tab, change "Name" of the employee to "XYZ"
4. Finally click "Execute" button on "Fiddler"
Now either query the database table, or navigate to "Index" view and notice that the employee name is changed to "XYZ".
In our next video, we will discuss preventing these type of un-intended updates.
Suggested Videos
Part 15 - Updatemodel function in MVC
Part 16 - Difference between UpdateModel and TryUpdateModel
Part 17 - Editing a model in mvc
In this video we will discuss updating data in mvc. Please watch Part 17, before proceeding.
Step 1: Create a stored procedure to update employee data.
Create procedure spSaveEmployee
@Id int,
@Name nvarchar(50),
@Gender nvarchar (10),
@City nvarchar (50),
@DateOfBirth DateTime
as
Begin
Update tblEmployee Set
Name = @Name,
Gender = @Gender,
City = @City,
DateOfBirth = @DateOfBirth
Where Id = @Id
End
Step 2: Add the following "SaveEmployee()" method to "EmployeeBusinessLayer" class in "BusinessLayer" project. This method is used to save employee data to the database table.
public void SaveEmmployee(Employee employee)
{
string connectionString =
ConfigurationManager.ConnectionStrings["DBCS"].ConnectionString;
using (SqlConnection con = new SqlConnection(connectionString))
{
SqlCommand cmd = new SqlCommand("spSaveEmployee", con);
cmd.CommandType = CommandType.StoredProcedure;
SqlParameter paramId = new SqlParameter();
paramId.ParameterName = "@Id";
paramId.Value = employee.ID;
cmd.Parameters.Add(paramId);
SqlParameter paramName = new SqlParameter();
paramName.ParameterName = "@Name";
paramName.Value = employee.Name;
cmd.Parameters.Add(paramName);
SqlParameter paramGender = new SqlParameter();
paramGender.ParameterName = "@Gender";
paramGender.Value = employee.Gender;
cmd.Parameters.Add(paramGender);
SqlParameter paramCity = new SqlParameter();
paramCity.ParameterName = "@City";
paramCity.Value = employee.City;
cmd.Parameters.Add(paramCity);
SqlParameter paramDateOfBirth = new SqlParameter();
paramDateOfBirth.ParameterName = "@DateOfBirth";
paramDateOfBirth.Value = employee.DateOfBirth;
cmd.Parameters.Add(paramDateOfBirth);
con.Open();
cmd.ExecuteNonQuery();
}
}
Step 3: Copy and paste the following "Edit" controller action method in "EmployeeController.cs" file.
[HttpPost]
public ActionResult Edit(Employee employee)
{
if (ModelState.IsValid)
{
EmployeeBusinessLayer employeeBusinessLayer =
new EmployeeBusinessLayer();
employeeBusinessLayer.SaveEmmployee(employee);
return RedirectToAction("Index");
}
return View(employee);
}
Please note:
1. This method is decorated with [HttpPost] attribute. So this method only responds to HTTP post request when updating data.
2. The "Edit" action method receives the modified "Employee" object. This object is then passed to SaveEmployee() method, which saves the employee details. After the employee details are saved, the user is redirected to "Index" action.
3. If there are model validation errors, none of the code in the IF block gets executed. In this case, the user stays on the "Edit" view. Since we are passing "Employee" object to the "Edit" view, the user gets to see the validation errors. This allows him to fix those errors and re-submit the view.