Suggested Videos
Part 15 - Updating data in asp.net core razor pages | Text | Slides
Part 16 - File upload in asp.net core razor pages | Text | Slides
Part 17 - Handle multiple forms in asp.net core razor pages | Text | Slides
In this video, we will discuss the use of TempData in ASP.NET core. Let's understand this with an example.
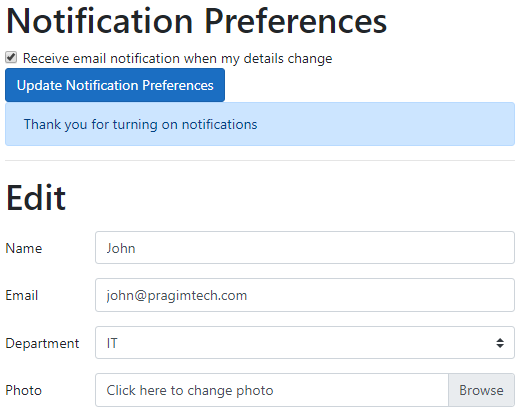
At the moment, on updating notification preferences, the confirmation message is displayed on the same Edit razor page.
Passing query string parameters between razor pages
Instead we want to redirect the request to Details razor page, and then display the confirmation message there. One way to achieve this is by passing the confirmation message as a query string parameter to the Details razor page from the Edit razor page.
Edit.cshtml
The following code that displays the confirmation message on the Edit razor page is no longer required, so please remove it.
@if (!string.IsNullOrEmpty(Model.Message))
{
<div class="alert alert-primary">
@Model.Message
</div>
}
Edit.cshtml.cs
Details.cshtml.cs
Include a public property with name Message. This is the property, the display template will bind to.
Details razor page receives the message as a query string parameter. Model binding will automatically map the query string parameter value in the URL to the public property - Message.
Details.cshtml
Display the value from the Message property
With the above changes, the confirmation message is passed in the URL as a query string parameter.

Why is the query string parameter always in lowercase
This is because we have set LowercaseQueryStrings property of the RouteOptions object to true in ConfigureServices() method of the Startup class.
Problem with query string for this workflow
If a user bookmarks this URL and comes back to it at a later date, he will still see the confirmation message. This could confuse the user. Hang on a minute, I did not change any notification settings, why am I getting this message. This can be easily fixed by using temp data.
Use TempData to pass data between razor pages in ASP.NET Core
Edit.cshtml.cs
Details.cshtml
Display the confirmation message from TempData. As the name implies, TempData is temporary. It's only available for a given request. Once the data is read from TempData, it's deleted and not available for subsequent requests.
For this reason, if we refresh the page or bookmark and visit this page at a later date we will not see the notification confirmation message. This is exactly the behaviour we want, and TempData is perfect for a workflow like this.
Accessing TempData using TempData attribute
One way to access TempData is by using the string key. In our case @TempData["message"]. Alternatively, in the PageModel class, create a public property with the same name as the @TempData key and decorate it with [TempData] attribute.
In the display template, we can now simply use the Message property from the Model.
Can TempData be retained
Yes, there are 2 ways to have TempData retained.
Use TempData.Peek() method. This will not mark TempData for deletion. So it will be available for subsequent requests.
Use TempData.Keep() method. As the name implies Keep() method keeps the temp data value even after it is read. In the following example, only the message key value from the TempData dictionary is retained. All other keys and their values will be deleted once they are read.
If you want to retain the entire TempData dictionary i.e all the keys and their values, use the overloaded version of the Keep() method that does not take any parameters.

Part 15 - Updating data in asp.net core razor pages | Text | Slides
Part 16 - File upload in asp.net core razor pages | Text | Slides
Part 17 - Handle multiple forms in asp.net core razor pages | Text | Slides
In this video, we will discuss the use of TempData in ASP.NET core. Let's understand this with an example.
At the moment, on updating notification preferences, the confirmation message is displayed on the same Edit razor page.
Passing query string parameters between razor pages
Instead we want to redirect the request to Details razor page, and then display the confirmation message there. One way to achieve this is by passing the confirmation message as a query string parameter to the Details razor page from the Edit razor page.
Edit.cshtml
The following code that displays the confirmation message on the Edit razor page is no longer required, so please remove it.
Edit.cshtml.cs
public string Message { get; set; }
public IActionResult OnPostUpdateNotificationPreferences(int id)
{
if (Notify)
{
Message = "Thank you for turning on notifications";
}
else
{
Message = "You have turned off email notifications";
}
// Redirect the request to Details razor page and pass along
// EmployeeID and the message. EmployeeID is passed as route
// parameter and the message is passed as a query string
return RedirectToPage("Details", new { id = id, message = Message });
}
Details.cshtml.cs
Include a public property with name Message. This is the property, the display template will bind to.
[BindProperty(SupportsGet = true )]
public string Message { get; set; }
public string Message { get; set; }
Details razor page receives the message as a query string parameter. Model binding will automatically map the query string parameter value in the URL to the public property - Message.
Details.cshtml
Display the value from the Message property
@if (!string.IsNullOrEmpty(Model.Message))
{
<div class="col-sm-8">
<div class="alert alert-primary">
@Model.Message
</div>
</div>
}
With the above changes, the confirmation message is passed in the URL as a query string parameter.
https://localhost:44383/employees/view/2/?message=thank%20you%20for%20turning%20on%20notifications
Why is the query string parameter always in lowercase
This is because we have set LowercaseQueryStrings property of the RouteOptions object to true in ConfigureServices() method of the Startup class.
public void ConfigureServices(IServiceCollection services)
{
services.AddRazorPages();
services.AddSingleton<IEmployeeRepository, MockEmployeeRepository>();
services.Configure<RouteOptions>(options =>
{
options.LowercaseUrls = true;
// Converts query strings to lowercase
options.LowercaseQueryStrings = true;
options.AppendTrailingSlash = true;
options.ConstraintMap.Add("even", typeof(EvenConstraint));
});
}
{
services.AddRazorPages();
services.AddSingleton<IEmployeeRepository, MockEmployeeRepository>();
services.Configure<RouteOptions>(options =>
{
options.LowercaseUrls = true;
// Converts query strings to lowercase
options.LowercaseQueryStrings = true;
options.AppendTrailingSlash = true;
options.ConstraintMap.Add("even", typeof(EvenConstraint));
});
}
Problem with query string for this workflow
If a user bookmarks this URL and comes back to it at a later date, he will still see the confirmation message. This could confuse the user. Hang on a minute, I did not change any notification settings, why am I getting this message. This can be easily fixed by using temp data.
Use TempData to pass data between razor pages in ASP.NET Core
Edit.cshtml.cs
public string Message { get; set; }
public IActionResult OnPostUpdateNotificationPreferences(int id)
{
if (Notify)
{
Message = "Thank you for turning on notifications";
}
else
{
Message = "You have turned off email notifications";
}
// Store the confirmation message in TempData
TempData["message"] = Message;
// Redirect the request to Details razor page and pass along
// EmployeeID in URL as a route parameter
return RedirectToPage("Details", new { id = id });
}
Details.cshtml
Display the confirmation message from TempData. As the name implies, TempData is temporary. It's only available for a given request. Once the data is read from TempData, it's deleted and not available for subsequent requests.
For this reason, if we refresh the page or bookmark and visit this page at a later date we will not see the notification confirmation message. This is exactly the behaviour we want, and TempData is perfect for a workflow like this.
@if (TempData["message"] != null)
{
<div class="col-sm-8">
<div class="alert alert-primary">
@TempData["message"]
</div>
</div>
}
Accessing TempData using TempData attribute
One way to access TempData is by using the string key. In our case @TempData["message"]. Alternatively, in the PageModel class, create a public property with the same name as the @TempData key and decorate it with [TempData] attribute.
[TempData]
public string Message { get; set; }
public string Message { get; set; }
In the display template, we can now simply use the Message property from the Model.
@if (Model.Message != null)
{
<div class="col-sm-8">
<div class="alert alert-primary">
@Model.Message
</div>
</div>
}
Can TempData be retained
Yes, there are 2 ways to have TempData retained.
Use TempData.Peek() method. This will not mark TempData for deletion. So it will be available for subsequent requests.
@if (TempData.Peek("message") != null)
{
<div class="col-sm-8">
<div class="alert
alert-primary">
@TempData.Peek("message")
</div>
</div>
}
Use TempData.Keep() method. As the name implies Keep() method keeps the temp data value even after it is read. In the following example, only the message key value from the TempData dictionary is retained. All other keys and their values will be deleted once they are read.
TempData.Keep("message");
If you want to retain the entire TempData dictionary i.e all the keys and their values, use the overloaded version of the Keep() method that does not take any parameters.
TempData.Keep();
No comments:
Post a Comment
It would be great if you can help share these free resources