Suggested Videos
Part 1 - Angular project setup | Text | Slides
In this video we will discuss performing the READ operation in Angular. In our upcoming videos, we will discuss the rest of the CRUD operations i.e Creating, Updating and Deleting.
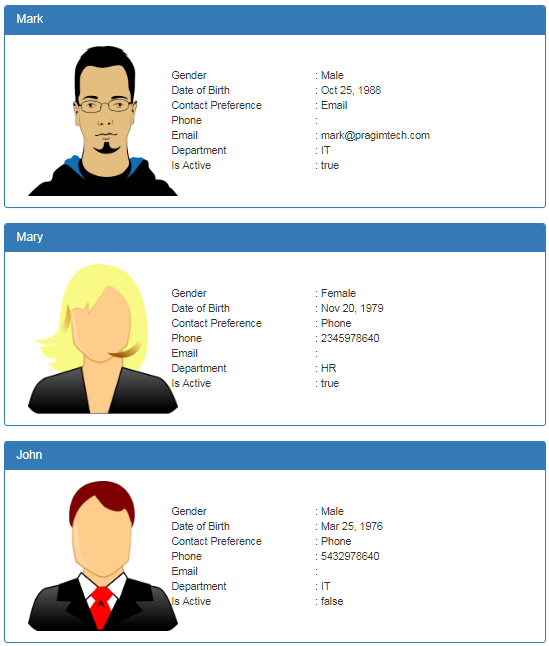
Let us understand implementing the READ operation with an example. We want to display list of employees as shown below.
At the moment, we do not have Employee model. First, let's create the Employee model.
Creating Employee model :
id: number;
name: string;
gender: string;
email?: string;
phoneNumber?: number;
contactPreference: string;
dateOfBirth: Date;
department: string;
isActive: boolean;
photoPath?: string;
}
Next, create a component to display the list of employees. Name it ListEmployeesComponent.
Creating ListEmployeesComponent : Use the following AngularCLI command to create ListEmployeesComponent. We will place all employee CRUD components in "employees" folder. This is the reason we prefixed the "employees" folder name in the command. Also, notice we have set --flat option to true as we do not want to place the ListEmployeesComponent files in it's own dedicated folder.
ng g c employees/listEmployees --spec false --flat true
The above command not only creates the ListEmployeesComponent, it also updates the AppModule. In the app.module.ts file it has imported ListEmployeesComponent and included it in the declarations array. So the Angular CLI has generated lot of boiler plate code, that we would have to write manually otherwise.
Creating images folder : We will place all the images that we are going to use in "images" folder. We will have the images folder in the "assets" folder. So add a new folder in the "assets" folder and name it "images" and copy the following 3 images. Name the images mark.png, mary.png and john.png.


Changes in list-employees.component.ts : The changes are commented and self-explanatory
Changes in list-employees.component.html : Replace the existing HTML, with the following HTML. Notice we are using Bootstrap for styling.
Changes in list-employees.component.css : Include the following CSS classes
Changes in app.component.html : Include the ListEmployeesComponent selector (app-list-employees) as a directive in the root component (app.component.html)
At this point, save all the changes and run the angular project using the following command. This command not only compiles the angular application, it also launches your default browser and displays the list of employees as expected.
ng serve -o
We have just seen how to perform the READ operation. In our next video, we will set up routing.

Part 1 - Angular project setup | Text | Slides
In this video we will discuss performing the READ operation in Angular. In our upcoming videos, we will discuss the rest of the CRUD operations i.e Creating, Updating and Deleting.
Let us understand implementing the READ operation with an example. We want to display list of employees as shown below.
At the moment, we do not have Employee model. First, let's create the Employee model.
Creating Employee model :
- In Visual Studio Code, expand the "src" folder
- Right click on the "App" folder, and select "New Folder" from the context menu
- Name the folder "models". We will place all our models in this folder
- Now add a new file in the "models" folder
- Name it "employee.model.ts"
- Copy and paste the following code in it
id: number;
name: string;
gender: string;
email?: string;
phoneNumber?: number;
contactPreference: string;
dateOfBirth: Date;
department: string;
isActive: boolean;
photoPath?: string;
}
Next, create a component to display the list of employees. Name it ListEmployeesComponent.
Creating ListEmployeesComponent : Use the following AngularCLI command to create ListEmployeesComponent. We will place all employee CRUD components in "employees" folder. This is the reason we prefixed the "employees" folder name in the command. Also, notice we have set --flat option to true as we do not want to place the ListEmployeesComponent files in it's own dedicated folder.
ng g c employees/listEmployees --spec false --flat true
The above command not only creates the ListEmployeesComponent, it also updates the AppModule. In the app.module.ts file it has imported ListEmployeesComponent and included it in the declarations array. So the Angular CLI has generated lot of boiler plate code, that we would have to write manually otherwise.
Creating images folder : We will place all the images that we are going to use in "images" folder. We will have the images folder in the "assets" folder. So add a new folder in the "assets" folder and name it "images" and copy the following 3 images. Name the images mark.png, mary.png and john.png.


Changes in list-employees.component.ts : The changes are commented and self-explanatory
import
{ Component, OnInit } from '@angular/core';
// import Employee Model
import
{ Employee } from '../models/employee.model';
@Component({
selector: 'app-list-employees',
templateUrl: './list-employees.component.html',
styleUrls: ['./list-employees.component.css']
})
export
class ListEmployeesComponent implements
OnInit {
// Hard code the employee data. In a later video we
will discuss
// how to retrieve this employees data from a
database table
employees: Employee[] = [
{
id: 1,
name: 'Mark',
gender: 'Male',
contactPreference: 'Email',
email: 'mark@pragimtech.com',
dateOfBirth: new Date('10/25/1988'),
department: 'IT',
isActive: true,
photoPath: 'assets/images/mark.png'
},
{
id: 2,
name: 'Mary',
gender: 'Female',
contactPreference: 'Phone',
phoneNumber: 2345978640,
dateOfBirth: new Date('11/20/1979'),
department: 'HR',
isActive: true,
photoPath: 'assets/images/mary.png'
},
{
id: 3,
name: 'John',
gender: 'Male',
contactPreference: 'Phone',
phoneNumber: 5432978640,
dateOfBirth: new Date('3/25/1976'),
department: 'IT',
isActive: false,
photoPath: 'assets/images/john.png'
},
];
constructor() { }
ngOnInit() {
}
}
Changes in list-employees.component.html : Replace the existing HTML, with the following HTML. Notice we are using Bootstrap for styling.
<div
class="panel
panel-primary" *ngFor="let
employee of employees">
<div class="panel-heading">
<h3 class="panel-title">{{employee.name}}</h3>
</div>
<div class="panel-body">
<div class="col-xs-10">
<div class="row
vertical-align">
<div class="col-xs-4">
<img
class="imageClass"
[src]="employee.photoPath"
/>
</div>
<div class="col-xs-8">
<div
class="row">
<div
class="col-xs-6">
Gender
</div>
<div
class="col-xs-6">
: {{employee.gender}}
</div>
</div>
<div
class="row">
<div
class="col-xs-6">
Date of Birth
</div>
<div
class="col-xs-6">
: {{employee.dateOfBirth | date}}
</div>
</div>
<div
class="row">
<div
class="col-xs-6">
Contact Preference
</div>
<div
class="col-xs-6">
: {{employee.contactPreference}}
</div>
</div>
<div
class="row">
<div
class="col-xs-6">
Phone
</div>
<div
class="col-xs-6">
: {{employee.phoneNumber}}
</div>
</div>
<div
class="row">
<div
class="col-xs-6">
Email
</div>
<div
class="col-xs-6">
: {{employee.email}}
</div>
</div>
<div
class="row">
<div
class="col-xs-6">
Department
</div>
<div
class="col-xs-6">
: {{employee.department}}
</div>
</div>
<div
class="row">
<div
class="col-xs-6">
Is Active
</div>
<div
class="col-xs-6">
: {{employee.isActive}}
</div>
</div>
</div>
</div>
</div>
</div>
</div>
Changes in list-employees.component.css : Include the following CSS classes
.imageClass{
width:200px;
height:200px;
}
.vertical-align{
display: flex;
align-items: center;
}
Changes in app.component.html : Include the ListEmployeesComponent selector (app-list-employees) as a directive in the root component (app.component.html)
<div
class="container">
<app-list-employees></app-list-employees>
</div>
At this point, save all the changes and run the angular project using the following command. This command not only compiles the angular application, it also launches your default browser and displays the list of employees as expected.
ng serve -o
We have just seen how to perform the READ operation. In our next video, we will set up routing.
awesome detailed and easy to understand tutorial!!! your tutorials are very helpful for beginners too. appreciate it
ReplyDeleteFantastic demonstration!
ReplyDeleteYour Clarity and way of teaching the Concepts leaves an Impact..great Job!!!
ReplyDeletereally really helpfull for learn angular crud
ReplyDeletevery simple and clean code to understand.
ReplyDeleteHi Sir,
ReplyDeleteI am unable to link images in our components html with assets images...can you please help
ng g c employees/listEmployees --skipTests=true --flat=true
ReplyDeleteng g c employees/listEmployees --flat=true
ReplyDelete