Suggested Videos
Part 87 - jquery selectmenu widget
Part 88 - jQuery selectmenu from database
Part 89 - jquery dialog widget
In this video we will discuss, how to save jQuery modal dialog data to a database table.
We will be using the following tblEmployees table in this demo

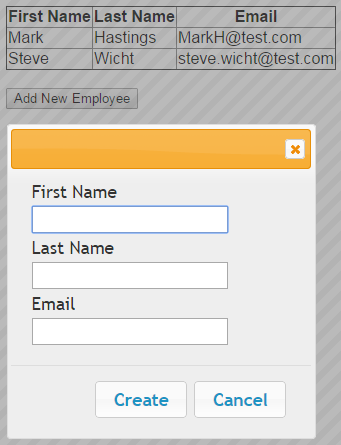
Here is what we want to achieve
1. When the page initially loads, retrieve all the employee rows from the database and display them in a table on the web page
2. When "Add New Employee" button is clicked, jQuery modal popup should be displayed
3. After entering the employee details, and when "Create" button is clicked, the data should be saved to the database and the popup should close automatically
4. The newly added employee should be displayed in the table on the web page
5. If the cancel button ic clicked the dialog should be closed without adding the employee to the database
Step 1 : Create SQL Server table and insert test employee data
Step 2 : Create stored procedures to insert and retrieve employees
Step 3 : Create new asp.net web application project. Name it Demo.
Step 4 : Include a connection string in the web.config file to your database.
Step 5 : Add a class file to the project. Name it Employee.cs. Copy and paste the following code.
Step 6 : Add a new WebService (ASMX). Name it EmployeeService.asmx. Copy and paste the following code.
Step 7 : Add a WebForm to the ASP.NET project. Copy and paste the following HTML and jQuery code

Part 87 - jquery selectmenu widget
Part 88 - jQuery selectmenu from database
Part 89 - jquery dialog widget
In this video we will discuss, how to save jQuery modal dialog data to a database table.
We will be using the following tblEmployees table in this demo
Here is what we want to achieve
1. When the page initially loads, retrieve all the employee rows from the database and display them in a table on the web page
2. When "Add New Employee" button is clicked, jQuery modal popup should be displayed
3. After entering the employee details, and when "Create" button is clicked, the data should be saved to the database and the popup should close automatically
4. The newly added employee should be displayed in the table on the web page
5. If the cancel button ic clicked the dialog should be closed without adding the employee to the database
Step 1 : Create SQL Server table and insert test employee data
Create table tblEmployees
(
ID int primary
key identity,
FirstName nvarchar(50),
LastName nvarchar(50),
Email nvarchar(50)
)
Go
Insert into tblEmployees values ('Mark', 'Hastings', 'MarkH@test.com')
Insert into tblEmployees values ('Steve', 'Wicht', 'steve.wicht@test.com')
Go
Step 2 : Create stored procedures to insert and retrieve employees
Create procedure spInsertEmployee
@FirstName nvarchar(50),
@LastName nvarchar(50),
@Email nvarchar(50)
as
Begin
Insert into
tblEmployees
values (@FirstName, @LastName, @Email)
End
Create procedure spGetEmployees
as
Begin
Select *
from tblEmployees
End
Step 3 : Create new asp.net web application project. Name it Demo.
Step 4 : Include a connection string in the web.config file to your database.
<add name="DBCS"
connectionString="server=.;database=SampleDB;integrated security=SSPI"/>
Step 5 : Add a class file to the project. Name it Employee.cs. Copy and paste the following code.
namespace Demo
{
public class Employee
{
public int Id { get; set; }
public string FirstName { get; set; }
public string LastName { get; set; }
public string Email { get; set; }
}
}
Step 6 : Add a new WebService (ASMX). Name it EmployeeService.asmx. Copy and paste the following code.
using System.Collections.Generic;
using System.Configuration;
using System.Data;
using System.Data.SqlClient;
using System.Web.Script.Serialization;
using System.Web.Services;
namespace Demo
{
[WebService(Namespace = "http://tempuri.org/")]
[WebServiceBinding(ConformsTo = WsiProfiles.BasicProfile1_1)]
[System.ComponentModel.ToolboxItem(false)]
[System.Web.Script.Services.ScriptService]
public class EmployeeService : System.Web.Services.WebService
{
[WebMethod]
public void SaveEmployee(Employee employee)
{
string cs = ConfigurationManager.ConnectionStrings["DBCS"].ConnectionString;
using (SqlConnection con = new SqlConnection(cs))
{
SqlCommand cmd = new SqlCommand("spInsertEmployee", con);
cmd.CommandType = CommandType.StoredProcedure;
SqlParameter paramFirstName = new SqlParameter()
{
ParameterName = "@FirstName",
Value = employee.FirstName
};
cmd.Parameters.Add(paramFirstName);
SqlParameter paramLastName = new SqlParameter()
{
ParameterName = "@LastName",
Value = employee.LastName
};
cmd.Parameters.Add(paramLastName);
SqlParameter paramEmail = new SqlParameter()
{
ParameterName = "@Email",
Value = employee.Email
};
cmd.Parameters.Add(paramEmail);
con.Open();
cmd.ExecuteNonQuery();
}
}
[WebMethod]
public void GetEmployees()
{
string cs = ConfigurationManager.ConnectionStrings["DBCS"].ConnectionString;
List<Employee> listEmployee = new List<Employee>();
using (SqlConnection con = new SqlConnection(cs))
{
SqlCommand cmd = new SqlCommand("spGetEmployees", con);
cmd.CommandType = CommandType.StoredProcedure;
con.Open();
SqlDataReader rdr = cmd.ExecuteReader();
while (rdr.Read())
{
Employee employee = new Employee();
employee.FirstName = rdr["FirstName"].ToString();
employee.LastName = rdr["LastName"].ToString();
employee.Email = rdr["Email"].ToString();
listEmployee.Add(employee);
}
}
JavaScriptSerializer js = new JavaScriptSerializer();
Context.Response.Write(js.Serialize(listEmployee));
}
}
}
Step 7 : Add a WebForm to the ASP.NET project. Copy and paste the following HTML and jQuery code
<%@ Page Language="C#" AutoEventWireup="true"
CodeBehind="WebForm1.aspx.cs" Inherits="Demo.WebForm1" %>
<!DOCTYPE html>
<html xmlns="http://www.w3.org/1999/xhtml">
<head runat="server">
<title></title>
<script src="jquery-1.11.2.js"></script>
<script src="jquery-ui.js"></script>
<link href="jquery-ui.css" rel="stylesheet" />
<script type="text/javascript">
$(document).ready(function () {
var dialogDiv = $('#dialog');
dialogDiv.dialog({
autoOpen: false,
modal: true,
buttons: {
'Create': CreateEmployee,
'Cancel': function () {
dialogDiv.dialog('close');
clearInputFields();
}
}
});
function CreateEmployee() {
var emp = {};
emp.FirstName = $('#txtFirstName').val();
emp.LastName = $('#txtLastName').val();
emp.Email = $('#txtEmail').val();
$.ajax({
url: 'EmployeeService.asmx/SaveEmployee',
method: 'post',
data: '{ employee:' +
JSON.stringify(emp) + '}',
contentType: 'application/json; charset=utf-8',
dataType: 'json',
success: function () {
loadEmployees();
dialogDiv.dialog('close');
clearInputFields();
}
});
}
function loadEmployees() {
var tboby = $('#employees
tbody');
tboby.empty();
$.ajax({
url: 'EmployeeService.asmx/GetEmployees',
method: 'post',
dataType: 'json',
success: function (data) {
$(data).each(function () {
var tr = $('<tr></tr>')
tr.append('<td>' + this.FirstName + '</td>')
tr.append('<td>' + this.LastName + '</td>')
tr.append('<td>' + this.Email + '</td>')
tboby.append(tr);
})
}
});
}
function clearInputFields() {
$('#dialog input[type="text"]').val('');
}
$('#btnAddEmployee').click(function () {
dialogDiv.dialog("open");
});
loadEmployees();
});
</script>
</head>
<body style="font-family:
Arial">
<form id="form1" runat="server">
<div id="dialog">
<table>
<tr>
<td>First Name</td>
</tr>
<tr>
<td><input type="text" id="txtFirstName" /></td>
</tr>
<tr>
<td>Last Name</td>
</tr>
<tr>
<td><input type="text" id="txtLastName" /></td>
</tr>
<tr>
<td>Email</td>
</tr>
<tr>
<td><input type="text" id="txtEmail" /></td>
</tr>
</table>
</div>
<table id="employees" style="border-collapse: collapse" border="1">
<thead>
<tr>
<th>First Name</th>
<th>Last Name</th>
<th>Email</th>
</tr>
</thead>
<tbody>
</tbody>
</table>
<br />
<input type="button" id="btnAddEmployee" value="Add New
Employee" />
</form>
</body>
</html>
sir
ReplyDeletei am trying to run this in a cordova app in visual studio,
the load event is working but the save event is not working
please help
Dear sir it's not working for me for save event.and give me the error
ReplyDeleteSystem.InvalidOperationException: SEmployee Web Service method name is not valid.
at System.Web.Services.Protocols.HttpServerProtocol.Initialize()
at System.Web.Services.Protocols.ServerProtocolFactory.Create(Type type, HttpContext context, HttpRequest request, HttpResponse response, Boolean& abortProcessing)
kindly guide me
thanks
Dear sir,
ReplyDeleteKindly help me. i do same like your code but it's give me error message on create button and data is not send to server. and the error is SEmployee Web Service method name is not valid.