Suggested Videos
Part 9 - Overriding stored procedure defaults with entity frameowrk code first approach
Part 10 - Entity splitting in entity framework
Part 11 - Entity splitting in entity framework with code first approach
In this video we will discuss Table splitting in entity framework with database first approach. Table Splitting is the opposite of Entity Splitting.
We discussed Entity Splitting in Part 10 and 11 of Entity Framework tutorial.
Entity Splitting refers to mapping an entity to two or more tables when the tables share a common key.
Mapping multiple entities to a single table is called table splitting.
One common entity framework interview question is, What is the main reason for using Table Splitting?
Table Splitting is useful when you want to delay the loading of some properties with large data when using lazy loading.
For example, if you have Employee entity and if it contains Photo property that would return large binary data, and if we use this Photo property only on a few pages in our application, then it does not make sense from a performance perspective to load this property every time we load the Employee entity. Using lazy loading load it only on the pages where we need to display Employee photo.
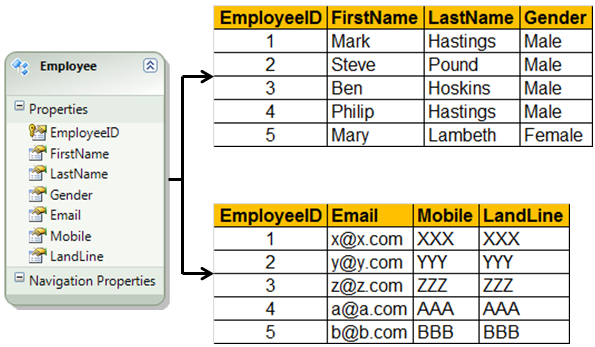
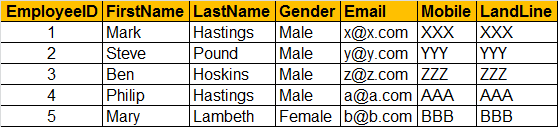
We will be using the following Employees table
SQL script to create the table
Now, when we use ADO.NET Entity Framework to generate entities from the database using database first approach, by default one entity will be created, i.e Empoyee entity.

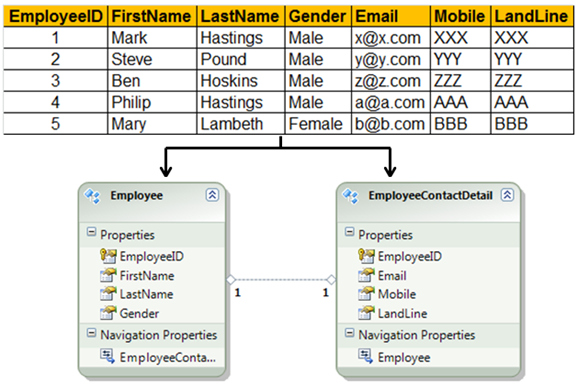
Let's say, we will not be using Email, Mobile and Landline properties as often as we would be using FirstName, LastName, and Gender properties. If all of these properties are present in one Employee entity, then every time we load this entity, all the properties will be automatically loaded. So let's create 2 entities (Employee & EmployeeContactDetail). This enables us to load EmployeeContactDetails only when needed.
To achieve this:
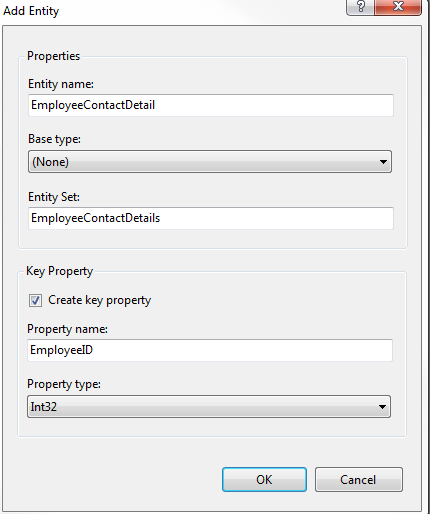
1. Right click on the entity designer and select "Add Entity" option from the context menu. Set
a) Entity Name = EmployeeContactDetail
b) Bae type = (None)
c) Entity Set = EmployeeContactDetails
d) Create Key Property = Checked
e) Property Name = EmployeeID
2. Cut Email, Mobile and LandLine properties from Employee entity and paste them in EmployeeContactDetail entity
3. Right click on the entity designer and select "Add - Association" option from the context menu. Fill the details shown below.

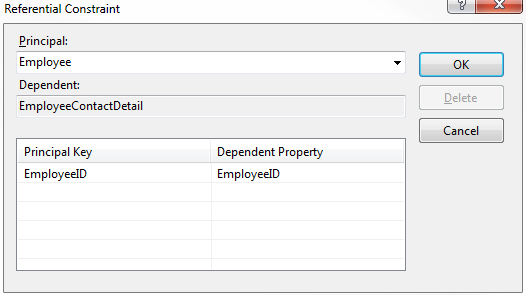
4. Right click on the association and select "Properties". In the Properties window, click on the ellipsis button next to "Referential Constraint" property and fill in the details as shown below.
5. Right click on "EmployeeContactDetail" entity and select "Table Mapping" option from the context menu. Select "Employees" table and map EmployeeId, Email, Mobile and Landline properties of the entity to the respective columns of the table.

6. Add a webform. Copy and paste the following HTML in the ASPX page.
7. Copy and paste the following code in the code-behind file.
At this point, run the application and when you retrieve Employees without checking "Include Contact Details" checkbox, the following query is generated by the entity framework. Use SQL Profiler to view the generated query. Notice that Email, Mobile and LandLine column values are not loaded.
When you check "Include Contact Details" checkbox, the following query is generated

Part 9 - Overriding stored procedure defaults with entity frameowrk code first approach
Part 10 - Entity splitting in entity framework
Part 11 - Entity splitting in entity framework with code first approach
In this video we will discuss Table splitting in entity framework with database first approach. Table Splitting is the opposite of Entity Splitting.
We discussed Entity Splitting in Part 10 and 11 of Entity Framework tutorial.
Entity Splitting refers to mapping an entity to two or more tables when the tables share a common key.
Mapping multiple entities to a single table is called table splitting.
One common entity framework interview question is, What is the main reason for using Table Splitting?
Table Splitting is useful when you want to delay the loading of some properties with large data when using lazy loading.
For example, if you have Employee entity and if it contains Photo property that would return large binary data, and if we use this Photo property only on a few pages in our application, then it does not make sense from a performance perspective to load this property every time we load the Employee entity. Using lazy loading load it only on the pages where we need to display Employee photo.
We will be using the following Employees table
SQL script to create the table
Create table Employees
(
EmployeeID int primary key identity,
FirstName nvarchar(50),
LastName nvarchar(50),
Gender nvarchar(50),
Email nvarchar(50),
Mobile nvarchar(50),
LandLine nvarchar(50)
)
Insert into Employees values ('Mark', 'Hastings', 'Male', 'x@x.com', 'XXX', 'XXX')
Insert into Employees values ('Steve', 'Pound', 'Male', 'y@y.com', 'YYY', 'YYY')
Insert into Employees values ('Ben', 'Hoskins', 'Male', 'z@z.com', 'ZZZ', 'ZZZ')
Insert into Employees values ('Philip', 'Hastings', 'Male', 'a@a.com', 'AAA', 'AAA')
Insert into Employees values ('Mary', 'Lambeth', 'Female', 'b@b.com', 'BBB', 'BBB')
Now, when we use ADO.NET Entity Framework to generate entities from the database using database first approach, by default one entity will be created, i.e Empoyee entity.
Let's say, we will not be using Email, Mobile and Landline properties as often as we would be using FirstName, LastName, and Gender properties. If all of these properties are present in one Employee entity, then every time we load this entity, all the properties will be automatically loaded. So let's create 2 entities (Employee & EmployeeContactDetail). This enables us to load EmployeeContactDetails only when needed.
To achieve this:
1. Right click on the entity designer and select "Add Entity" option from the context menu. Set
a) Entity Name = EmployeeContactDetail
b) Bae type = (None)
c) Entity Set = EmployeeContactDetails
d) Create Key Property = Checked
e) Property Name = EmployeeID
2. Cut Email, Mobile and LandLine properties from Employee entity and paste them in EmployeeContactDetail entity
3. Right click on the entity designer and select "Add - Association" option from the context menu. Fill the details shown below.
4. Right click on the association and select "Properties". In the Properties window, click on the ellipsis button next to "Referential Constraint" property and fill in the details as shown below.
5. Right click on "EmployeeContactDetail" entity and select "Table Mapping" option from the context menu. Select "Employees" table and map EmployeeId, Email, Mobile and Landline properties of the entity to the respective columns of the table.
6. Add a webform. Copy and paste the following HTML in the ASPX page.
<div style="font-family:Arial">
<asp:CheckBox ID="checkBoxIncludeContactDetails"
Text="Include Contact Details" runat="server" />
<br />
<asp:Button ID="Button1" runat="server" Text="Get Employee Data"
onclick="Button1_Click" />
<asp:GridView ID="GridView1" runat="server">
</asp:GridView>
</div>
7. Copy and paste the following code in the code-behind file.
public partial class WebForm1 : System.Web.UI.Page
{
private DataTable GetEmployeeData()
{
EmployeeDBContext employeeDBContext = new EmployeeDBContext();
List<Employee> employees
= employeeDBContext.Employees.ToList();
DataTable dataTable = new
DataTable();
DataColumn[] columns = { new
DataColumn("EmployeeID"),
new DataColumn("FirstName"),
new DataColumn("LastName"),
new DataColumn("Gender")};
dataTable.Columns.AddRange(columns);
foreach (Employee employee in employees)
{
DataRow dr = dataTable.NewRow();
dr["EmployeeID"]
= employee.EmployeeID;
dr["FirstName"]
= employee.FirstName;
dr["LastName"]
= employee.LastName;
dr["Gender"]
= employee.Gender;
dataTable.Rows.Add(dr);
}
return dataTable;
}
private DataTable GetEmployeeDataIncludingContactDetails()
{
EmployeeDBContext employeeDBContext = new EmployeeDBContext();
List<Employee> employees
= employeeDBContext.Employees
.Include("EmployeeContactDetail").ToList();
DataTable dataTable = new
DataTable();
DataColumn[] columns = { new
DataColumn("EmployeeID"),
new DataColumn("FirstName"),
new DataColumn("LastName"),
new DataColumn("Gender"),
new DataColumn("Email"),
new DataColumn("Mobile"),
new DataColumn("LandLine") };
dataTable.Columns.AddRange(columns);
foreach (Employee employee in employees)
{
DataRow dr = dataTable.NewRow();
dr["EmployeeID"]
= employee.EmployeeID;
dr["FirstName"]
= employee.FirstName;
dr["LastName"]
= employee.LastName;
dr["Gender"]
= employee.Gender;
dr["Email"]
= employee.EmployeeContactDetail.Email;
dr["Mobile"]
= employee.EmployeeContactDetail.Mobile;
dr["LandLine"]
= employee.EmployeeContactDetail.LandLine;
dataTable.Rows.Add(dr);
}
return dataTable;
}
protected void Button1_Click(object sender, EventArgs
e)
{
if (checkBoxIncludeContactDetails.Checked)
{
GridView1.DataSource = GetEmployeeDataIncludingContactDetails();
}
else
{
GridView1.DataSource = GetEmployeeData();
}
GridView1.DataBind();
}
}
At this point, run the application and when you retrieve Employees without checking "Include Contact Details" checkbox, the following query is generated by the entity framework. Use SQL Profiler to view the generated query. Notice that Email, Mobile and LandLine column values are not loaded.
SELECT
[Extent1].[EmployeeID] AS
[EmployeeID],
[Extent1].[FirstName] AS
[FirstName],
[Extent1].[LastName] AS
[LastName],
[Extent1].[Gender] AS [Gender]
FROM [dbo].[Employees] AS
[Extent1]
When you check "Include Contact Details" checkbox, the following query is generated
SELECT
[Extent1].[EmployeeID] AS
[EmployeeID],
[Extent1].[FirstName] AS
[FirstName],
[Extent1].[LastName] AS
[LastName],
[Extent1].[Gender] AS [Gender],
[Extent1].[Email] AS [Email],
[Extent1].[Mobile] AS [Mobile],
[Extent1].[LandLine] AS
[LandLine]
FROM [dbo].[Employees] AS
[Extent1]
No comments:
Post a Comment
It would be great if you can help share these free resources