Suggested Videos
Part 7 - Using stored procedures with entity framework
Part 8 - Using stored procedures with entity frameowrk code first approach
Part 9 - Overriding stored procedure defaults with entity frameowrk code first approach
Entity splitting refers to mapping an entity to two or more tables when the tables share a common key. Let us understand Entity splitting with an example.
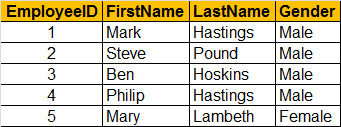
We have the following 2 tables. Notice that both the table share the common key - EmployeeID.
Employees Table

EmployeeContactDetails Table

SQL Script to create the database objects and populate them with test data
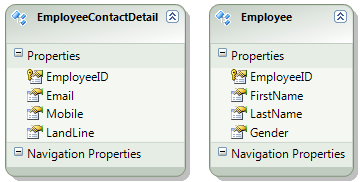
Now, when we use ADO.NET Entity Framework to generate entities from the database using database first approach, by default 2 entities will be created, i.e Empoyee and EmployeeContactDetail entities.

There is a one to one mapping between tables and entities. We want a single Employee to map to both Employees & EmployeeContactDetails table.
To achieve this
1. Cut Email, Mobile and LandLine properties from EmployeeContactDetail entity and paste them in Employee entity
2. Delete EmployeeContactDetail entity. On "Delete Unmapped Tables and Views" window click NO.
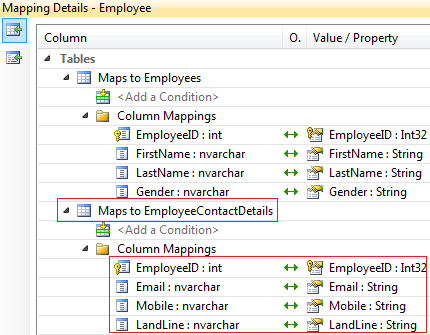
3. Right click on Employee entity and select "Table Mapping" option from the context menu. Map EmployeeId, Email, Mobile and LandLine properties to the respective columns of EmployeeContactDetails table.

At this point we have only one Entity. Build the solution. Add a WebForm. Drag and drop the following 3 controls.
1. GridView
2. DetailsView
3. EntityDataSource
Configure EntityDataSource control
a). Right click on EntityDataSource control and select "Show Smart Tag" option
b) Click on Configure Data Source link
c) Select EmployeeDBContext from the Named Connection dropdownlist and click Next
d) Select Employees from EntitySetName dropdownlist and enable Inserts, Updates and Deletes.
Configure GridView control
a). Right click on GridView control and select "Show Smart Tag" option
b) Click on "Auto Format" link and select "Colourful" scheme
c) Select "EntityDataSource1" from "Choose Data Source" dropdownlist
d) Select Enable Editing and Enable Deleting checkboxes
Configure DetailsView control
a) Right click on DetailsView control and select "Show Smart Tag" option
b) Click on "Auto Format" link and select "Colourful" scheme
c) Select "EntityDataSource1" from "Choose Data Source" dropdownlist
d) Select Enable Inserting checkbox
e) Set DeafultMode=Insert. Use properties window to set this.
f) Set InsertVisible="false" for the EmployeeID BoundField. You can do this directly in the HTML Source.
g) Generate ItemInserted event handler method for DetailsView control. Copy and paste the following code.
At this point run the application. Insert, update and delete an Employee, and notice that both the tables (Employees and EmployeeContactDetails) are updated as expected.

Part 7 - Using stored procedures with entity framework
Part 8 - Using stored procedures with entity frameowrk code first approach
Part 9 - Overriding stored procedure defaults with entity frameowrk code first approach
Entity splitting refers to mapping an entity to two or more tables when the tables share a common key. Let us understand Entity splitting with an example.
We have the following 2 tables. Notice that both the table share the common key - EmployeeID.
Employees Table

EmployeeContactDetails Table

SQL Script to create the database objects and populate them with test data
Create table Employees
(
EmployeeID int primary key identity,
FirstName nvarchar(50),
LastName nvarchar(50),
Gender nvarchar(50)
)
GO
Create table EmployeeContactDetails
(
EmployeeID int primary key,
Email nvarchar(50),
Mobile nvarchar(50),
LandLine nvarchar(50)
)
GO
Insert into Employees values ('Mark', 'Hastings', 'Male')
Insert into Employees values ('Steve', 'Pound', 'Male')
Insert into Employees values ('Ben', 'Hoskins', 'Male')
Insert into Employees values ('Philip', 'Hastings', 'Male')
Insert into Employees values ('Mary', 'Lambeth', 'Female')
Insert into EmployeeContactDetails values
(1, 'Mark@pragimtech.com', '111111111', '111111111')
Insert into EmployeeContactDetails values
(2, 'Steve@pragimtech.com', '2222222222', '2222222222')
Insert into EmployeeContactDetails values
(3, 'Ben@pragimtech.com', '3333333333', '3333333333')
Insert into EmployeeContactDetails values
(4, 'Philip@pragimtech.com', '44444444444', '44444444444')
Insert into EmployeeContactDetails values
(5, 'Mary@pragimtech.com', '5555555555', '5555555555')
Now, when we use ADO.NET Entity Framework to generate entities from the database using database first approach, by default 2 entities will be created, i.e Empoyee and EmployeeContactDetail entities.

There is a one to one mapping between tables and entities. We want a single Employee to map to both Employees & EmployeeContactDetails table.
To achieve this
1. Cut Email, Mobile and LandLine properties from EmployeeContactDetail entity and paste them in Employee entity
2. Delete EmployeeContactDetail entity. On "Delete Unmapped Tables and Views" window click NO.
3. Right click on Employee entity and select "Table Mapping" option from the context menu. Map EmployeeId, Email, Mobile and LandLine properties to the respective columns of EmployeeContactDetails table.

At this point we have only one Entity. Build the solution. Add a WebForm. Drag and drop the following 3 controls.
1. GridView
2. DetailsView
3. EntityDataSource
Configure EntityDataSource control
a). Right click on EntityDataSource control and select "Show Smart Tag" option
b) Click on Configure Data Source link
c) Select EmployeeDBContext from the Named Connection dropdownlist and click Next
d) Select Employees from EntitySetName dropdownlist and enable Inserts, Updates and Deletes.
Configure GridView control
a). Right click on GridView control and select "Show Smart Tag" option
b) Click on "Auto Format" link and select "Colourful" scheme
c) Select "EntityDataSource1" from "Choose Data Source" dropdownlist
d) Select Enable Editing and Enable Deleting checkboxes
Configure DetailsView control
a) Right click on DetailsView control and select "Show Smart Tag" option
b) Click on "Auto Format" link and select "Colourful" scheme
c) Select "EntityDataSource1" from "Choose Data Source" dropdownlist
d) Select Enable Inserting checkbox
e) Set DeafultMode=Insert. Use properties window to set this.
f) Set InsertVisible="false" for the EmployeeID BoundField. You can do this directly in the HTML Source.
g) Generate ItemInserted event handler method for DetailsView control. Copy and paste the following code.
protected void DetailsView1_ItemInserted(object sender, DetailsViewInsertedEventArgs
e)
{
GridView1.DataBind();
}
At this point run the application. Insert, update and delete an Employee, and notice that both the tables (Employees and EmployeeContactDetails) are updated as expected.

An item with the same key has already been added. i got this error
ReplyDeletei am waiting for the solution....Assaf by any chance did u get the solution?
DeleteFirst i made employeeId in Employeecontactdetails as idenetity then I too got the same error. so i deleted tables and edmx file and created again as venkat sir told then it works fine
Deletejust add foreign key in EmployeeContactDetails.
DeleteHere is the updated script for EmplyeeContactDetails:
DeleteCreate table EmployeeContactDetails
(
EmployeeID int primary key,
Email nvarchar(50),
Mobile nvarchar(50),
LandLine nvarchar(50),
CONSTRAINT fk_pk_empid FOREIGN KEY(EmployeeID) REFERENCES Employees(EmployeeID)
)
GO
I changed the table definitions and it worked just fine, i just set a foreign key reference in EmployeeContactDetails table:
ReplyDeleteCreate table Employees
(
EmployeeID int primary key identity,
FirstName nvarchar(50),
LastName nvarchar(50),
Gender nvarchar(50)
)
GO
Create table EmployeeContactDetails
(
EmployeeID int primary key,
foreign key (EmployeeID) references Employees (EmployeeID),
Email nvarchar(50),
Mobile nvarchar(50),
LandLine nvarchar(50)
)
GO
yes..just need to add foreign key refrence to primark key of EmployeeContactdetails
DeleteAdded foreign key, still getting the same error. Anybody here facing same problem?
ReplyDeleteYes facing same problem what the solution (An item with the same key has already been added.)
ReplyDeleteRight click on Employee Entity in edmx file and select "Update Model from Database".
DeleteThank you.
DeleteI changed the table 'EmployeeContactDetails' as it is recommended here , then I did as you recommended and it works.
we also had this error and we added FK 2016
ReplyDeleteI hv also same issue what to do?
ReplyDeleteI had problems in VS2015 earlier before I re-did the table designs with the foreign key. -->Carefully<-- re-do your example:
ReplyDelete1) Go to SQL Server, delete the two tables, then run the script that creates tables with the foreign key constraint. Now populate your data.
2) Return to Visual Studio, right click on EmployeeModel.edmx then delete it from the project.
3) Goto web.config and remove entry in the connection strings originally used (like EmployeeDBContext).
4) Recreate the EmployeeModel.edmx going through tutorial steps precisely. NOTE--You should see relationship/connection between tables on the design surface. Follow the exact steps as shown in the video.
5) Review/Redo the settings on your web form controls (EntityDataSource, GridView, DetailView) -- verify all the steps.
6) When I run the webform, insert/update/delete all work now as expected. When I short-cut any steps, I encountered mysterious errors. The critical point is to start over with the table designs. Nothing else worked without re-creating the tables and going through the steps again.
i face problem, gridview1 is not updated directly after inserting, i have to refresh webform1
ReplyDelete