Suggested Videos
Part 4 - Customizing table & column names
Part 5 - How to handle model changes in entity framework
Part 6 - How to seed database with test data using entity framework
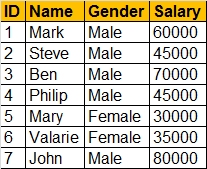
In this video we will discuss using our own custom stored procedures to perform Insert, Update and Delete operations using entity framework. We will be using the following Employees table for this demo.

Step 1: Use the following SQL Script to create and populate Employee table.
Step 2: Create Insert, Update and Delete stored procedures
Step 3: Create a new empty asp.net web application
Step 4: Add a new ADO.NET Entity Data Model.
a) On Choose Model Contents screen select "Generate from database" option and click Next

b) On "Choose Your Data Connections" screen give a meaningful name for the connection string that will be stored in the web.config file. I have named it EmployeeDBContext. Click Next.

c) On "Choose Your Database Objects" screen, select Employees Table and the 3 stored procedures (InsertEmployee, UpdateEmployee, DeleteEmployee). Provide a meaningful name for the Model namespace. I have named it EmployeeModel. CLick Finish.

At this point on the ADO.NET Entity Model designer surface, we should be able to see the Employee entity but not the stored procedures.
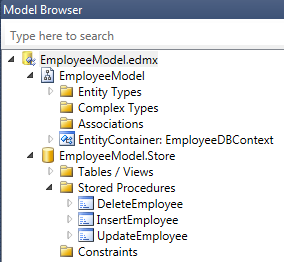
To view the stored procedures,
1. Right click on entity model designer surface and select "Model Broswer" from the context menu.
2. Expand Stored Procedures folder

Step 5: Add a web form to the project. Drag and drop the following 3 controls and build the solution.
1. GridView
2. DetailsView
3. EntityDataSource
Step 6: Configure EntityDataSource control
a). Right click on EntityDataSource control and select "Show Smart Tag" option
b) Click on Configure Data Source link
c) Select EmployeeDBContext from the Named Connection dropdownlist and click Next
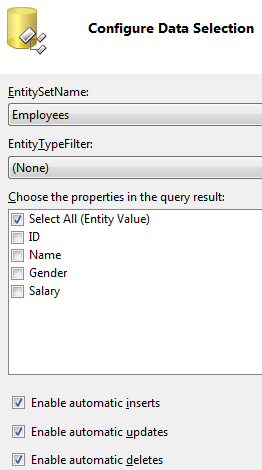
d) Select the options on "Configure Data Selection" screen as shown in the image below and click Finish

Step 7: Configure GridView control
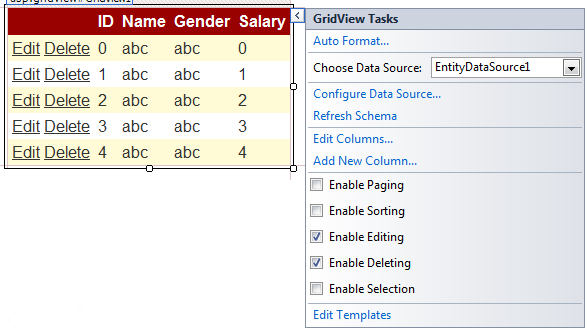
a). Right click on GridView control and select "Show Smart Tag" option
b) Click on "Auto Format" link and select "Colourful" scheme
c) Select "EntityDataSource1" from "Choose Data Source" dropdownlist
d) Select Enable Editing and Enable Deleting checkboxes

Step 8: Configure DetailsView control
a) Right click on DetailsView control and select "Show Smart Tag" option
b) Click on "Auto Format" link and select "Colourful" scheme
c) Select "EntityDataSource1" from "Choose Data Source" dropdownlist
d) Select Enable Inserting checkbox
e) Set DeafultMode=Insert. Use properties window to set this.
f) Set InsertVisible="false" for the ID BoundField. You can do this directly in the HTML Source.
g) Generate ItemInserted event handler method for DetailsView control. Copy and paste the following code.
At this point if you run the application, and if you insert, update and delete employees, by default entity framework will use the sql it auto-generates and not our custom stored procedures.
To tell the entity framework to use the stored procedures, we have to map them to the Employee entity.
Here are the steps.
1. Right click on "Employee" entity on "EmployeeModel.edmx" and select "Stored Procedure Mapping" option from the context menu.
2. In the "Mapping Details" windows specify the Insert, Update and Delete stored procedures that you want to use with "Employee" entity

At this point,
1. Run SQL Prrofiler
2. Run the application
3. Insert, Update and Delete Employee, and notice that the respective stored procedures are being called now.

Part 4 - Customizing table & column names
Part 5 - How to handle model changes in entity framework
Part 6 - How to seed database with test data using entity framework
In this video we will discuss using our own custom stored procedures to perform Insert, Update and Delete operations using entity framework. We will be using the following Employees table for this demo.

Step 1: Use the following SQL Script to create and populate Employee table.
Create table Employees
(
ID int primary
key identity,
Name nvarchar(50),
Gender nvarchar(50),
Salary int
)
Insert into Employees values ('Mark', 'Male', 60000)
Insert into Employees values ('Steve', 'Male', 45000)
Insert into Employees values ('Ben', 'Male', 70000)
Insert into Employees values ('Philip', 'Male', 45000)
Insert into Employees values ('Mary', 'Female', 30000)
Insert into Employees values ('Valarie', 'Female', 35000)
Insert into Employees values ('John', 'Male', 80000)
Step 2: Create Insert, Update and Delete stored procedures
Create procedure InsertEmployee
@Name nvarchar(50),
@Gender nvarchar(50),
@Salary int
as
Begin
Insert into
Employees values (@Name, @Gender, @Salary)
End
Go
Create procedure UpdateEmployee
@ID int,
@Name nvarchar(50),
@Gender nvarchar(50),
@Salary int
as
Begin
Update Employees Set Name = @Name, Gender = @Gender,
Salary = @Salary
where ID = @ID
End
Go
Create procedure DeleteEmployee
@ID int
as
Begin
Delete from
Employees where ID =
@ID
End
Go
Step 3: Create a new empty asp.net web application
Step 4: Add a new ADO.NET Entity Data Model.
a) On Choose Model Contents screen select "Generate from database" option and click Next

b) On "Choose Your Data Connections" screen give a meaningful name for the connection string that will be stored in the web.config file. I have named it EmployeeDBContext. Click Next.

c) On "Choose Your Database Objects" screen, select Employees Table and the 3 stored procedures (InsertEmployee, UpdateEmployee, DeleteEmployee). Provide a meaningful name for the Model namespace. I have named it EmployeeModel. CLick Finish.

At this point on the ADO.NET Entity Model designer surface, we should be able to see the Employee entity but not the stored procedures.
To view the stored procedures,
1. Right click on entity model designer surface and select "Model Broswer" from the context menu.
2. Expand Stored Procedures folder

Step 5: Add a web form to the project. Drag and drop the following 3 controls and build the solution.
1. GridView
2. DetailsView
3. EntityDataSource
Step 6: Configure EntityDataSource control
a). Right click on EntityDataSource control and select "Show Smart Tag" option
b) Click on Configure Data Source link
c) Select EmployeeDBContext from the Named Connection dropdownlist and click Next
d) Select the options on "Configure Data Selection" screen as shown in the image below and click Finish

Step 7: Configure GridView control
a). Right click on GridView control and select "Show Smart Tag" option
b) Click on "Auto Format" link and select "Colourful" scheme
c) Select "EntityDataSource1" from "Choose Data Source" dropdownlist
d) Select Enable Editing and Enable Deleting checkboxes

Step 8: Configure DetailsView control
a) Right click on DetailsView control and select "Show Smart Tag" option
b) Click on "Auto Format" link and select "Colourful" scheme
c) Select "EntityDataSource1" from "Choose Data Source" dropdownlist
d) Select Enable Inserting checkbox
e) Set DeafultMode=Insert. Use properties window to set this.
f) Set InsertVisible="false" for the ID BoundField. You can do this directly in the HTML Source.
g) Generate ItemInserted event handler method for DetailsView control. Copy and paste the following code.
protected void DetailsView1_ItemInserted (object sender, DetailsViewInsertedEventArgs
e)
{
GridView1.DataBind();
}
At this point if you run the application, and if you insert, update and delete employees, by default entity framework will use the sql it auto-generates and not our custom stored procedures.
To tell the entity framework to use the stored procedures, we have to map them to the Employee entity.
Here are the steps.
1. Right click on "Employee" entity on "EmployeeModel.edmx" and select "Stored Procedure Mapping" option from the context menu.
2. In the "Mapping Details" windows specify the Insert, Update and Delete stored procedures that you want to use with "Employee" entity

At this point,
1. Run SQL Prrofiler
2. Run the application
3. Insert, Update and Delete Employee, and notice that the respective stored procedures are being called now.

Hai,
ReplyDeleteFirst i like to thanks for you, for preparing this type of useful material. I like to know the clear details about page life cycle. I studied in the internet but that is not giving satisfaction to me. am expecting a video from you which full fill the page life cycle in details. Please prepare a video on page life cycle and send to me to the below email id. I am expecting your video will cover in each event what we do and what we cannot do. Please prepare and send to me as soon as possible. Thanks
Email ID: kforkalithu@yahoo.com
Hi ,
DeleteJust very the fallowing url.u will underastand it clearly.It was prepared by venkat long back
http://csharp-video-tutorials.blogspot.in/2012/10/aspnet-page-life-cycle-events-part-6.html
hell venkat,
ReplyDeletesir your video tutorials are very good for learning .
please sir post some sale of point system tutorials in asp.net using c# and sql server
I need these very urgently
please sir if you have any video about the POS system then post them.
I shall be very thankful to you.
keep doing sir weldone
Thanks for this material that you gave for learning
ReplyDeleteThis is very good videos sir
please give some video on POS point sale system in asp.net using c# and sql server.
thanks once again.
Thanks for your tutorials. I have a lot of things to learn from this.
ReplyDelete