Suggested Videos
Part 76 - ValidateInput attribute
Part 77 - Custom action filters
Paty 78 - Different types of ActionResult in asp.net mvc
In this video, we will discuss Areas.
When you create a new asp.net mvc application, the following folders are created with in the root directory.
1. Models
2. Views
3. Controllers
This structure is fine for simple applications, but when your application gets big and complex, maintaining your Models, Views and Controllers can get complicated.
The structure of a complex asp.net mvc application can be very easily maintained using areas. So, in short areas are introduced in asp.net mvc 2, that allow us to breakdown a large complex application into a several small sections called areas. These areas can have their own set of
1. Models
2. Views
3. Controllers
4. Routes
Let's understand this with an example. Let's say, we are building a Job Portal. It's common for a typical job portal to have the following functional areas.
Employee Area - This functional area allows a job seeker to create their profile, upload resume, and perform job search.
Employer Area - This functional area allows a job provider to create employer profile, upload jobs, and search for suitable candidates.
Administrator Area - This functional area allows an administrator to configure the site and mantain.
To create an area in an MVC application
1. Right click on the project name in Solution Explorer and select Add => Area
2. Provide a meaningful name. For example "Employee" and click Add
At this point, "Areas" folder will be created, and with in this, a folder for Employee area will be added. You can add as many areas as you want.
In a similar fashion, add areas for Employer and Admin. At this point, your solution explorer should look as shown below. Notice the Areas folder.
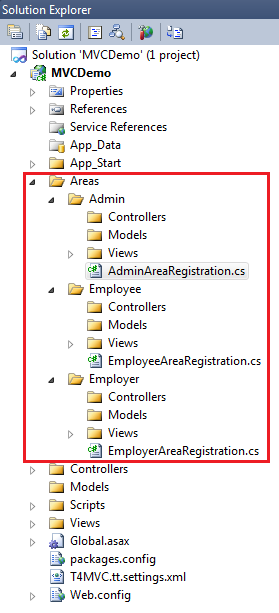
Notice that in each area folder (Employee, Employer and Admin), you have a set of Models, Views and Controllers folders. Also, there is "AreaRegistration.cs" file, which contains the code to register a route for the area.
Now navigate to Global.asax.cs file and notice Application_Start(). With in this method there is code to register all areas in your application.
protected void Application_Start()
{
AreaRegistration.RegisterAllAreas();
WebApiConfig.Register(GlobalConfiguration.Configuration);
FilterConfig.RegisterGlobalFilters(GlobalFilters.Filters);
RouteConfig.RegisterRoutes(RouteTable.Routes);
}
At this point Add "HomeController" to the following areas. Notice that we can have a HomeController(Controller with the same) in Employee, Employer, Admin and MainArea.
1. Employee
2. Employer
3. Admin
4. Main Area
At this point, we have Index() action method in all of the HomeControllers.
public ActionResult Index()
{
return View();
}
Now Add Index view to all the areas. Copy and paste the following HTML in respective Index views.
Main Area: <h1>Main Area Index View</h1>
Employee Area: <h1>Employee Area Index View</h1>
Employer Area: <h1>Employer Area Index View</h1>
Admin Area: <h1>Admin Area Index View</h1>
At this point, build the application, and navigate to http://localhost/MVCDemo. You will get an error
Multiple types were found that match the controller named 'Home'. This can happen if the route that services this request ('{controller}/{action}/{id}') does not specify namespaces to search for a controller that matches the request. If this is the case, register this route by calling an overload of the 'MapRoute' method that takes a 'namespaces' parameter.
The request for 'Home' has found the following matching controllers:
MVCDemo.Controllers.HomeController
MVCDemo.Areas.Admin.Controllers.HomeController
MVCDemo.Areas.Employee.Controllers.HomeController
MVCDemo.Areas.Employer.Controllers.HomeController
To fix this change RegisterRoutes() method in RouteConfig.cs file in App_start folder. Notice that we are passing the namespace of the HomeController in the Main area using namespace parameter.
public static void RegisterRoutes(RouteCollection routes)
{
routes.IgnoreRoute("{resource}.axd/{*pathInfo}");
routes.MapRoute(
name: "Default",
url: "{controller}/{action}/{id}",
defaults: new { controller = "Home", action = "Index", id = UrlParameter.Optional },
namespaces: new [] { "MVCDemo.Controllers" }
);
}
Now, if you navigate to http://localhost/MVCDemo/Employee, you will get an error - The resource cannot be found.
To fix this, change RegisterArea() area method in EmployeeAreaRegistration.cs file in Employee folder as shown below. Notice that we are setting HomeController as the default controller
public override void RegisterArea(AreaRegistrationContext context)
{
context.MapRoute(
"Employee_default",
"Employee/{controller}/{action}/{id}",
new { controller = "Home", action = "Index", id = UrlParameter.Optional }
);
}
Navigating to http://localhost/MVCDemo/Employee may throw a compilation error related to System.Web.Optimization. If you get this error follow the steps below.
1. In Visual Studio, click Tools - Library PAckage Manager - Package Manager Console
2. In the Package Manager Console window, type the following command and press enter
Install-Package Microsoft.Web.Optimization -Pre
When we are building links using ActionLink() html helper to navigate between areas, we need to specify area name as shown below. Copy and paste the following code in all the Index views in all the areas and you will be able to navigate between areas when you click on the respective links.
<table border="1">
<tr>
<td>
<b>Links</b>
</td>
</tr>
<tr>
<td>
@Html.ActionLink("Main Area Home Page", "Index", "Home", new { area = "" }, null)
</td>
</tr>
<tr>
<td>
@Html.ActionLink("Employee Area Home Page", "Index", "Home", new { area = "Employee" }, null)
</td>
</tr>
<tr>
<td>
@Html.ActionLink("Employer Area Home Page", "Index", "Home", new { area = "Employer" }, null)
</td>
</tr>
<tr>
<td>
@Html.ActionLink("Admin Area Home Page", "Index", "Home", new { area = "Admin" }, null)
</td>
</tr>
</table>

Part 76 - ValidateInput attribute
Part 77 - Custom action filters
Paty 78 - Different types of ActionResult in asp.net mvc
In this video, we will discuss Areas.
When you create a new asp.net mvc application, the following folders are created with in the root directory.
1. Models
2. Views
3. Controllers
This structure is fine for simple applications, but when your application gets big and complex, maintaining your Models, Views and Controllers can get complicated.
The structure of a complex asp.net mvc application can be very easily maintained using areas. So, in short areas are introduced in asp.net mvc 2, that allow us to breakdown a large complex application into a several small sections called areas. These areas can have their own set of
1. Models
2. Views
3. Controllers
4. Routes
Let's understand this with an example. Let's say, we are building a Job Portal. It's common for a typical job portal to have the following functional areas.
Employee Area - This functional area allows a job seeker to create their profile, upload resume, and perform job search.
Employer Area - This functional area allows a job provider to create employer profile, upload jobs, and search for suitable candidates.
Administrator Area - This functional area allows an administrator to configure the site and mantain.
To create an area in an MVC application
1. Right click on the project name in Solution Explorer and select Add => Area
2. Provide a meaningful name. For example "Employee" and click Add
At this point, "Areas" folder will be created, and with in this, a folder for Employee area will be added. You can add as many areas as you want.
In a similar fashion, add areas for Employer and Admin. At this point, your solution explorer should look as shown below. Notice the Areas folder.
Notice that in each area folder (Employee, Employer and Admin), you have a set of Models, Views and Controllers folders. Also, there is "AreaRegistration.cs" file, which contains the code to register a route for the area.
Now navigate to Global.asax.cs file and notice Application_Start(). With in this method there is code to register all areas in your application.
protected void Application_Start()
{
AreaRegistration.RegisterAllAreas();
WebApiConfig.Register(GlobalConfiguration.Configuration);
FilterConfig.RegisterGlobalFilters(GlobalFilters.Filters);
RouteConfig.RegisterRoutes(RouteTable.Routes);
}
At this point Add "HomeController" to the following areas. Notice that we can have a HomeController(Controller with the same) in Employee, Employer, Admin and MainArea.
1. Employee
2. Employer
3. Admin
4. Main Area
At this point, we have Index() action method in all of the HomeControllers.
public ActionResult Index()
{
return View();
}
Now Add Index view to all the areas. Copy and paste the following HTML in respective Index views.
Main Area: <h1>Main Area Index View</h1>
Employee Area: <h1>Employee Area Index View</h1>
Employer Area: <h1>Employer Area Index View</h1>
Admin Area: <h1>Admin Area Index View</h1>
At this point, build the application, and navigate to http://localhost/MVCDemo. You will get an error
Multiple types were found that match the controller named 'Home'. This can happen if the route that services this request ('{controller}/{action}/{id}') does not specify namespaces to search for a controller that matches the request. If this is the case, register this route by calling an overload of the 'MapRoute' method that takes a 'namespaces' parameter.
The request for 'Home' has found the following matching controllers:
MVCDemo.Controllers.HomeController
MVCDemo.Areas.Admin.Controllers.HomeController
MVCDemo.Areas.Employee.Controllers.HomeController
MVCDemo.Areas.Employer.Controllers.HomeController
To fix this change RegisterRoutes() method in RouteConfig.cs file in App_start folder. Notice that we are passing the namespace of the HomeController in the Main area using namespace parameter.
public static void RegisterRoutes(RouteCollection routes)
{
routes.IgnoreRoute("{resource}.axd/{*pathInfo}");
routes.MapRoute(
name: "Default",
url: "{controller}/{action}/{id}",
defaults: new { controller = "Home", action = "Index", id = UrlParameter.Optional },
namespaces: new [] { "MVCDemo.Controllers" }
);
}
Now, if you navigate to http://localhost/MVCDemo/Employee, you will get an error - The resource cannot be found.
To fix this, change RegisterArea() area method in EmployeeAreaRegistration.cs file in Employee folder as shown below. Notice that we are setting HomeController as the default controller
public override void RegisterArea(AreaRegistrationContext context)
{
context.MapRoute(
"Employee_default",
"Employee/{controller}/{action}/{id}",
new { controller = "Home", action = "Index", id = UrlParameter.Optional }
);
}
Navigating to http://localhost/MVCDemo/Employee may throw a compilation error related to System.Web.Optimization. If you get this error follow the steps below.
1. In Visual Studio, click Tools - Library PAckage Manager - Package Manager Console
2. In the Package Manager Console window, type the following command and press enter
Install-Package Microsoft.Web.Optimization -Pre
When we are building links using ActionLink() html helper to navigate between areas, we need to specify area name as shown below. Copy and paste the following code in all the Index views in all the areas and you will be able to navigate between areas when you click on the respective links.
<table border="1">
<tr>
<td>
<b>Links</b>
</td>
</tr>
<tr>
<td>
@Html.ActionLink("Main Area Home Page", "Index", "Home", new { area = "" }, null)
</td>
</tr>
<tr>
<td>
@Html.ActionLink("Employee Area Home Page", "Index", "Home", new { area = "Employee" }, null)
</td>
</tr>
<tr>
<td>
@Html.ActionLink("Employer Area Home Page", "Index", "Home", new { area = "Employer" }, null)
</td>
</tr>
<tr>
<td>
@Html.ActionLink("Admin Area Home Page", "Index", "Home", new { area = "Admin" }, null)
</td>
</tr>
</table>
Hi Venkat,
ReplyDeleteI am getting an error during Install-Package Microsoft.Web.Optimization -Pre installation on package Manger console
PM> Install-Package Microsoft.Web.Optimization -Pre
Install-Package : Unable to find package 'Microsoft.Web.Optimization'.
At line:1 char:1
+ Install-Package Microsoft.Web.Optimization -Pre
+ ~~~~~~~~~~~~~~~~~~~~~~~~~~~~~~~~~~~~~~~~~~~~~~~
+ CategoryInfo : NotSpecified: (:) [Install-Package], InvalidOperationException
+ FullyQualifiedErrorId : NuGetCmdletUnhandledException,NuGet.PowerShell.Commands.InstallPackageCommand
please help me
Change Microsoft.Web.Optimization to Microsoft.AspNet.Web.Optimization or open Manage NuGet Packages Window & install Microsoft.AspNet.Web.Optimization
DeleteInstall-Package Microsoft.AspNet.Web.Optimization -Pre
Deleteafter moving to an area page how we are gone move back to main page from area page ??
ReplyDeletePM> Install-Package Microsoft.AspNet.Web.Optimization -Version 1.1.0-alpha1 -Pre
ReplyDeleteuse above command ...for different versions of visual studios packages may vary with different versions ..... Venkat's command is for his visual studios's version
Install-Package Microsoft.AspNet.Web.Optimization
ReplyDeleteuse above the command it will work enjoy coding
The view 'Index' or its master was not found or no view engine supports the searched locations. The following locations were searched:
ReplyDeleteInstall-Package Microsoft.AspNet.Web.Optimization
ReplyDeletesort out my issue.
Follow My step by step suggestion to install that in your Computer..
ReplyDelete1) download set up in your computer and put that in one folder on ur desktop
2)go to visual studio click on Tools menu => click on Library Package Manager => click on Package Manager Settings =>Package Manager =>Package Source => click on '+' sign on the top right side corner => Than give any name like WebOptimize => than click on Brows or "..." and find your folder hit Ok..after that go to click on Tools menu => click on Library Package Manager =>Manage NuGet Package Manger for solution => on the top right side you will see the DireceryName mine is WebOptimize. thats what the name i give. click on that and install your package.. this method is same for all other packages simply download it and install that in your machine...
Hi All,
ReplyDeletePlease help.
I am getting the following error when I try to install.I have tried with all the possible methods mentioned in the comments above.But the error is not getting resolved.
PM> Install-Package Microsoft.AspNet.Web.Optimization
Install-Package : Unable to connect to the remote server
At line:1 char:1
+ Install-Package Microsoft.AspNet.Web.Optimization
+ ~~~~~~~~~~~~~~~~~~~~~~~~~~~~~~~~~~~~~~~~~~~~~~~~~
+ CategoryInfo : NotSpecified: (:) [Install-Package], WebException
+ FullyQualifiedErrorId : NuGetCmdletUnhandledException,NuGet.PowerShell.Comm
ands.InstallPackageCommand
Use this,
DeleteInstall-Package Microsoft.Aspnet.Web.Optimization -Pre
It works for me on VS 2013 professional.
1. In Visual Studio, click Tools - Library PAckage Manager - Package Manager Console
ReplyDelete2. In the Package Manager Console window, type the following command and press enter
**Install-Package Microsoft.Web.Optimization -Pre
<-- This link is not Working You use below link -->
Install-Package -IncludePrerelease Microsoft.AspNet.Web.Optimization