Suggested Videos
Part 27 - EmptyDataText and EmptyDataTemplate properties of asp.net gridview control
Part 28 - Delete mulitple rows from asp.net gridview
Part 29 - Enhancing gridview using jquery when deleting mulitple rows

In this video we will discuss about displaying images in gridview control. There are 2 ways display images in gridview.
1. Using TemplateField
2. Using ImageField
In this video, we will discuss about using TemplateField and in our next vidoe we will discuss about using ImageField.
We will be using tblEmployee table for this demo. Please use the sql script below, to create and populate the table.
Create Table tblEmployee
(
EmployeeId int primary key identity,
Name nvarchar(50),
Gender nvarchar(20),
City nvarchar(50),
PhotoPath nvarchar(100)
)
Insert into tblEmployee values('Mark','Male','London','Images/Mark.png')
Insert into tblEmployee values('John','Male','Chennai','Images/John.png')
Insert into tblEmployee values('Mary','Female','New York','Images/Mary.png')
Insert into tblEmployee values('Mike','Male','Sydeny','Images/Mike.png')
Create an asp.net web application. Add a class file with name EmployeeDataAccessLayer.cs. Copy and paste the following code.
using System;
using System.Data;
using System.Configuration;
using System.Data.SqlClient;
using System.Collections.Generic;
using System.Linq;
namespace Demo
{
public class Employee
{
public int EmployeeId { get; set; }
public string Name { get; set; }
public string Gender { get; set; }
public string City { get; set; }
public string Photo { get; set; }
}
public class EmployeeDataAccessLayer
{
public static List<Employee> GetAllEmployees()
{
List<Employee> listEmployees = new List<Employee>();
string CS = ConfigurationManager.ConnectionStrings["DBCS"].ConnectionString;
using (SqlConnection con = new SqlConnection(CS))
{
SqlCommand cmd = new SqlCommand("Select * from tblEmployee", con);
con.Open();
SqlDataReader rdr = cmd.ExecuteReader();
while (rdr.Read())
{
Employee employee = new Employee();
employee.EmployeeId = Convert.ToInt32(rdr["EmployeeId"]);
employee.Name = rdr["Name"].ToString();
employee.Gender = rdr["Gender"].ToString();
employee.City = rdr["City"].ToString();
employee.Photo = rdr["PhotoPath"].ToString();
listEmployees.Add(employee);
}
}
return listEmployees;
}
}
}
Drag and drop gridview control on WebForm1.aspx. Copy and paste the following code in WebForm1.aspx.cs.
protected void Page_Load(object sender, EventArgs e)
{
GridView1.DataSource = EmployeeDataAccessLayer.GetAllEmployees();
GridView1.DataBind();
}
Add a folder with Name="Images" to your web application. Copy and paste any 4 images into "Images" folder. The names of the images must match with what we have in the database.
1. Mark.png
2. John.png
3. Mary.png
4. Mike.png
After you add images, the folder structure in solution explorer is as shown below.

Run the application, and notice that the image path is displayed in the gridview instead of displaying images.
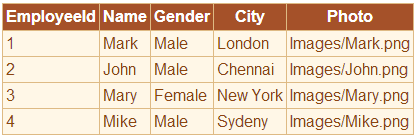
Add 4 BoundFields and 1 TemplateField to GridView control. The HTML is shown below.
<asp:GridView ID="GridView1" runat="server" AutoGenerateColumns="False">
<Columns>
<asp:BoundField DataField="EmployeeId" HeaderText="EmployeeId" />
<asp:BoundField DataField="Name" HeaderText="Name" />
<asp:BoundField DataField="Gender" HeaderText="Gender" />
<asp:BoundField DataField="City" HeaderText="City" />
<asp:TemplateField HeaderText="Photo">
<ItemTemplate>
<asp:Image ID="Image1" runat="server" Height="100px"
Width="100px" ImageUrl='<%# Bind("Photo") %>' />
</ItemTemplate>
</asp:TemplateField>
</Columns>
</asp:GridView>
Please note the following
1. The templatefield is used to display photos of employees.
2. In the ItemTemplate we are using Image control.
3. The "ImageUrl" property is set to "Photo" property of "Employee" object.
4. To control the size of the image in GridView control, set the Width and Height properties. We have set them to 100X100 pixels.
5. Finally set GridView1 control's AutoGenerateColumns property to "False"

Part 27 - EmptyDataText and EmptyDataTemplate properties of asp.net gridview control
Part 28 - Delete mulitple rows from asp.net gridview
Part 29 - Enhancing gridview using jquery when deleting mulitple rows
In this video we will discuss about displaying images in gridview control. There are 2 ways display images in gridview.
1. Using TemplateField
2. Using ImageField
In this video, we will discuss about using TemplateField and in our next vidoe we will discuss about using ImageField.
We will be using tblEmployee table for this demo. Please use the sql script below, to create and populate the table.
Create Table tblEmployee
(
EmployeeId int primary key identity,
Name nvarchar(50),
Gender nvarchar(20),
City nvarchar(50),
PhotoPath nvarchar(100)
)
Insert into tblEmployee values('Mark','Male','London','Images/Mark.png')
Insert into tblEmployee values('John','Male','Chennai','Images/John.png')
Insert into tblEmployee values('Mary','Female','New York','Images/Mary.png')
Insert into tblEmployee values('Mike','Male','Sydeny','Images/Mike.png')
Create an asp.net web application. Add a class file with name EmployeeDataAccessLayer.cs. Copy and paste the following code.
using System;
using System.Data;
using System.Configuration;
using System.Data.SqlClient;
using System.Collections.Generic;
using System.Linq;
namespace Demo
{
public class Employee
{
public int EmployeeId { get; set; }
public string Name { get; set; }
public string Gender { get; set; }
public string City { get; set; }
public string Photo { get; set; }
}
public class EmployeeDataAccessLayer
{
public static List<Employee> GetAllEmployees()
{
List<Employee> listEmployees = new List<Employee>();
string CS = ConfigurationManager.ConnectionStrings["DBCS"].ConnectionString;
using (SqlConnection con = new SqlConnection(CS))
{
SqlCommand cmd = new SqlCommand("Select * from tblEmployee", con);
con.Open();
SqlDataReader rdr = cmd.ExecuteReader();
while (rdr.Read())
{
Employee employee = new Employee();
employee.EmployeeId = Convert.ToInt32(rdr["EmployeeId"]);
employee.Name = rdr["Name"].ToString();
employee.Gender = rdr["Gender"].ToString();
employee.City = rdr["City"].ToString();
employee.Photo = rdr["PhotoPath"].ToString();
listEmployees.Add(employee);
}
}
return listEmployees;
}
}
}
Drag and drop gridview control on WebForm1.aspx. Copy and paste the following code in WebForm1.aspx.cs.
protected void Page_Load(object sender, EventArgs e)
{
GridView1.DataSource = EmployeeDataAccessLayer.GetAllEmployees();
GridView1.DataBind();
}
Add a folder with Name="Images" to your web application. Copy and paste any 4 images into "Images" folder. The names of the images must match with what we have in the database.
1. Mark.png
2. John.png
3. Mary.png
4. Mike.png
After you add images, the folder structure in solution explorer is as shown below.
Run the application, and notice that the image path is displayed in the gridview instead of displaying images.
Add 4 BoundFields and 1 TemplateField to GridView control. The HTML is shown below.
<asp:GridView ID="GridView1" runat="server" AutoGenerateColumns="False">
<Columns>
<asp:BoundField DataField="EmployeeId" HeaderText="EmployeeId" />
<asp:BoundField DataField="Name" HeaderText="Name" />
<asp:BoundField DataField="Gender" HeaderText="Gender" />
<asp:BoundField DataField="City" HeaderText="City" />
<asp:TemplateField HeaderText="Photo">
<ItemTemplate>
<asp:Image ID="Image1" runat="server" Height="100px"
Width="100px" ImageUrl='<%# Bind("Photo") %>' />
</ItemTemplate>
</asp:TemplateField>
</Columns>
</asp:GridView>
Please note the following
1. The templatefield is used to display photos of employees.
2. In the ItemTemplate we are using Image control.
3. The "ImageUrl" property is set to "Photo" property of "Employee" object.
4. To control the size of the image in GridView control, set the Width and Height properties. We have set them to 100X100 pixels.
5. Finally set GridView1 control's AutoGenerateColumns property to "False"
Hi Venkat,
ReplyDeleteEmployeeDataAccessLayer is not visible in my WebForm1.aspx.cs. Error is the name 'EmployeeDataAccessLayer' does not exist in the current content.By default namespace is not included in my cs file when I manually add it then I get a error 3 different errors.
When you create a class it asks you to save it in web_app folder say "yes".
ReplyDeletethis code give me error
ReplyDeleteObject reference not set to an instance of an object.