Suggested Videos
Part 42 - jQuery scroll event
Part 43 - jQuery image gallery
Part 44 - Optimise jQuery image gallery
In this video, we will discuss creating a simple image slideshow using jQuery. We will be using setInterval() and clearInterval() JavaScript methods to achieve this. We discussed these functions in detail in Part 34 of JavaScript Tutorial.
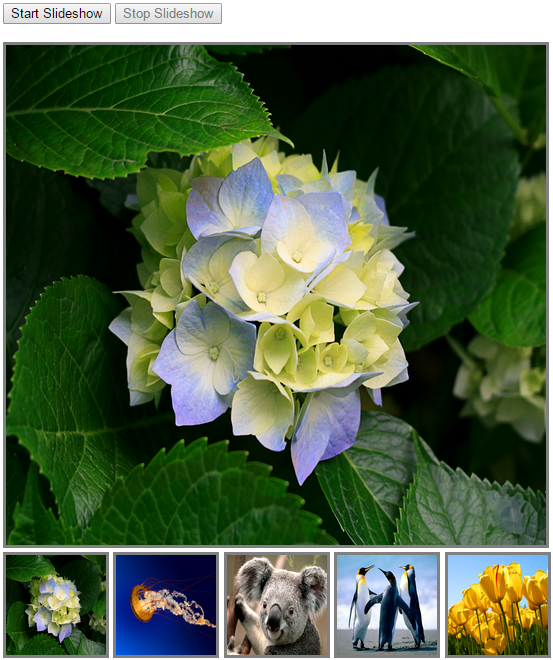
The slideshow should be as shown in the image below. When you click "Start Slide Show" button the image slideshow should start and when you click the "Stop Slide Show" button the image slideshow should stop.

For the purpose of this demo we will be using the images that can be found on any windows machine at the following path.
C:\Users\Public\Pictures\Sample Pictures
Here are the steps to create the image slideshow using jQuery
Step 1 : Open Visual Studio and create a new empty asp.net web application project. Name it Demo.
Step 2 : Right click on the Project Name in Solution Explorer in Visual Studio and create a new folder with name = Images.
Step 3 : Copy the images from C:\Users\Public\Pictures\Sample Pictures to Images folder in your project.
Step 4 : Right click on the Project Name in Solution Explorer in Visual Studio and add a new HTML Page. It should automatically add HTMLPage1.htm. Also add a jQuery file. At this point your solution explorer should look as shown below.

Step 5 : Copy and paste the following HTML and jQuery code in HTMLPage1.htm page.

Part 42 - jQuery scroll event
Part 43 - jQuery image gallery
Part 44 - Optimise jQuery image gallery
In this video, we will discuss creating a simple image slideshow using jQuery. We will be using setInterval() and clearInterval() JavaScript methods to achieve this. We discussed these functions in detail in Part 34 of JavaScript Tutorial.
The slideshow should be as shown in the image below. When you click "Start Slide Show" button the image slideshow should start and when you click the "Stop Slide Show" button the image slideshow should stop.

For the purpose of this demo we will be using the images that can be found on any windows machine at the following path.
C:\Users\Public\Pictures\Sample Pictures
Here are the steps to create the image slideshow using jQuery
Step 1 : Open Visual Studio and create a new empty asp.net web application project. Name it Demo.
Step 2 : Right click on the Project Name in Solution Explorer in Visual Studio and create a new folder with name = Images.
Step 3 : Copy the images from C:\Users\Public\Pictures\Sample Pictures to Images folder in your project.
Step 4 : Right click on the Project Name in Solution Explorer in Visual Studio and add a new HTML Page. It should automatically add HTMLPage1.htm. Also add a jQuery file. At this point your solution explorer should look as shown below.

Step 5 : Copy and paste the following HTML and jQuery code in HTMLPage1.htm page.
<html>
<head>
<style type="text/css">
.imgStyle {
width: 100px;
height: 100px;
border: 3px solid grey;
}
</style>
<script src="jquery-1.11.2.js"></script>
<script type="text/javascript">
$(document).ready(function () {
var imageURLs = new Array();
var intervalId;
var btnStart = $('#btnStartSlideShow');
var btnStop = $('#btnStopSlideShow');
$('#divId
img').each(function () {
imageURLs.push($(this).attr('src'));
});
function setImage() {
var mainImageElement = $('#mainImage');
var currentImageURL = mainImageElement.attr('src');
var currentImageIndex = $.inArray(currentImageURL,
imageURLs);
if (currentImageIndex == (imageURLs.length - 1)) {
currentImageIndex = -1;
}
mainImageElement.attr('src', imageURLs[currentImageIndex
+ 1])
}
btnStart.click(function () {
intervalId =
setInterval(setImage, 500);
$(this).attr('disabled', 'disabled');
btnStop.removeAttr('disabled');
});
btnStop.click(function () {
clearInterval(intervalId);
$(this).attr('disabled', 'disabled');
btnStart.removeAttr('disabled');
}).attr('disabled', 'disabled');
});
</script>
</head>
<body style="font-family:Arial">
<input id="btnStartSlideShow" type="button" value="Start
Slideshow" />
<input id="btnStopSlideShow" type="button" value="Stop
Slideshow" />
<br /><br />
<img id="mainImage" style="border:3px solid grey"
src="/Images/Hydrangeas.jpg" height="500" width="540" />
<br />
<div id="divId">
<img class="imgStyle" src="/Images/Hydrangeas.jpg" />
<img class="imgStyle" src="/Images/Jellyfish.jpg" />
<img class="imgStyle" src="/Images/Koala.jpg" />
<img class="imgStyle" src="/Images/Penguins.jpg" />
<img class="imgStyle" src="/Images/Tulips.jpg" />
</div>
</body>
</html>

No comments:
Post a Comment
It would be great if you can help share these free resources