Suggested Videos
Part 56 - How to prevent cross site scripting attack
Part 57 - Razor views in mvc
Part 58 - Razor views in mvc continued
What is the advantage of using _Layout.cshtml view?
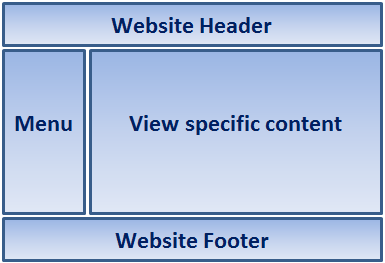
Layout views provide the advantage of maintaining consistent look and feel across all the views in an mvc application. A typical layout view consists of
1. Header
2. Footer
3. Navigation menu
4. View specific content

Rather than having all of these sections, in each and every view, we can define them in a layout view and then inherit that look and feel in all the views. With layout views, maintaining the consistent look and feel across all the views becomes much easier, as we have only one layout file to modify, should there be any change. The change will then be immediately reflected across all the views in entire application.
Let us now create a layout view with
1. Header
2. Footer
3. Navigation menu and
4. a place to plugin view specific content
Step 1: Create an empty asp.net mvc4 application.
Step 2: Right click on "Views" folder and add "Shared" folder.
Step 3: Right click on "Shared" folder and add "_Layout.cshtml" view. This is our layout view, where we will define the site wide look and feel. The layout file can have any name, and will have .cshtml file extension. Copy and paste the following html
<html>
<head>
<title>@ViewBag.Title</title>
@*All the javascript and css files that are required by the
application can be referenced here so that there is no
need to reference them in each and every view*@
</head>
<body>
<table border="1" style="width:800px; font-family:Arial">
<tr>
<td colspan="2" style="text-align:center">
<h3>Website Header</h3>
</td>
</tr>
<tr>
<td style="width:200px">
<h3>Menu</h3>
</td>
<td style="width:600px">
@RenderBody()
</td>
</tr>
<tr>
<td colspan="2" style="text-align:center; font-size:x-small">
<h3>Website Footer</h3>
</td>
</tr>
</table>
</body>
</html>
Points to note:
1. View specific title is retrieved using @ViewBag.Title.
2. View specific content will be plugged-in at the location, where RenderBody() function is called.
Step 4: Let us use the following table tblEmployee, and generate a few views that can be used with our layout view.
Create table tblEmployee
(
Id int identity primary key,
FirstName nvarchar(50),
LastName nvarchar(50),
Salary int
)
Insert into tblEmployee values('Tom', 'S', 5000)
Insert into tblEmployee values('Mary', 'P', 8000)
Insert into tblEmployee values('Ben', 'K', 3000)
Step 5: Add ADO.NET entity data model based on the above table. Build the solution, so that Employee model class is compiled.
Step 6: Add a HomeController, with the following settings, so that Index, Details, Create, Edit and Delete views are auto-generated.
1. Controller name - HomeController
2. Template - MVC controller with read/write actions and views, using Entity Framework
3. Model class - Employee
4. Data context class - SampleDBContext
5. Views - Razor
Step 7: Now, we need to make modifications to Index.cshtml view, to use _Layout.cshtml layout view. Copy and paste the following code just below, @model declaration. Notice that, we are storing title in ViewBag object. The layout view is going to retrieve it from viewbag and use it as the title. The next statement, specifies the layout file to use.
@{
ViewBag.Title = "Employee List Page";
Layout = "~/Views/Shared/_Layout.cshtml";
}
At this point navigate to Index view and notice that, it uses the layout file that we have defined.
Step 8: Make the following modifications to layout view. Replace
1. Website Header with Employee Portal
2. <h3>Website Footer</h3> with © 2013 Pragim Technologes
3. <h3>Menu</h3> with @Html.ActionLink("Employee List", "Index")
Save changes and navigate to Index view. Now click on "Edit" link. The page crashes. To fix it, delete "Scripts" section that is at the bottom of the Edit view. Refresh the page. Notice that, we don't have error now, but this view is not using the layout view. To fix it, we need to include the following code, as we did on index view.
@{
ViewBag.Title = "Employee Edit Page";
Layout = "~/Views/Shared/_Layout.cshtml";
}
In our next video, we will discuss - How to specify layout view setting for all the views at one place

Hi Kudvenkat,
ReplyDeleteCongratulation for wonderful video tutorials on MVC.
One thing I would like to know, I have a master layout and in navigation div, I want to add dynamic menus. I tried with partial view and RenderAction but using render action it generate Error " Error executing child request for handler HandlerUtilServerExecuteHttpHandler and when execute partial view , controller method does not execute and received null exception in Partial view. Please help, thanks.
How to avoid refresh of layout view when navigating between pages.
ReplyDeletefor example in my layout i have left sidebar with links.
when i clink on link to create the whole page refresh. how to avoid this, please help.
routing
DeleteHi Venkat,
ReplyDeletePlease make latest MVC versions video with latest visual studio