Suggested Videos
Part 37 - Detailsview in asp.net
Part 38 - Using objectdatasource control with detailsview
Part 39 - Working with detailsview without using datasource controls
In this video we will discuss about inserting, updating and deleting data using detailsview and sqldatasource control.
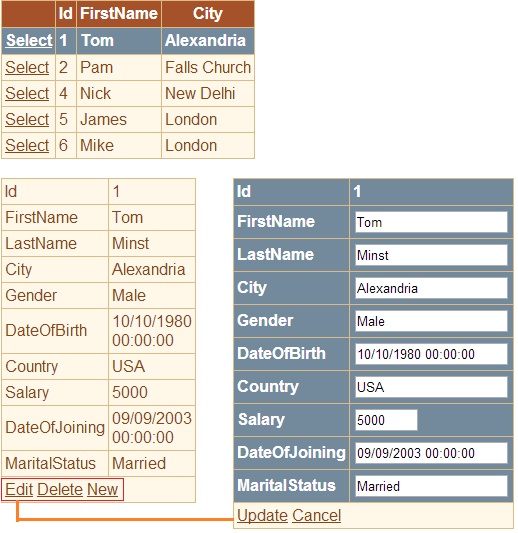
When the webform is loaded, the gridview control, should retrieve and display all the rows from tblEmployee table. As soon as I select a row, in the gridview control, then all the columns of the selected row, should be displayed in details view control. Then, we should be able to edit, delete and add a new employee using the DetailsView control, as shown in the image below.

We will be using tblEmployee table for this demo. If you need sql script to create this table, please refer to Part 37 by clicking here.
Step 1: Drag and drop a gridview control, a detailsview control and 2 sqldatasource controls on webform1.aspx.
Step 2: Configure SqlDataSource1 to retrieve [Id], [FirstName], [City] columns from tblEmployee table
Step 3: Associate SqlDataSource1 with GridView1 control
Step 4: Configure SqlDataSource2 to retrieve all columns from tblEmployee table. Add a WHERE clause to filter the rows based on the selected row in GridView1 control.

Step 5: While configuring SqlDataSource2 control, click on "Advanced" button, and make sure "Generate INSERT, UPDATE and DELETE statements" checkbox is selected.

Step 6: Associate SqlDataSource2 with DetailsView1 control and make sure the following checkboxes are selected.
Enable Inserting
Enable Editing
Enable Deleting
Step 7: Generate ItemInserted, ItemUpdated and ItemDeleted event handler methods for DetailsView1 control.
Step 8: Copy and paste the following code in webform1.aspx.cs
protected void Page_Load(object sender, EventArgs e)
{
}
protected void Page_PreRender(object sender, EventArgs e)
{
if (GridView1.SelectedRow == null)
{
DetailsView1.Visible = false;
}
else
{
DetailsView1.Visible = true;
}
}
protected void DetailsView1_ItemInserted(object sender, DetailsViewInsertedEventArgs e)
{
GridView1.DataBind();
GridView1.SelectRow(-1);
}
protected void DetailsView1_ItemDeleted(object sender, DetailsViewDeletedEventArgs e)
{
GridView1.DataBind();
GridView1.SelectRow(-1);
}
protected void DetailsView1_ItemUpdated(object sender, DetailsViewUpdatedEventArgs e)
{
GridView1.DataBind();
GridView1.SelectRow(-1);
}

Part 37 - Detailsview in asp.net
Part 38 - Using objectdatasource control with detailsview
Part 39 - Working with detailsview without using datasource controls
In this video we will discuss about inserting, updating and deleting data using detailsview and sqldatasource control.
When the webform is loaded, the gridview control, should retrieve and display all the rows from tblEmployee table. As soon as I select a row, in the gridview control, then all the columns of the selected row, should be displayed in details view control. Then, we should be able to edit, delete and add a new employee using the DetailsView control, as shown in the image below.

We will be using tblEmployee table for this demo. If you need sql script to create this table, please refer to Part 37 by clicking here.
Step 1: Drag and drop a gridview control, a detailsview control and 2 sqldatasource controls on webform1.aspx.
Step 2: Configure SqlDataSource1 to retrieve [Id], [FirstName], [City] columns from tblEmployee table
Step 3: Associate SqlDataSource1 with GridView1 control
Step 4: Configure SqlDataSource2 to retrieve all columns from tblEmployee table. Add a WHERE clause to filter the rows based on the selected row in GridView1 control.

Step 5: While configuring SqlDataSource2 control, click on "Advanced" button, and make sure "Generate INSERT, UPDATE and DELETE statements" checkbox is selected.

Step 6: Associate SqlDataSource2 with DetailsView1 control and make sure the following checkboxes are selected.
Enable Inserting
Enable Editing
Enable Deleting
Step 7: Generate ItemInserted, ItemUpdated and ItemDeleted event handler methods for DetailsView1 control.
Step 8: Copy and paste the following code in webform1.aspx.cs
protected void Page_Load(object sender, EventArgs e)
{
}
protected void Page_PreRender(object sender, EventArgs e)
{
if (GridView1.SelectedRow == null)
{
DetailsView1.Visible = false;
}
else
{
DetailsView1.Visible = true;
}
}
protected void DetailsView1_ItemInserted(object sender, DetailsViewInsertedEventArgs e)
{
GridView1.DataBind();
GridView1.SelectRow(-1);
}
protected void DetailsView1_ItemDeleted(object sender, DetailsViewDeletedEventArgs e)
{
GridView1.DataBind();
GridView1.SelectRow(-1);
}
protected void DetailsView1_ItemUpdated(object sender, DetailsViewUpdatedEventArgs e)
{
GridView1.DataBind();
GridView1.SelectRow(-1);
}

No comments:
Post a Comment
It would be great if you can help share these free resources