Suggested Videos
Part 2 - Reading data in angular | Text | Slides
Part 3 - Angular routing and navigation | Text | Slides
Part 4 - Angular base href | Text | Slides
In Part 2 of Angular CRUD tutorial, we discussed performing the READ operation. In this video and in the next few videos we will discuss performing the CREATE operation. To understand the CREATE operation, let us build a form that help us create a new employee. For this we will use the createEmployee component that we already created in one of our previous videos in this series. Along the way, we will also discuss performing validation and displaying meaningful error messages to the user.
There are 2 ways to create forms in Angular
Both these approaches have their own pros and cons. For example, Template Driven forms are generally used to create simple forms. On the other hand, Reactive forms are used to create complex forms. For example, if you want to add form controls dynamically or perform cross-field validation we use the Reactive forms approach. There are several other differences, between Template driven and Reactive forms. We will discuss those differences in detail, in a later video.
In this video, we will use the Template driven approach to build the "Create Employee" form. As the name implies, template driven forms are heavy on the template. This means we do most of the work in the view template of the component.
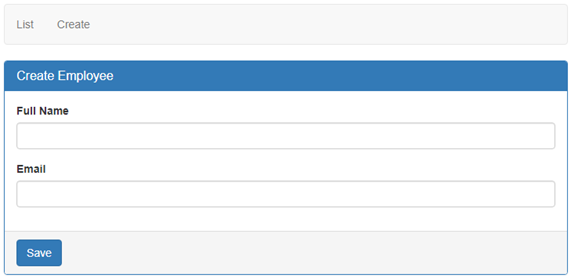
We want to design our "Create Employee" form as shown below. To keep this simple, at the moment we only have 2 fields (Full Name & Email). We will add the other fields like Gender, Department, Phone Number etc.. later. Also, at the moment, we only have textboxes on our form. In our upcoming videos we will discuss working with radio buttons, checkbox, dropdownlist etc
Replace the HTML in "create-employee.component.html" file with the following HTML
Angular Generated Form Model : {{employeeForm.value | json}}
Code Explanation:
We are using Bootstrap CSS classes like panel, panel-primary, panel-heading, panel-title etc to style the form. There is no Angular here. If you are new to bootstrap, please click here to check out our Bootstrap tutorial.
Consider the following line of code
<form #employeeForm="ngForm" (ngSubmit)="saveEmployee(employeeForm)">
#employeeForm is called the template reference variable. Notice we have assigned "ngForm" as the value for the template reference variable employeeForm. So employeeForm variable holds a reference to the form. When Angular sees a form tag, it automatically attaches the ngForm directive to it. The ngForm directive supplements the form element with additional features. It holds all the form controls that we create with ngModel directive and name attribute, and monitors their properties like value, dirty, touched, valid etc. The form also has all these properties. We will discuss these properties at the individual control level and at the form level in detail in our upcoming videos.
The ngSubmit directive submits the form when we hit the enter key or when we click the Submit button. When the form is submitted, saveEmployee() method is called and we are passing it the employeeForm. We do not have this method yet. We will create it in the component class in just a bit.
The ngForm directive is provided by Angular FormsModule. So for us to be able to use it, we will have to import the FormsModule in our AppModule file (app.module.ts). So please make sure to include the following import statement. Also include "FormsModule" in the imports array of @NgModule decorator.
import { FormsModule } from '@angular/forms';
If "FormsModule" is not imported you will see the following error in the browser developer toolsthere is no directive with exportas set to ngform
Consider the following block of code
Angular Generated Forom Model : {{employeeForm.value | json}}
Finally in the CreateEmployeeComponent class include the following saveEmployee() method. At the moment we are simply logging the value of the Angular generated Form model to the console. In our upcoming videos, we will discuss how to save the new employee to a database table.
saveEmployee(employeeForm: NgForm): void {
console.log(employeeForm.value);
}
Please note : Make sure to import NgForm type from '@angular/forms'
import { NgForm } from '@angular/forms';
Remember we discussed, The ngForm directive supplements the form element with additional features and properties like value, dirty, touched, valid etc. To see all these properties, knock of the value property and log just the employeeForm as shown below.
saveEmployee(employeeForm: NgForm): void {
console.log(employeeForm);
}
At this point, if you fill in the Full Name and Email text boxes and when you submit the form either by click the "Save" button or by pressing the "Enter" key you will see the form logged to the browser console and you can see all these properties.
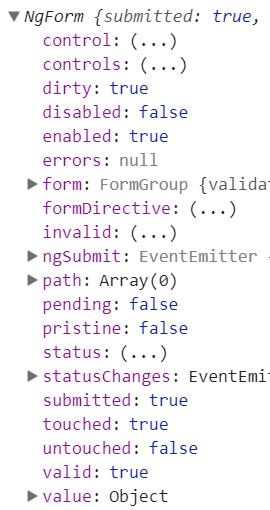
These properties are greatly useful for performing form validation. We will discuss them in detail in our upcoming videos.

Part 2 - Reading data in angular | Text | Slides
Part 3 - Angular routing and navigation | Text | Slides
Part 4 - Angular base href | Text | Slides
In Part 2 of Angular CRUD tutorial, we discussed performing the READ operation. In this video and in the next few videos we will discuss performing the CREATE operation. To understand the CREATE operation, let us build a form that help us create a new employee. For this we will use the createEmployee component that we already created in one of our previous videos in this series. Along the way, we will also discuss performing validation and displaying meaningful error messages to the user.
There are 2 ways to create forms in Angular
- Template Driven Forms
- Model Driven Forms (Commonly called Reactive Forms)
Both these approaches have their own pros and cons. For example, Template Driven forms are generally used to create simple forms. On the other hand, Reactive forms are used to create complex forms. For example, if you want to add form controls dynamically or perform cross-field validation we use the Reactive forms approach. There are several other differences, between Template driven and Reactive forms. We will discuss those differences in detail, in a later video.
In this video, we will use the Template driven approach to build the "Create Employee" form. As the name implies, template driven forms are heavy on the template. This means we do most of the work in the view template of the component.
We want to design our "Create Employee" form as shown below. To keep this simple, at the moment we only have 2 fields (Full Name & Email). We will add the other fields like Gender, Department, Phone Number etc.. later. Also, at the moment, we only have textboxes on our form. In our upcoming videos we will discuss working with radio buttons, checkbox, dropdownlist etc
Replace the HTML in "create-employee.component.html" file with the following HTML
<form
#employeeForm="ngForm"
(ngSubmit)="saveEmployee(employeeForm)">
<div class="panel
panel-primary">
<div class="panel-heading">
<h3 class="panel-title">Create
Employee</h3>
</div>
<div class="panel-body">
<div class="form-group">
<label for="fullName">Full
Name</label>
<input id="fullName"
type="text"
class="form-control"
name="fullName"
[(ngModel)]="fullName">
</div>
<div class="form-group">
<label for="email">Email</label>
<input id="email"
type="text"
class="form-control"
name="email"
[(ngModel)]="email">
</div>
</div>
<div class="panel-footer">
<button class="btn
btn-primary" type="submit">Save</button>
</div>
</div>
</form>
Angular Generated Form Model : {{employeeForm.value | json}}
Code Explanation:
We are using Bootstrap CSS classes like panel, panel-primary, panel-heading, panel-title etc to style the form. There is no Angular here. If you are new to bootstrap, please click here to check out our Bootstrap tutorial.
Consider the following line of code
<form #employeeForm="ngForm" (ngSubmit)="saveEmployee(employeeForm)">
#employeeForm is called the template reference variable. Notice we have assigned "ngForm" as the value for the template reference variable employeeForm. So employeeForm variable holds a reference to the form. When Angular sees a form tag, it automatically attaches the ngForm directive to it. The ngForm directive supplements the form element with additional features. It holds all the form controls that we create with ngModel directive and name attribute, and monitors their properties like value, dirty, touched, valid etc. The form also has all these properties. We will discuss these properties at the individual control level and at the form level in detail in our upcoming videos.
The ngSubmit directive submits the form when we hit the enter key or when we click the Submit button. When the form is submitted, saveEmployee() method is called and we are passing it the employeeForm. We do not have this method yet. We will create it in the component class in just a bit.
The ngForm directive is provided by Angular FormsModule. So for us to be able to use it, we will have to import the FormsModule in our AppModule file (app.module.ts). So please make sure to include the following import statement. Also include "FormsModule" in the imports array of @NgModule decorator.
import { FormsModule } from '@angular/forms';
If "FormsModule" is not imported you will see the following error in the browser developer toolsthere is no directive with exportas set to ngform
Consider the following block of code
<div
class="form-group">
<label for="fullName">Full
Name</label>
<input id="fullName"
type="text"
class="form-control"
name="fullName"
[(ngModel)]="fullName">
</div>
- To style the "Full Name" field and it's associated label, we are using Bootstrap. So "form-group" and "form-control" are Bootstrap CSS classes used for styling. There is no Angular here.
- The "for" attribute on the label, is used to link the label with it's associated "fullName" input control. With the "for" attribute in place, when we click on the label, it's associated input element automatically receives the focus. Again there is no Angular here. It's all standard HTML.
- The ngModel directive is used for creating two-way data binding i.e to keep the HTML element value and it's corresponding component property in sync. We discussed two-way data binding in detail in our Angular 2 course. Click here to watch two-way data binding video.
- Notice we have set ngModel directive to "fullName". We do not have "fullName" property in the component class. Angular automatically creates "fullName" property using the value of the "name" attribute of the HTML input element. This is why "name" attribute is also required when we use ngModel directive. If we remove the "name" attribute, we get the following error.
If ngModel is used within a form tag, either the name attribute must be set or the form control must be defined as 'standalone' in ngModelOptions - So the bottom line is, if you want an input element to be tracked by the form make sure to include both the name attribute and ngModel directive. Otherwise that input element will not be part of the Form model created by Angular.
Consider the following piece of code : We are using the value property of the employeeForm to display fullName and email property values of the Form Model that angular automatically generates for us. We are using the Angular "json" pipe to format the JSON data.
Angular Generated Forom Model : {{employeeForm.value | json}}
Finally in the CreateEmployeeComponent class include the following saveEmployee() method. At the moment we are simply logging the value of the Angular generated Form model to the console. In our upcoming videos, we will discuss how to save the new employee to a database table.
saveEmployee(employeeForm: NgForm): void {
console.log(employeeForm.value);
}
Please note : Make sure to import NgForm type from '@angular/forms'
import { NgForm } from '@angular/forms';
Remember we discussed, The ngForm directive supplements the form element with additional features and properties like value, dirty, touched, valid etc. To see all these properties, knock of the value property and log just the employeeForm as shown below.
saveEmployee(employeeForm: NgForm): void {
console.log(employeeForm);
}
At this point, if you fill in the Full Name and Email text boxes and when you submit the form either by click the "Save" button or by pressing the "Enter" key you will see the form logged to the browser console and you can see all these properties.
These properties are greatly useful for performing form validation. We will discuss them in detail in our upcoming videos.
import { Component, OnInit } from '@angular/core';
ReplyDeleteimport { NgForm } from '@angular/forms';
@Component({
selector: 'app-create-employee',
templateUrl: './create-employee.component.html',
styleUrls: ['./create-employee.component.css'],
})
export class CreateEmployeeComponent implements OnInit {
fullName:string="";
email:string="";
saveEmployee(employeeForm: NgForm): void {
console.log(employeeForm.value);
}
constructor() { }
ngOnInit(): void {
}
}