Suggested Videos
Part 114 - Adding properties to composite custom controls
Part 115 - Solving the problems of asp.net composite custom calendar control
Part 116 - Adding custom events to asp.net composite custom control
In this video we will discuss about assigning an image to the Composite Custom calendar control in visual studio tool box. Please watch Parts 112 to 116 from the asp.net video tutorial before proceeding with this video.
To associate an image to the composite custom calendar control use ToolboxBitmap attribute. This attribute is present in System.Drawing namespace. There are 2 ways we can use this attribute.
Using ToolboxBitmap attribute to associate, the image of an existing control: In this example, we are assigning the image of the asp.net calendar control to the composite custom calendar control. Please notice the usage of ToolboxBitmap attribute with "typeof" keyword.
[System.Drawing.ToolboxBitmap(typeof(Calendar))]
[ToolboxData("<{0}:CustomCalendar runat=server></{0}:CustomCalendar>")]
public class CustomCalendar : CompositeControl
{
TextBox textBox;
ImageButton imageButton;
Calendar calendar;
// Rest of the code.....
}
Rebuild the CustomControls project. Re-add the CustomCalendar control to visual studio tool box and notice that the asp.net calendar control icon is also used for the CustomCalendar control.

Using ToolboxBitmap attribute to associate a custom image: Create an image measuring 16X16 pixels in dimensions. I have used Microsoft paint to come up with the custom image that you can see below.

Save this image to "C:\Images" folder or in a folder of your choice. I have given the name of "CustomCalendarIcon.bmp" to the image.
Finally use the ToolboxBitmap attribute and specify the path to the image.
[System.Drawing.ToolboxBitmap(@"C:\Images\CustomCalendarIcon.bmp")]
[ToolboxData("<{0}:CustomCalendar runat=server></{0}:CustomCalendar>")]
public class CustomCalendar : CompositeControl
{
TextBox textBox;
ImageButton imageButton;
Calendar calendar;
// Rest of the code.....
}
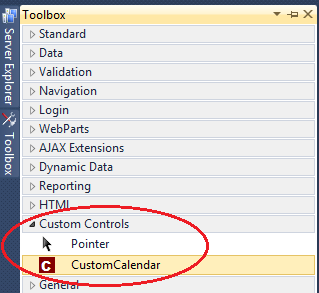
Rebuild the CustomControls project. Re-add the CustomCalendar control to visual studio tool box and notice that the custom image "CustomCalendarIcon.bmp" is used for the CustomCalendar control.
In our next video, we will discuss about the differences between user controls and custom controls.

Part 114 - Adding properties to composite custom controls
Part 115 - Solving the problems of asp.net composite custom calendar control
Part 116 - Adding custom events to asp.net composite custom control
In this video we will discuss about assigning an image to the Composite Custom calendar control in visual studio tool box. Please watch Parts 112 to 116 from the asp.net video tutorial before proceeding with this video.
To associate an image to the composite custom calendar control use ToolboxBitmap attribute. This attribute is present in System.Drawing namespace. There are 2 ways we can use this attribute.
Using ToolboxBitmap attribute to associate, the image of an existing control: In this example, we are assigning the image of the asp.net calendar control to the composite custom calendar control. Please notice the usage of ToolboxBitmap attribute with "typeof" keyword.
[System.Drawing.ToolboxBitmap(typeof(Calendar))]
[ToolboxData("<{0}:CustomCalendar runat=server></{0}:CustomCalendar>")]
public class CustomCalendar : CompositeControl
{
TextBox textBox;
ImageButton imageButton;
Calendar calendar;
// Rest of the code.....
}
Rebuild the CustomControls project. Re-add the CustomCalendar control to visual studio tool box and notice that the asp.net calendar control icon is also used for the CustomCalendar control.
Using ToolboxBitmap attribute to associate a custom image: Create an image measuring 16X16 pixels in dimensions. I have used Microsoft paint to come up with the custom image that you can see below.
Save this image to "C:\Images" folder or in a folder of your choice. I have given the name of "CustomCalendarIcon.bmp" to the image.
Finally use the ToolboxBitmap attribute and specify the path to the image.
[System.Drawing.ToolboxBitmap(@"C:\Images\CustomCalendarIcon.bmp")]
[ToolboxData("<{0}:CustomCalendar runat=server></{0}:CustomCalendar>")]
public class CustomCalendar : CompositeControl
{
TextBox textBox;
ImageButton imageButton;
Calendar calendar;
// Rest of the code.....
}
Rebuild the CustomControls project. Re-add the CustomCalendar control to visual studio tool box and notice that the custom image "CustomCalendarIcon.bmp" is used for the CustomCalendar control.
In our next video, we will discuss about the differences between user controls and custom controls.
No comments:
Post a Comment
It would be great if you can help share these free resources