Suggested Videos
Part 13 - Angular cli generate class, interface and enum | Text | Slides
Part 14 - Linting TypeScript | Text | Slides
Part 15 - Angular tslint rules | Text | Slides
In this video we will discuss, How to display linting errors in Visual Studio Code
At the moment, our editor Visual Studio Code does not show linting errors. It would be nice if Visual Studio Code can display these linting errors so we can fix them as we are writing code. To achieve this install Visual Studio Code extension - TSLint.
To install this extension

Once you click on the line where you see a linting error, a light bulb appears on the left margin and when you click on the light bulb you will see 1 to 3 options

You can click on the respective options

Part 13 - Angular cli generate class, interface and enum | Text | Slides
Part 14 - Linting TypeScript | Text | Slides
Part 15 - Angular tslint rules | Text | Slides
In this video we will discuss, How to display linting errors in Visual Studio Code
At the moment, our editor Visual Studio Code does not show linting errors. It would be nice if Visual Studio Code can display these linting errors so we can fix them as we are writing code. To achieve this install Visual Studio Code extension - TSLint.
To install this extension
- Click on the "View" menu in "Visual Studi Code" and select "Extensions" from the context menu
- In the "Search Extensions in Marketplace" textbox type TSLint

- Click the "install" button
- Once installed, restart Visual Stduio Code to activate TSLint

Once you click on the line where you see a linting error, a light bulb appears on the left margin and when you click on the light bulb you will see 1 to 3 options

You can click on the respective options
- To have the linting errors fixed automatically depending on whether the issue supports automatic fix or not
- To disable that specific rule
- To get documentation of the rule
- Click on the "View" menu in "Visual Studi Code" and select "Extensions" from the context menu
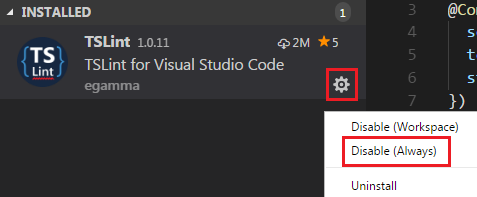
- In the "EXTENSIONS" window, expand "INSTALLED" section
- Click the "SETTINGS" icon against TSLint extension
- Select "Disable (Always)" option

- Restart Visual Studio Code

No comments:
Post a Comment
It would be great if you can help share these free resources