Suggested Videos
Part 21 - Angular component input properties | Text | Slides
Part 22 - Angular component output properties | Text | Slides
Part 23 - Interfaces in Angular 2 | Text | Slides
In this video we will discuss Angular component lifecycle hooks.
A component has a lifecycle managed by Angular. Angular
To tap into and react when these life cycle events occur, angular offers several lifecycle hooks as shown in the image below.
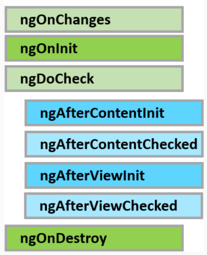
The 3 most commonly used hooks are
There are 3 simple steps to use the Life Cycle Hooks
Step 1 : Import the Life Cycle Hook interface. For example, to use ngOnInit() life cycle hook, import OnInit interface.
import { OnInit } from '@angular/core';
Step 2 : Make the component class implement the Life Cycle Hook interface, using the implements keyword as shown below. This step is optional, but good to have so you will get editor support and flags errors at compile time if you incorrectly implement the interface method or make any typographical errors.
export class SimpleComponent implements OnInit { }
Step 3 : Write the implementation code for the life cycle interface method. Each interface has a single hook method whose name is the interface name prefixed with ng.
ngOnInit() {
console.log('OnInit Life Cycle Hook');
}
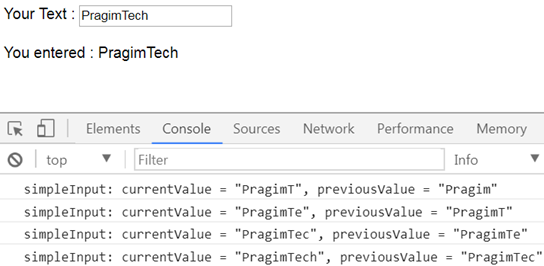
Let's understand ngOnChanges life cycle hook with a simple example. Here is what we want to do. As soon as the user starts typing into the text box, we want to capture the current and previous value and log it to the browser console as shown below. We can very easily achieve this by using the ngOnChanges life cycle hook.
ngOnChanges, is called every time the value of an input property of a component changes. So first let's create a SimpleComponent with an input property as shown below. We will continue with the example we worked with in our previous video. Add a new folder in the App folder and name it Others. Add a new TypeScript file to this folder and name it - simple.component.ts. Copy and paste the following code which is commented and self explanatory.
Now copy and paste the following code in our root component - app.component.ts
Please note : Do not forget to import and declare SimpleComponent in the root module - app.module.ts
At this point run the application and launch browser developer tools. As you start typing into the text box, the changes are logged to the console by the ngOnChanges life cycle hook method.
The steps for implementing the other component life cycle hook methods are very similar.

Part 21 - Angular component input properties | Text | Slides
Part 22 - Angular component output properties | Text | Slides
Part 23 - Interfaces in Angular 2 | Text | Slides
In this video we will discuss Angular component lifecycle hooks.
A component has a lifecycle managed by Angular. Angular
- Creates the component
- Renders the component
- Creates and renders the component children
- Checks when the component data-bound properties change, and
- Destroys the component before removing it from the DOM
To tap into and react when these life cycle events occur, angular offers several lifecycle hooks as shown in the image below.
The 3 most commonly used hooks are
| Life Cycle Hook | Purpose |
|---|---|
| ngOnChanges | Executes, every time the value of an input property changes. The hook method receives a SimpleChanges object containing current and previous property values. This is called before ngOnInit |
| ngOnInit | Executes after the constructor and after ngOnChange hook for the first time. It is most commonly used for component initialisation and retrieving data from a database |
| ngOnDestroy | Executes just before angular destroys the component and generally used for performing cleanup |
There are 3 simple steps to use the Life Cycle Hooks
Step 1 : Import the Life Cycle Hook interface. For example, to use ngOnInit() life cycle hook, import OnInit interface.
import { OnInit } from '@angular/core';
Step 2 : Make the component class implement the Life Cycle Hook interface, using the implements keyword as shown below. This step is optional, but good to have so you will get editor support and flags errors at compile time if you incorrectly implement the interface method or make any typographical errors.
export class SimpleComponent implements OnInit { }
Step 3 : Write the implementation code for the life cycle interface method. Each interface has a single hook method whose name is the interface name prefixed with ng.
ngOnInit() {
console.log('OnInit Life Cycle Hook');
}
Let's understand ngOnChanges life cycle hook with a simple example. Here is what we want to do. As soon as the user starts typing into the text box, we want to capture the current and previous value and log it to the browser console as shown below. We can very easily achieve this by using the ngOnChanges life cycle hook.
ngOnChanges, is called every time the value of an input property of a component changes. So first let's create a SimpleComponent with an input property as shown below. We will continue with the example we worked with in our previous video. Add a new folder in the App folder and name it Others. Add a new TypeScript file to this folder and name it - simple.component.ts. Copy and paste the following code which is commented and self explanatory.
// Step 1
: Import OnChanges and SimpleChanges
import { Component, Input, OnChanges, SimpleChanges } from '@angular/core';
// The
selector "simple" will be used as the directive
// where
we want to use this component. Notice we are
// also
using the simpleInput property with interpolation
// to
display the value it receives from the parent
//
component
@Component({
selector: 'simple',
template: `You
entered : {{simpleInput}}`
})
// Step 2
: Implement OnChanges Life Cycle Hook interface
export class
SimpleComponent implements OnChanges {
// Input
property. As and when this property changes
// ngOnChanges
life cycle hook method is called
@Input() simpleInput: string;
// Step 3 :
Implementation for the hook method
// This code
logs the current and previous value
// to the
console.
ngOnChanges(changes: SimpleChanges) {
for (let
propertyName in changes) {
let change = changes[propertyName];
let current = JSON.stringify(change.currentValue);
let previous = JSON.stringify(change.previousValue);
console.log(propertyName + ': currentValue = '
+ current + ', previousValue = ' + previous);
// The above
line can be rewritten using
// placeholder
syntax as shown below
//
console.log(`${propertyName}: currentValue
// = ${current
}, previousValue = ${previous }`);
}
}
}
Now copy and paste the following code in our root component - app.component.ts
import { Component } from '@angular/core';
// Notice
we have placed the text box in this root component
// To
keep the value in the textbox and the component property
// value
"userText" in sync we are using 2 way data binding
// We
have also bound userText property of this component
// to the
input property of the SimpleComponent
@Component({
selector: 'my-app',
template: `Your
Text : <input type='text' [(ngModel)]='userText'/>
<br/><br/>
<simple
[simpleInput]='userText'></simple>
`
})
export class
AppComponent {
userText: string = 'Pragim';
}
Please note : Do not forget to import and declare SimpleComponent in the root module - app.module.ts
At this point run the application and launch browser developer tools. As you start typing into the text box, the changes are logged to the console by the ngOnChanges life cycle hook method.
The steps for implementing the other component life cycle hook methods are very similar.
Do the ngOnChnages always accepts the SimpleChanges type parameter or it has to do something with component name?
ReplyDeletengOnChanges(changes: SimpleChanges) {}
It got it. SimleChanges is the object provided by the angular framework that represents the basic change from a previous to a new value.
Delete