Suggested Videos
Part 100 - jQuery sortable from database
Part 101 - jquery background color animate
Part 102 - jQuery class transition animation
In this video we will discuss how to display both images and text in the suggestions menu of jQuery autocomplete widget. Let us understand this with an example.
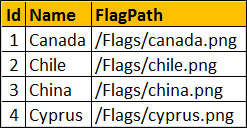
We will be using the following database table - tblCountry

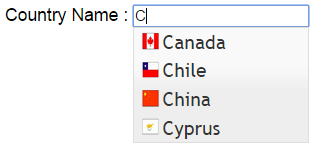
When we type the first character of a country name, we want to retrieve all the countries that start with that letter and display their flag and name in the suggestions menu.

Step 1 : Create the countries table and the stored procedure to retrieve data
Step 2 : Create new asp.net web application project. Name it Demo.
Step 3 : Include a connection string in the web.config file to your database.
Step 4 : Add a folder with Name = flags to the project. Copy and paste the respective country flag images.
Step 5 : Add a class file to the project. Name it Country.cs. Copy and paste the following code.
Step 6 : Add a WebService (ASMX) to the project. Name it CountryService.asmx. Copy and paste the following code.
Step 7 : Download jQuery UI from jqueryui.com. Copy and paste the following files in your project.
a) jquery-ui.js
b) jquery-ui.css
c) images
Step 8 : Add a WebForm to the ASP.NET project. Copy and paste the following HTML and jQuery code.

Part 100 - jQuery sortable from database
Part 101 - jquery background color animate
Part 102 - jQuery class transition animation
In this video we will discuss how to display both images and text in the suggestions menu of jQuery autocomplete widget. Let us understand this with an example.
We will be using the following database table - tblCountry

When we type the first character of a country name, we want to retrieve all the countries that start with that letter and display their flag and name in the suggestions menu.

Step 1 : Create the countries table and the stored procedure to retrieve data
Create table tblCountry
(
Id int identity
primary key,
Name nvarchar(100),
FlagPath nvarchar(200)
)
Go
Insert into tblCountry values('Canada','/Flags/canada.png')
Insert into tblCountry values('Chile','/Flags/chile.png')
Insert into tblCountry values('China','/Flags/china.png')
Insert into tblCountry values('Cyprus','/Flags/cyprus.png')
Go
Create proc spGetCountries
@Name nvarchar(100)
as
Begin
Select *
from tblCountry where
Name like @Name +
'%'
End
Go
Step 2 : Create new asp.net web application project. Name it Demo.
Step 3 : Include a connection string in the web.config file to your database.
<add name="DBCS"
connectionString="server=.;database=SampleDB;integrated security=SSPI"/>
Step 4 : Add a folder with Name = flags to the project. Copy and paste the respective country flag images.
Step 5 : Add a class file to the project. Name it Country.cs. Copy and paste the following code.
namespace Demo
{
public class Country
{
public int Id { get; set; }
public string Name { get; set; }
public string FlagPath { get; set; }
}
}
Step 6 : Add a WebService (ASMX) to the project. Name it CountryService.asmx. Copy and paste the following code.
using System;
using System.Collections.Generic;
using System.Configuration;
using System.Data;
using System.Data.SqlClient;
using System.Web.Script.Serialization;
using System.Web.Services;
namespace Demo
{
[WebService(Namespace = "http://tempuri.org/")]
[WebServiceBinding(ConformsTo = WsiProfiles.BasicProfile1_1)]
[System.ComponentModel.ToolboxItem(false)]
[System.Web.Script.Services.ScriptService]
public class CountryService : System.Web.Services.WebService
{
[WebMethod]
public void GetCountries(string term)
{
string cs = ConfigurationManager.ConnectionStrings["DBCS"].ConnectionString;
List<Country> countries = new List<Country>();
using (SqlConnection con = new SqlConnection(cs))
{
SqlCommand cmd = new SqlCommand("spGetCountries", con);
cmd.CommandType = CommandType.StoredProcedure;
SqlParameter paramName = new SqlParameter()
{
ParameterName = "@Name",
Value = term
};
cmd.Parameters.Add(paramName);
con.Open();
SqlDataReader rdr = cmd.ExecuteReader();
while (rdr.Read())
{
Country country = new Country();
country.Id = Convert.ToInt32(rdr["Id"]);
country.Name = rdr["Name"].ToString();
country.FlagPath = rdr["FlagPath"].ToString();
countries.Add(country);
}
}
JavaScriptSerializer js = new JavaScriptSerializer();
Context.Response.Write(js.Serialize(countries));
}
}
}
Step 7 : Download jQuery UI from jqueryui.com. Copy and paste the following files in your project.
a) jquery-ui.js
b) jquery-ui.css
c) images
Step 8 : Add a WebForm to the ASP.NET project. Copy and paste the following HTML and jQuery code.
<%@ Page Language="C#" AutoEventWireup="true"
CodeBehind="WebForm1.aspx.cs" Inherits="Demo.WebForm1" %>
<!DOCTYPE html>
<html xmlns="http://www.w3.org/1999/xhtml">
<head runat="server">
<title></title>
<script src="jquery-1.11.2.js"></script>
<script src="jquery-ui.js"></script>
<link href="jquery-ui.css" rel="stylesheet" />
<script type="text/javascript">
$(document).ready(function () {
$('#txtName').autocomplete({
minLength: 1,
source: function (request, response)
{
$.ajax({
url: 'CountryService.asmx/GetCountries',
method: 'post',
data: { term:
request.term },
dataType: 'json',
success: function (data) {
response(data);
},
error: function (err) {
alert(err);
}
});
},
focus: updateTextBox,
select: updateTextBox
})
.autocomplete('instance')._renderItem = function (ul, item) {
return $('<li>')
.append("<img class='imageClass' src=" + item.FlagPath + "
alt=" + item.Name + "/>")
.append('<a>' +
item.Name + '</a>')
.appendTo(ul);
};
function updateTextBox(event, ui) {
$(this).val(ui.item.Name);
return false;
}
});
</script>
<style>
.imageClass {
width: 16px;
height: 16px;
padding-right: 3px;
}
</style>
</head>
<body style="font-family:
Arial">
<form id="form1" runat="server">
Country Name : <input id="txtName" type="text" />
</form>
</body>
</html>

dear sir kindly explain with table ... i will be very thanks full for this also ...............
ReplyDeleteand your video is very useful for every one ...very thanks
see this i want to know how it work
http://jsfiddle.net/ShadGunnerAziz/nPxb8/