In this video we will discuss using LINQ to SQL to retrieve data from a SQL Server database.
What is LINQ to SQL
LINQ to SQL is an ORM (Object Relational Mapping) framework, that automatically creates strongly typed .net classes based on database tables. We can then write LINQ to SQL queries (Select, Insert, Update, Delete) in any .NET supported language (C#, VB etc). The LINQ to SQL provider will then convert LINQ queries to Transact-SQL that the SQL Server database understands. LINQ to SQL supports transactions, views, and stored procedures. LINQ to SQL supports only SQL Server database.
Since LINQ to SQL models a relational database using strongly typed .net classes, we have the following advantages
1. Intellisense support
2. Compile time error checking
3. Debugging support
Modeling Databases - Creating LINQ to SQL classes
Use the LINQ to SQL designer that ships with Visual Studio to create LINQ to SQL classes. Here are the steps.
Step 1 : Create a dataabse. Name it Sample.
Step 2 : Execute the following SQL script to create Departments and Employees tables and populate them with test data.
Step 3 : Run Visual Studio as an administrator. Create a new empty asp.net web application project. Name it Demo.
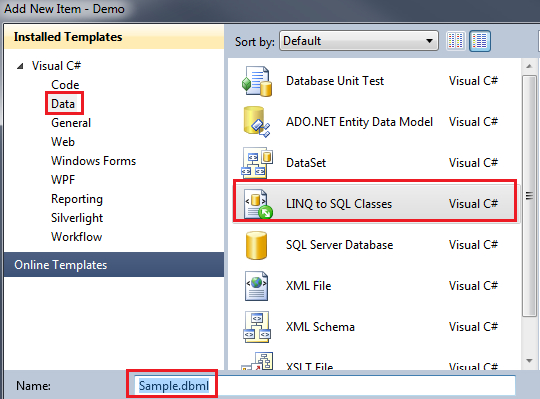
Step 4 : Right click on the project in solution explorer and add LINQ to SQL Classes. Change the name from DataClasses1.dbml to Sample.dbml

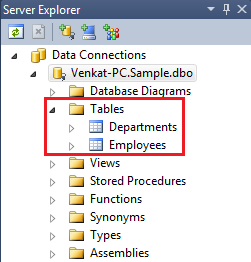
Step 5 : At this point, Sample.dbml file should have been added to the project. Click on Server Explorer link on Sample.dbml file. In the Server Explorer window, you should find all the tables in the Sample database. Drag and drop the tables on Sample.dbml file.

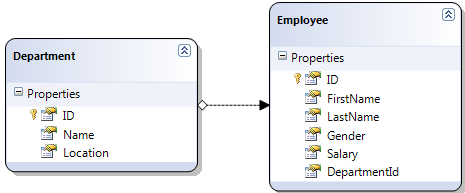
Step 6 : At this point we should have Department and Employee classes. The properties of the class map to the columns of the respective table in the database. The arrow between the classes represent the association between them. These associations are modeled based on the primary-key/foreign-key relationships between the tables in the database. Notice that the arrow is pointing from Department to Employee entity. In this case there is a One-to-Many relationship between Department and Employee entities. A Department can have 1 or more employees.

Step 7 : Add a WebForm to the project. Drag and Drop a GridView control on the webform.
Step 8 : Copy and paste the following code in the code-behind file.
In the Page_Load() event, we are creating an instance of SampleDataContext class. We will discuss DataContext class in detail in a later video session. For now, understand that the DataContext is the entry point to the underlying database. Next we have a LINQ query which fetches all the Male Employees sorted by Salary in descending order.
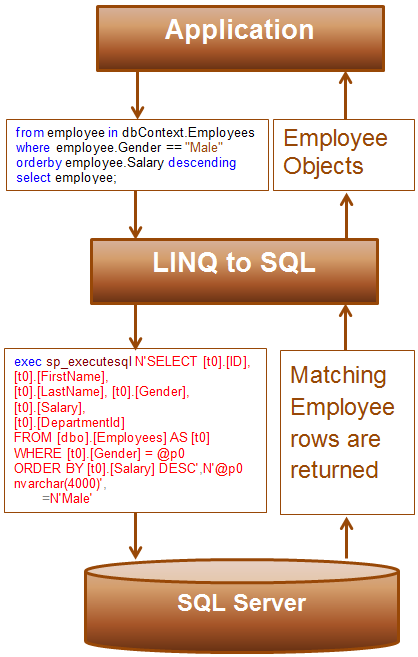
We have not written any T-SQL code here. So, how is the application able to retrieve data from the SQL Server database. Let us understand what is happening behind the scenes.
1. Application issues a LINQ Query
2. LINQ to SQL provider translates the LINQ query into T-SQL that the SQL Server database can understand
3. SQL Server executes the query, and returns the matching rows
4. LINQ to SQL provider creates Employee objects, populates properties and return the objects to the application.


What is LINQ to SQL
LINQ to SQL is an ORM (Object Relational Mapping) framework, that automatically creates strongly typed .net classes based on database tables. We can then write LINQ to SQL queries (Select, Insert, Update, Delete) in any .NET supported language (C#, VB etc). The LINQ to SQL provider will then convert LINQ queries to Transact-SQL that the SQL Server database understands. LINQ to SQL supports transactions, views, and stored procedures. LINQ to SQL supports only SQL Server database.
Since LINQ to SQL models a relational database using strongly typed .net classes, we have the following advantages
1. Intellisense support
2. Compile time error checking
3. Debugging support
Modeling Databases - Creating LINQ to SQL classes
Use the LINQ to SQL designer that ships with Visual Studio to create LINQ to SQL classes. Here are the steps.
Step 1 : Create a dataabse. Name it Sample.
Step 2 : Execute the following SQL script to create Departments and Employees tables and populate them with test data.
Create table Departments
(
ID int primary
key identity,
Name nvarchar(50),
Location nvarchar(50)
)
GO
Create table Employees
(
ID int primary
key identity,
FirstName nvarchar(50),
LastName nvarchar(50),
Gender nvarchar(50),
Salary int,
DepartmentId int foreign key references Departments(Id)
)
GO
Insert into Departments values ('IT', 'New York')
Insert into Departments values ('HR', 'London')
Insert into Departments values ('Payroll', 'Sydney')
GO
Insert into Employees values ('Mark', 'Hastings', 'Male', 60000, 1)
Insert into Employees values ('Steve', 'Pound', 'Male', 45000, 3)
Insert into Employees values ('Ben', 'Hoskins', 'Male', 70000, 1)
Insert into Employees values ('Philip', 'Hastings', 'Male', 45000, 2)
Insert into Employees values ('Mary', 'Lambeth', 'Female', 30000, 2)
Insert into Employees values ('Valarie', 'Vikings', 'Female', 35000, 3)
Insert into Employees values ('John', 'Stanmore', 'Male', 80000, 1)
GO
Step 3 : Run Visual Studio as an administrator. Create a new empty asp.net web application project. Name it Demo.
Step 4 : Right click on the project in solution explorer and add LINQ to SQL Classes. Change the name from DataClasses1.dbml to Sample.dbml

Step 5 : At this point, Sample.dbml file should have been added to the project. Click on Server Explorer link on Sample.dbml file. In the Server Explorer window, you should find all the tables in the Sample database. Drag and drop the tables on Sample.dbml file.

Step 6 : At this point we should have Department and Employee classes. The properties of the class map to the columns of the respective table in the database. The arrow between the classes represent the association between them. These associations are modeled based on the primary-key/foreign-key relationships between the tables in the database. Notice that the arrow is pointing from Department to Employee entity. In this case there is a One-to-Many relationship between Department and Employee entities. A Department can have 1 or more employees.

Step 7 : Add a WebForm to the project. Drag and Drop a GridView control on the webform.
Step 8 : Copy and paste the following code in the code-behind file.
using System;
using System.Linq;
namespace Demo
{
public partial class
WebForm1 : System.Web.UI.Page
{
protected void Page_Load(object sender,
EventArgs e)
{
SampleDataContext dbContext = new SampleDataContext();
GridView1.DataSource = from employee in
dbContext.Employees
where employee.Gender == "Male"
orderby employee.Salary descending
select employee;
GridView1.DataBind();
}
}
}
In the Page_Load() event, we are creating an instance of SampleDataContext class. We will discuss DataContext class in detail in a later video session. For now, understand that the DataContext is the entry point to the underlying database. Next we have a LINQ query which fetches all the Male Employees sorted by Salary in descending order.
We have not written any T-SQL code here. So, how is the application able to retrieve data from the SQL Server database. Let us understand what is happening behind the scenes.
1. Application issues a LINQ Query
2. LINQ to SQL provider translates the LINQ query into T-SQL that the SQL Server database can understand
3. SQL Server executes the query, and returns the matching rows
4. LINQ to SQL provider creates Employee objects, populates properties and return the objects to the application.


Hi Venkat Please upload the video on n-tier architecture and Design Pattern.
ReplyDeletegetting error on SampleDataContext
ReplyDeletewhy it is dbContext.Employees and not Employee only as table name is Employee only
ReplyDelete