In this video session
1. We will learn about using visual studio
2. Creating your first ASP.NET web application
3. Learn about different windows in visual studio
Start Page in Visual Studio:
When you first run visual studio, you will see the start page. The start page contains latest news related to .NET development, learning and community resources. If you are using visual studio 2010, at the bottom of the start page, you will notice the following 2 options.
1. Close page after project load - Select this option if you want to close the start page, as soon as you open and load a project.
2. Show page on startup - Uncheck this option, if you don't want the start page to be shown, when you start visual studio.
If you have closed the start page, and later, if you want to see it again, select START PAGE from the VIEW menu.
Creating your first ASP.NET web application:
1. Select File => New Project
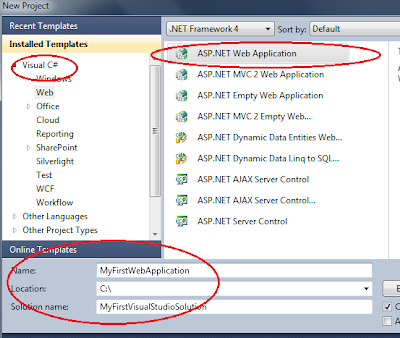
2. Select the Programming language you want to use from Installed Templates section, in the New Project dialog box. Out of the box, you can either use C# or Visual Basic to develop ASP.NET web applications.
3. Now, Select ASP.NET Web Application, from the middle section of the New Project dialog box.
4. Give your project and solution a meaningful name.
5. Select the location, where you want the solution to be created.
6. Finally click OK.

Different windows in visual studio:
At this point, you should have your first web application created. Now, let's shift our focus, to learn more about the windows that we see in visual studio.
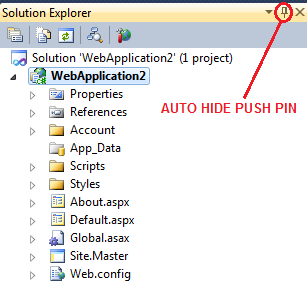
Solution Explorer: To view the solution explorer window, from the VIEW menu, select SOLUTION EXPLORER. Or you can also use keyboard short cut, CTRL + W, S. On the solution explorer, use the AUTO-HIDE push pin button, to either show or hide solution explorer.

Visual Studio organizes applications into projects and solutions. A solution is a collection of projects. In our example, we have WebApplication2 solution. This solution has only one project - WebApplication2. If you want to add another project to the solution, simply right click the solution, and Select Add => New Project. For example, to add a class library project, select CLASS LIBRARY from the New Project dialog box and click OK.
At this point, your solution should contain 2 projects
1. A web Application Project - WebApplication2
2. A class library project - ClassLibrary1

Notice that, in the solution explorer, WebApplication2 project is bolded, indicating that this is the start up project. You can only have one start up project in a solution. If you want to change your start up project, RIGHT CLICK the project, and select "SET AS STARTUP PROJECT". The start-up project is the project that runs when you click Start in Visual Studio .NET. When you’re developing multiple projects as part of a single solution, the start-up project usually calls the other projects in the solution.
The solution file will have a .sln extension and the project file will have .csproj (if c# is the programming language) or .vbproj (if visual basic is the programming language)
Tool Box: To view the TOOL BOX, Select TOOL BOX from the VIEW menu, or use the keyboard short cut, CTRL + W, X. Just like, solution explorer, tool box can be auto hidden using the AUTO-HIDE PUSH PIN. Toolbox displays the controls and components that can be used on a web form.
Web Forms: WebForms has the extension of .aspx. A web form also has a code behind and designer files. Code behind files has the extension of .aspx.cs (if c# is the programming language) or .aspx.vb (if vb is the programming language). Designer files contains the extension of .aspx.designer.cs (if c# is the programming language) or .aspx.designer.vb (if visual basic is the programming language). Code behind files contain the code that user writes, where as the designer file contains the auto generated code. You shouldn't change the code in the designer file, because that code might later be modified by Visual Studio and your changes could be overwritten. A Web form is associated with its code file using the @Page directive found in the Web form’s HTML.
<%@ Page Title="Home Page" Language="C#" MasterPageFile="~/Site.master" AutoEventWireup="true" CodeBehind="Default.aspx.cs" Inherits="WebApplication2._Default" %>
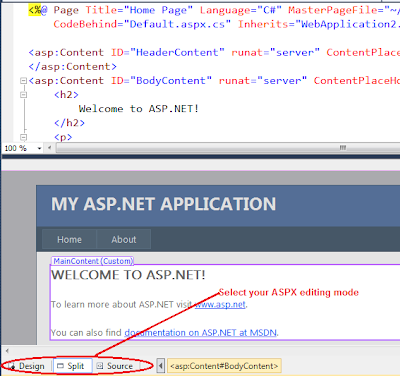
A webform's HTML can be edited either in Source or Design mode. You can also choose SPLIT mode, which shows both the DESIGN and the SOURCE at the same time.

Properties Window: Used to change property of a webform or a control on a webform. To view the Properties window, select PROPERTIES WINDOW from the VIEW menu, or use keyboard short cut CTRL + W, P.

1. We will learn about using visual studio
2. Creating your first ASP.NET web application
3. Learn about different windows in visual studio
Start Page in Visual Studio:
When you first run visual studio, you will see the start page. The start page contains latest news related to .NET development, learning and community resources. If you are using visual studio 2010, at the bottom of the start page, you will notice the following 2 options.
1. Close page after project load - Select this option if you want to close the start page, as soon as you open and load a project.
2. Show page on startup - Uncheck this option, if you don't want the start page to be shown, when you start visual studio.
If you have closed the start page, and later, if you want to see it again, select START PAGE from the VIEW menu.
Creating your first ASP.NET web application:
1. Select File => New Project
2. Select the Programming language you want to use from Installed Templates section, in the New Project dialog box. Out of the box, you can either use C# or Visual Basic to develop ASP.NET web applications.
3. Now, Select ASP.NET Web Application, from the middle section of the New Project dialog box.
4. Give your project and solution a meaningful name.
5. Select the location, where you want the solution to be created.
6. Finally click OK.

Different windows in visual studio:
At this point, you should have your first web application created. Now, let's shift our focus, to learn more about the windows that we see in visual studio.
Solution Explorer: To view the solution explorer window, from the VIEW menu, select SOLUTION EXPLORER. Or you can also use keyboard short cut, CTRL + W, S. On the solution explorer, use the AUTO-HIDE push pin button, to either show or hide solution explorer.

Visual Studio organizes applications into projects and solutions. A solution is a collection of projects. In our example, we have WebApplication2 solution. This solution has only one project - WebApplication2. If you want to add another project to the solution, simply right click the solution, and Select Add => New Project. For example, to add a class library project, select CLASS LIBRARY from the New Project dialog box and click OK.
At this point, your solution should contain 2 projects
1. A web Application Project - WebApplication2
2. A class library project - ClassLibrary1

Notice that, in the solution explorer, WebApplication2 project is bolded, indicating that this is the start up project. You can only have one start up project in a solution. If you want to change your start up project, RIGHT CLICK the project, and select "SET AS STARTUP PROJECT". The start-up project is the project that runs when you click Start in Visual Studio .NET. When you’re developing multiple projects as part of a single solution, the start-up project usually calls the other projects in the solution.
The solution file will have a .sln extension and the project file will have .csproj (if c# is the programming language) or .vbproj (if visual basic is the programming language)
Tool Box: To view the TOOL BOX, Select TOOL BOX from the VIEW menu, or use the keyboard short cut, CTRL + W, X. Just like, solution explorer, tool box can be auto hidden using the AUTO-HIDE PUSH PIN. Toolbox displays the controls and components that can be used on a web form.
Web Forms: WebForms has the extension of .aspx. A web form also has a code behind and designer files. Code behind files has the extension of .aspx.cs (if c# is the programming language) or .aspx.vb (if vb is the programming language). Designer files contains the extension of .aspx.designer.cs (if c# is the programming language) or .aspx.designer.vb (if visual basic is the programming language). Code behind files contain the code that user writes, where as the designer file contains the auto generated code. You shouldn't change the code in the designer file, because that code might later be modified by Visual Studio and your changes could be overwritten. A Web form is associated with its code file using the @Page directive found in the Web form’s HTML.
<%@ Page Title="Home Page" Language="C#" MasterPageFile="~/Site.master" AutoEventWireup="true" CodeBehind="Default.aspx.cs" Inherits="WebApplication2._Default" %>
A webform's HTML can be edited either in Source or Design mode. You can also choose SPLIT mode, which shows both the DESIGN and the SOURCE at the same time.

Properties Window: Used to change property of a webform or a control on a webform. To view the Properties window, select PROPERTIES WINDOW from the VIEW menu, or use keyboard short cut CTRL + W, P.

hi sir, superb videos.. really useful thanks a lot.. a small help can u keep the explanations given in the video as slides so tat we can download..
ReplyDeletedear sir ur all video tutorial is super and excellent i m too much grateful to u.
ReplyDeletesir i need some windows application visual c# tutorial may i get in future as early as in your blog
Excellent tutorials, you are an awesome teacher. Love your tutorials.
ReplyDeletehi venkat,
ReplyDeleteiam new to .net...these videos very much helpful for me.
Because of you I am very interested to learn .net.
your explanation is very clean.
thank u....
Thank you
ReplyDeleteYour tutorials are the best.
I have spent a lot of money on books and your tutorials are better then all of them put together.
I am working on a project to keep track trucking fleet maintenance.
I began to think I failed but now I think I might be able to pull it off.
Amazing start you are great teacher , I appreciate your from all pakistani viewers on your youtube channel.
ReplyDeleteAll i want to say is you are awesome...!!! you are helping lot of people and you are real GURU.. keep going.
ReplyDeleteThanks Sir for you time and great effort
ReplyDeletedo you hav some real world project example such as School Management Sytem or Human Resource System.
Great job sir keep it up. :)
ReplyDeleteGreat videos... Your explanations are awesome. Looking for more samples in .net.
ReplyDelete